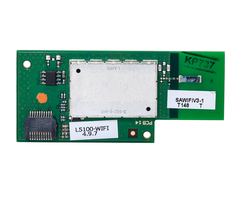
Honeywell L5100-WIFI: Pairing to Router in L7000
Related Products
Related Categories
Description
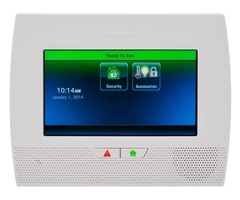
This video will show you how to link your L7000 control panel to the wireless router through the control panel. All control panel models after the L5000 have wireless capabilities. Follow along with the video to learn how to pair your wireless network with your L7000 control panel.
There are 2 methods to pairing your devices. This video will show you step-by-step instructions on how to accomplish this. The first method is through the programming menu using the installer code.
The first method covered in the guide will give you more options and information about the wireless network. You will be able to see network options and choose which network to join if you have more than one available.
Once you enter the programming menu and enter your installer code, you can follow the instructional video to learn how to select which network to join.
You will see a list of all available networks listed by signal strength and SSID name. You should choose the network with the lowest decibel (DB) level as this will give you the best signal for your home security system.
Our video walk through will guide you on how to find and select the available networks. Once in the installer mode menu, you need to select the “Comm. Diagnostics” menu. This will give you all the options for pairing your devices.
Following the video, you will see how to scan for your access points and how to choose which network to choose. You will be asked for the network password, and all SSID information is displayed.
Once you enter the password and join the network, you will be alerted that the system has been accessed. Once you return to the home screen on the control panel, you will see the network connection details and will ensure you are ready to go.
The other option is to connect to the network automatically. The walk through will take you through the procedures to join using the WPS method. This method has less control and selection but will ensure you connect to your network.
With WPS enabled routers, you can physically press buttons and without typing in long, complicated passwords. On your router, find the WPS button and press and hold until you enter WPS mode.
Once you have enabled WPS mode on the router, you will have a few minutes to find and press the WPS button on the L7000 control panel. Once the connection between the router and the control panel is established, you will see a success message.
By returning to the home screen, you will be able to verify that the network is active and connected visually. The video guide will show you on the panel what all of these options look like and where to find them.
Transcript
Hi DIY-ers, Sterling with Alarm Grid here. Today, we're going to show you how to pair your l5100 Wi-Fi communication module to your Wi-Fi router. This is a Lynx Touch l7000 panel, and all of the Lynx Touch systems after the l5000 have supported a Wi-Fi communicator. One of the more popular questions we're asked is how do we connect our device with our network?
So there's a couple ways to do it. One is by entering the master code. One, two, three, four is the default code, and you can go to Wi-Fi config, and you have your option to enroll it either by scanning for the access point and using WPA encryption, meaning typing in your Wi-Fi password. There's also WPS encryption, which you can use by pressing and holding the WPS button on your router and then hitting the WPS button on the panel.
I'm going to exit out of here, because I want to show you another way to do it first. That's the master code programming. My personal favorite way to do it, just because you get a little more activity and a little more data, is to go into Regular Installer Mode programming. So it was Security, More, Tools, type in your installer code. By default, it's four, one, one two. And then we can jump into Comm Diagnostics. This is the same screen we used to find the MAC and the CRC numbers for our devices.
But in this case, if we want to pair to an actual Wi-Fi network, what we do is we scan for access points. This scan will highlight and show you any available networks in the area. Depending on where you are, how close your neighbors are, or what Wi-Fi activity is in the area, you may find multiple networks. So you can see with the gold bars, you have an indication of the signal strength and you actually are also displayed with an actual dBm level. The lower the number, the better.
So typically, the best network is going to be at the top. In this case, Donnelly is the home network we're going to connect to. We have this exclamation because we've previously been joined to the network. Normally, out of the box, you would not have any indication of that. So we're going to select it, and then edit. Now you have your SSID name. You need to have your SSID name broadcast for it to pick it up here. It auto-detects the security being used by the router, which in this case, is WPA2. And then we just hit key. And we type in our password, done, and join.
So after a period of time, we get an indication that the device has been successfully added to the network. If we keyed in the wrong password or we had some sort of failure on the connection, you would have seen an error message indicating as such. In our case, we did it properly. So if we hit OK, you can see the key is blank, that's just for security purposes. You might have noticed earlier this little Wi-Fi indicator was showing an X. If we hit the back arrow, what used to show as a red exclamation is now showing has a green check mark, meaning we're active.
And if we back out a couple more times, you can see now we are connected, we have all four gold bars. This used to be all grayed out. And if we exit further, we are active on the network, we are ready to activate monitoring or use the Lynx Connect app to control the system. And if we were to hit ethernet information, you can see that it shows a physical link 54 Mbps, and that the DHCP is showing OK, meaning we have a good solid connection to our network.
So now that we know we're good and connected, we've shown you the way to connect it using your Wi-Fi password. A lot of times these Linksys routers out of the box, or whichever router your cable company may be using gives you a nice long complicated password. Of course, you probably have that written down somewhere. But a lot of people don't, and a lot of people don't ever change the password for their router. And therefore, if you don't want to deal with typing in a long, complicated password, there is another way that you can pair your Wi-Fi communicator to your system, or to your router, rather.
We're going to show you that. First, what we're going to do just to break the connection, is to edit, key, and we're going to just type in the wrong password. We're going to hit Done and Join. We're just doing this just to show you basically, we have to break the Wi-Fi connection to the router, and then we're going to use the WPS encryption to show you how you can roll it without having to use a key. So after this joint is pressed, last time, it said joined successfully because we type in the right password. On this case, we're going to get an error message that it was not joined successfully. There we go. Failed operation, device not added to the network.
We hit OK, we're back to showing Wi-Fi with a red X. We're back to showing the Wi-Fi has a red exclamation, and if we exit all the way back to here, we can see the network that it was last joined to is now showing with no gold bars. If we hit ethernet information, all of that good information has gone to bad. Physical link bad, DHCP bad. That it is an indication that we are offline.
So now, we're going to show you WPS encryption. Configue Wi-Fi. Last time, we did scan access points. We found our network, we edited our network, and we typed in our password. So this time, we're going to show you WPS encryption. WPS is how you can use your router's WPS button and then your device's WPS button, to have them sync and join automatically. Because you're pressing buttons on each, they can communicate and establish a good, solid connection securely, without having to type in a password.
So because you're in the house you have access to your router, your router normally, the WPS button either has two chasing arrows indicating a connection that way, or you'll have a button that just clearly is displayed with the letters WPS. Either way, your router may have it. You simply press and hold the button, which I'm going to have my partner do now. When you press and hold the button, typically, the router has some sort of indicator light that you are now in the WPS mode. You typically have so many minutes, couple minutes after pressing the button to then press the button on your WPS device. In this case, our Lynx Touch l7000 is our WPS device.
So we've already done the WPS on the access point. Now, we're going to select it on the panel. And assuming everything works as expected, we're going to get a nice solid Wi-Fi connection without having to type in our Wi-Fi password. Just like it did last time, it does take a minute or so. And beautiful, device has been successfully added to the network. No Wi-Fi password needed. If we hit OK and hit the back arrow, we are joined back to the Donnelly network with the four gold bars. If we hit ethernet information, we're back to showing the DHCP OK with a good physical link.
Our Wi-Fi indicator light is back to showing active, and that is how you have two options to join your l5100 Wi-Fi communicator to your wireless router. We hope this has been helpful and informative. We invite you to subscribe to our channel. And if you have any questions on your panel's Wi-Fi connection or connecting to your router, please let us know by emailing support@alarmgrid.com.
- Uploaded