2GIG-LTEV-A-GC3 Verizon LTE Radio - Installation and Setup Guide
Related Products
Related Categories
Document Transcript
2GIG
®
GC3 Security & Automation System
2GIG-LTEV-A-GC3
|
LTE Cellular Radio Module
10015237 B | Proprietary & Confi dential
Nortek Security & Control
|
1950 Camino Vida Roble, Suite 150
|
Carlsbad, CA 92008-6517
|
USA
|
800-421-1587
|
www.nortekcontrol.com
Copyright © 2017 Nortek Security & Control LLC
PRINTER’S INSTRUCTIONS:
INSTR,INSTL, 2GIG-LTEV-A-GC3 - P/N: 10015237 B - INK: BLACK - MATERIAL: 20 LB MEAD BOND
SIZE: 8.500” X 11.000” - TOLERANCE: ± .125” - SCALE: 1-1 - SIDE 1 OF 2
Installing the GC3 LTE Cellular Radio Module
The 2GIG GC3 LTE Cellular Radio Module is a snap-in unit providing the GC3
Security & Automation System with communication to the Central Station for
alarm signaling and delivering (Over-the-Air) OTA fi rmware updates to the GC3
Panel. It also provides connectivity to the Remote Service Provider and 2-way
voice communication.
The module includes a built-in antenna to provide a consistently strong
communications signal. An optional external antenna Model 2GIG-ANT5XL-GC3
is also available.
Box Contents
Verify that the package includes the following:
»
—GC3 LTE Cellular Radio Module
Install/Replace the Cellular Radio Module
To install/replace the Cellular Radio Module into a system that is completely
powered
OFF
:
1.
Open and remove the hinged door from the GC3 Control Panel.
2.
If you are replacing a module, pull the tab to remove the Cellular Radio
Module. Otherwise, skip this step.
3.
Insert the new GC3 Cellular Radio Module until it clicks in place.
4.
Replace the hinged door.
5.
(Optional) Install the lock on the Cellular Radio Module bay door. See
“(Optional) Lock/Unlock the Cellular Radio Module Door.”
6.
Power up the system and wait 30 to 40 seconds for the Control Panel
to recognize the Cell Radio Module.
7.
After installing the Cellular Radio Module, go to the
Installer Toolbox
> System Confi
guration > Radio Test
. Then tap
Start Radio Test
.
8.
When the test reads “
Success
”, tap
Done
.
To install/replace the Cellular Radio Module into a system that is powered
ON
:
1.
From the Home screen, go to
System Settings > Cell Radio Swap
.
2. Tap
Begin
.
3.
Open and remove the hinged door from the GC3 Control Panel.
4.
If you are replacing a module, pull the tab to remove the Cellular Radio
Module. Otherwise, skip this step.
5.
Insert the new CG3 Cellular Radio Module until it clicks into place.
6.
Replace the hinged door.
7.
(Optional) Install the lock on the Cellular Radio Module bay door. See
“(Optional) Lock/Unlock the Cellular Radio Module Door”.
8. Tap
Done
.
9. Tap
Radio Test
and then tap
Start Radio Test
.
10. When the test reads “
Success
”, tap
Done
.
(Optional) Lock/Unlock the Cellular Radio Module Door
The Cellular Radio Module fi ts into the bay on the side of the GC3 Panel and
features a built-in door lock under the faceplate. The Control Panel ships with
the door-lock screw in the UNLOCK position. To limit the possibility of someone
removing the door, installers have the option of moving the screw to the LOCK
position.
To lock and unlock the Cellular Radio Module door:
1.
Use your fi ngertips or carefully insert a screwdriver at the edge of the
faceplate. Then gently pry the faceplate from the chassis.
2.
Remove the door locking scre
w from the UNLOCK position
on the
right.
3.
Install the door locking screw into the LOCK position on the left. This
locks the hinged door on the GC3 Control Panel.
4.
Snap the faceplate back on the GC3 Control Panel.
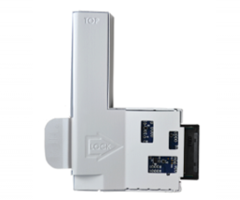
Figure 1
GC3 LTE Cellular Radio Module
Figure 2
Cellular Radio Module—Hinged Door
Figure 3
Inserting GC3 Cellular Radio Module
U
Figure 4
GC3 Panel—Removing Faceplate
U
Figure 5
GC3 Panel—UNLOCK position
U
Figure 6
GC3 Panel—LOCK position 2GIG
®
GC3 Security & Automation System
2GIG-LTEV-A-GC3
|
LTE Cellular Radio Module
10015237 B | Proprietary & Confi dential
Nortek Security & Control
|
1950 Camino Vida Roble, Suite 150
|
Carlsbad, CA 92008-6517
|
USA
|
800-421-1587
|
www.nortekcontrol.com
Copyright © 2017 Nortek Security & Control LLC
PRINTER’S INSTRUCTIONS:
INSTR,INSTL, 2GIG-LTEV-A-GC3 - P/N: 10015237 B - INK: BLACK - MATERIAL: 20 LB MEAD BOND
SIZE: 8.500” X 11.000” - TOLERANCE: ± .125” - SCALE: 1-1 - SIDE 2 OF 2
Limited Warranty
This Nortek Security & Control LLC product is warranted against defects in
material and workmanship for two (2) years.
This warranty extends only to
wholesale customers
who buy direct from Nortek or through Nortek’s normal
distribution channels.
Nortek Security & Control LLC does not warrant this
product to consumers.
Consumers should inquire from their selling dealer as
to the nature of the dealer’s warranty, if any.
There are no obligations or liabilities on the part of Nortek Security & Control
LLC for consequential damages arising out of or in connection with use or
performance of this product or other indirect damages with respect to loss of
property, revenue, or profi t, or cost of removal, installation, or re-installation. All
implied warranties, including implied warranties for merchantability and implied
warranties for fi tness, are valid only until the warranty expires. This Nortek
Security & Control LLC Warranty is in lieu of all other warranties express or
implied.
All products returned for warranty service require a Return Authorization
Number (RA#). Contact Returns at 1-855-546-3351 for an RA# and other
important details.
Support Services
Should you require support services for this system, contact 2GIG Technical
Support at Nortek Security & Control.
For support in the USA and Canada, contact 2GIG Technical Support at Nortek
Security & Control:
»
Telephone:
855-2GIG-TECH
»
Email:
2gigtechsupport@nortek.com
»
Dealer Site:
dealer.2gig.com
»
Websites:
www.nortekcontrol.com
and
www.2gig.com
For support outside of the USA or Canada, contact your regional 2GIG distributor.
For a list of distributors in your region, visit the websites above.
- Uploaded