Qolsys IQ Pro - Install Guide
Related Products


Document Transcript
29011132R002
I
Q Pro Alarm Cont ro ller Refe re nce Manual 2
IQ Pro Alarm Controller Reference Manual Contents
Contents
Safety
................................................................................................................................................................. 5
User information
....................................................................................................................................5
Introduction......................................................................................................................................................6
IQ Pro features.......................................................................................................................................6
IQ Pro specifications..............................................................................................................................7
Compatible devices................................................................................................................................8
Installing and mounting
................................................................................................................................12
Before installing the equipment........................................................................................................12
Overview of the IQ Pro installation process.....................................................................................13
Installing the IQ Pro............................................................................................................................ 13
Mounting the enclosures.......................................................................................................................... 13
IQ Pro terminal descriptions.....................................................................................................................18
Wiring the zones
.........................................................................................................................................27
Installing modules
..................................................................................................................................... 31
Wiring a keypad..........................................................................................................................................37
Connecting power......................................................................................................................................38
Wiring diagrams.........................................................................................................................................46
Attaching the cover for the IQ Pro P........................................................................................................48
Installing extension antennas.................................................................................................................. 48
Installer app programming...........................................................................................................................50
Connecting to the IQ Pro panel......................................................................................................... 50
Dashboard............................................................................................................................................51
Wizard..........................................................................................................................................................51
Configuration....................................................................................................................................... 51
User Management
..................................................................................................................................... 52
Installation settings
................................................................................................................................... 55
Rebooting your system
............................................................................................................................. 72
Date and time
.............................................................................................................................................72
Partitions
.....................................................................................................................................................73
Power down................................................................................................................................................74
Wi-Fi connection
.........................................................................................................................................74
Sound
...........................................................................................................................................................75
About
........................................................................................................................................................... 77
Dealer branding......................................................................................................................................... 77
Tests...................................................................................................................................................... 77
System tests
................................................................................................................................................77
Events
....................................................................................................................................................79
Application settings
.............................................................................................................................79
System operation........................................................................................................................................... 80
Using the keypad.................................................................................................................................80
Using the LCD keypad................................................................................................................................80
Using the IQ Remote keypad....................................................................................................................80
IQ Pro Alarm Controller Reference Manual
3 [*] Commands
..................................................................................................................................... 80
[*][1] Bypass zones
....................................................................................................................................81
[*][2] View troubles
................................................................................................................................... 81
[*][3] Alarm memory
.................................................................................................................................82
[*][4] Door chime enable/disable
............................................................................................................82
[*][6] User functions
..................................................................................................................................82
[*][7] Command outputs 1-4
....................................................................................................................83
[*][9] No-entry arming
..............................................................................................................................83
[*][0] Quick arm/exit
................................................................................................................................. 84
Working with partitions...................................................................................................................... 85
Setting up partitions
..................................................................................................................................85
Bell/siren operation...................................................................................................................................85
Single siren output operation...................................................................................................................85
Multiple siren output operation...............................................................................................................85
Interconnected smoke detector operation.............................................................................................85
Keypad partition setup..............................................................................................................................86
Hardware default.................................................................................................................................86
Troubleshooting.............................................................................................................................................87
Regulatory Approvals.................................................................................................................................... 88
UL/ULC Residential Fire, Burglary and Home Health Care.............................................................88
UL/ULC Commercial Burglary............................................................................................................89
FCC-ISED Canada Compliance Statement........................................................................................ 91
Recycling and Disposal
....................................................................................................................... 92
Locating detectors and escape plan
............................................................................................................93
Smoke Detectors..................................................................................................................................93
Fire Escape Planning........................................................................................................................... 94
Carbon Monoxide Detectors..............................................................................................................95
Legal
.................................................................................................................................................................96
Limited warranty..................................................................................................................................96
Software produce license................................................................................................................. 100
Copyright and Trademark................................................................................................................ 102
IQ Pro Alarm Controller Reference Manual
4 Safety
Read this safety information before you install the equipment.
This equipment must be installed by a skilled person only. Skilled persons are expected to use their
training and experience to recognize energy sources capable of causing pain or injury and to take
action for protection from injury. Skilled persons are persons who have training or experience in
the equipment technology, particularly the various energies and energy magnitudes used in the
equipment.
•
Before installing this equipment, disconnect all power sources (for example mains, battery,
and telephone line) connected to the alarm panel.
•
Install the equipment indoors in a non-hazardous environment where the following
conditions are met:
-
Pollution degree - Maximum 2
- Over voltages - Category II
•
Internal wiring must be routed to prevent strain on wire and terminal connections, loose
terminal connections, and damage to conductor insulation.
•
Instruct the user that there are no user serviceable parts in this equipment. All equipment
must be serviced by a skilled person.
User information
The installer should advise the user and note in the User Manual:
•
Service organization name and telephone number
•
Programmed exit and entry time
• Instructions to test the system weekly
• Note that the installer code cannot arm or disarm the system
•
Conditions that could result in false alarms or impaired operation of the product(s): arming
the system and not respecting the exit delay, entering the protected premises and not
respecting the entry delay for disarming the system can cause false alarms.
The installer should also caution the user not to give system information (such as codes or
bypass methods) to casual users and only to give out codes set to expire within 24 hours.
5
IQ Pro Alarm Controller Reference Manual Introduction
This manual covers the installation and configuration of the IQ Pro security system, including both
the metal and plastic enclosures.
Table 1:
IQ Pro models
Model
Description
IQ Pro
IQ Pro with metal cabinet
IQ Pro P
IQ Pro with plastic cabinet
IQ Pro features
Table 2:
Feature list
Feature
Description
Access codes
Supports up to 1000 access codes
Master, installer, dealer, guest, duress and user
codes
4 or 6-digit codes
Communicator support
Dual communicator support, primary
communication using Wi-Fi or Ethernet, secondary
communication using built-in cellular radio
128 hardwired and wireless devices
41 sensor groups
Normally closed, SEOL, DEOL resistors
Fully supervised hardwired zone expansion using
the HSM2108
Zone configuration
Note:
A maximum of 128 devices
can be enrolled on the IQ Pro system
(including devices such as keypads and
zone expanders).
Fully supervised wireless zone expansion using
PowerG and one-way RF protocols
Remote services
Alarm.com integration, cloud connectivity
Event history
Captures, stores and reports up to 200 events
Keypad support
Supports up to 16 keypads
Wireless key support
Supports up to 32 wireless remote keys
Panic pendant support
Supports up to 120 panic pendants
Partitions
Supports up to 8 partitions
Central station reporting
Central station reporting using cloud connectivity
Local installer app
Local installer app using Wi-Fi
Remote installer app
Remote installer app using Cloud
PowerG sensors
Wireless sensors
SRF sensors
MX modules
Addressable hardwired sensors
Wi-Fi access point
Connects with local installer app and Wi-Fi devices
System supervision
AC, zone, fire, communication, low battery, RF jam,
Aux, module, system overcurrent troubles/faults
IQ Pro Alarm Controller Reference Manual
6 IQ Pro specifications
Table 3: Specifications
Item
Description
DC input voltage and current
Use the provided external power adapter with the following
ratings:
•
Input for UL and ULC applications: 120 VAC, 60 Hz, 1.2A
• Output: 18 VDC, 2.22 A
•
Manufacturer: ShenZhen SOY Technology Co. Ltd.
•
DSC UL and ULC models: HS40WPSA & HS40WPSNA
Current draw - control panel
board assembly
120 mA (nominal)
Battery type
Sealed, rechargeable lead acid
Battery charge current
350 mA (min) / 700 mA (max) to charge 12 VDC lead-acid
batteries
Low battery threshold
11.4 VDC
Battery cutoff level
9.6 VDC ± 2%
Standby battery
Only use the battery rated 12 VDC 17 Ah / 14 Ah / 7 Ah / 4 Ah
The energy level of the battery when it is charged is 100%
24-hour standby time and 5-minute alarm time for UL
Home Health Care applications and ULC Security Level II
applications.
11.3 VDC to 12.5 VDC, maximum current 700 mA continuous
(supervised 1 kΩ), current limited at 2 A.
Bell output
Note:
For UL Commercial
Burglary applications, the
Bell Output is for supplemen-
tary use only.
Note:
The bell output supports continuous burglary
alarms, T3 fire alarms, and T4 CO alarms. Alarms sound
in the following priority: fire alarm, CO alarm, burglary
alarm, and other alarms.
11.3 VDC to 12.5 VDC.
Maximum current 700 mA shared between the AUX1 and
AUX2.
700 mA current (shared with Corbus and PGM outputs).
600 mVp-p max. output ripple voltage.
AUX 1
AUX 2
On-board programmable outputs.
PGM 1, 3, and 4 voltage and
current
11.3 VDC to 12.5 VDC, 50 mA
PGM 2 voltage and current
11.3 VDC to 12.5 VDC, 300 mA
RED, BLK, YEL, GRN terminals
Corbus terminals, used to provide power and communication
between the control panel and connected compatible
modules. Each compatible module (keypad, expander, power
supply) has four Corbus terminals that must be connected to
the Corbus.
11.3 VDC to 12.5 VDC, maximum current 700 mA shared
between the AUX1 and AUX2 and PGM outputs. Ripple: 50
mVpp.
7
IQ Pro Alarm Controller Reference Manual Table 3: Specifications
Item
Description
Operating temperature
-10°C to 55°C (14°F to 131°F)
Note:
UL and ULC verified operation for the range 0°C to
49°C (32°F to 120°F).
Note:
The control panel and power supply are suit-
able for use in dry, indoor, ordinary locations, inside the
supervised premises.
Humidity
5% to 93% RH non-condensing.
Note:
UL and ULC verified operation for a maximum of
93% RH.
PowerG wireless
PowerG radio modem operates in 912-919 MHz band (long
range, secure encrypted two-way wireless)
SRF wireless
SRFxxx radio cards operate in 319 MHz, 345 MHz or 433.92
MHz bands.
Platform
Android OS
Processor
Qualcomm SnapDragon 8 Core SOM (System On a Module)
with 16 GB of NAND Flash
Wi-Fi 802.11 a/b/g/n/ac dual band 2.4/5ghz - including built-in
router capability
Ethernet 10/100Mb
Network
Cellular LTE CAT4 (Bands 2/25, 4/66, 5/26, 7, 12/17, 13, 14 (non-
First Net)
IQ Pro (metal): 482.5mm x 305mm x 124mm (19” x 12” x 4.9")
Dimension (LxWxH)
IQ Pro P (plastic): 397.5mm x 304mm x 92mm (15.7" x 11.9" x
3.6")
IQ Pro (metal): 4.45 Kg (without battery)
Weight
IQ Pro P (plastic): 1.70 Kg (without battery)
Compatible devices
The IQ Pro security system is compatible with the following keypads, devices and modules.
Table 4:
Keypads
Keypad type
Model
Touchscreen keypad
IQ Remote
Touchscreen keypad PG
IQ Remote PG
LCD keypad
HS2LCD
UL
LCD keypad with prox
HS2LCDP
UL
LCD keypad with PowerG transceiver
HS2LCDRFx
UL
LCD keypad with PowerG transceiver and prox
HS2LCDRFPx
UL
LCD wire free keypad
HS2LCDWFx
UL
LCD wire free keypad with prox
HS2LCDWFPx
UL
LCD wire free keypad with prox/voice
HS2LCDWFPVx
UL
IQ Pro Alarm Controller Reference Manual
8 Note:
The x refers to the operating frequency. 4 refers to 433MHz, 8 refers to 868MHz and 9
refers to 912-919MHz.
Note:
UL indicates that the device is certified to UL/ULC standards. Only models operating in
912-919 MHz are UL/ULC listed.
Table 5:
PG Devices
Detector Type
Description
Door/window contact
PG9945
UL RF/CB
, PGP9945E
UL RF/CB
, PG9307
UL RB
,
PG9309
UL RF/CB
, PG9312
UL CB
Door/window shock sensor
PG9935
UL CB
Dual Tech (PIR+microwave) motion detector
PG9984(P)
UL CB
Glassbreak Detector
PG9922
UL CB
, PGP9922
Heat detector
PG9936H
UL RF
Remote keys (keyfobs)
PG9929, PG9939, PG9949, PG9938
UL CB
Outdoor motion detectors
PG9902, PG9994(P)
UL CB
PIR motion detector
PG9904(P), PG9914, PG9924, PG9862, PG9872
UL CB
PIR motion detectors with camera
PG9934(P), PG9974(P), PG9944
UL CB
Sirens
PG9901
UL RF/RB
, PG9911
UL RF/RB
Smoke/heat detector
PG9936
UL RF
Wireless CO detector
PG9933
UL RF
Wireless repeater
PG9920
UL CB
Vanishing door/window contacts
PG9303
UL CB
, PGP9303, PG9975
UL RB
Temperature sensor
PG9905 (indoor use)
Flood detector
PG9985
PowerG wired to wireless converter
Note:
The supervisory window must be set
to 200 seconds when used with fire and/or
CO devices.
PG9HRDW8, PG8WLSHW8, PG9WLSHW8
UL RF/RB CB
Outdoor beam detectors
PG9200AX
UL
, PG9350S
UL
Note:
Only HS2LCD keypad models must be used for UL/ULC listed Residential Fire
applications.
Note:
Only the PowerG sensors marked with
UL CB
shall be used in UL/ULC Residential and
Commercial Burg (UL2610/ULC-S304 Security Level I-II) listed installations. Devices marked
with
UL RB
in the table above shall be used only in UL/ULC Residential Burg (UL1023/ULC-S304
Security Level I) listed installations. Devices marked with
UL RF
in the table above can be used in
UL/ULC Residential Fire (UL985/ULC-S545) listed installations.
Note:
The PGxWLSHW8 and IQ Remote PG are supported only on the onboard PowerG
Daughter Card, they are not supported on the HS2LCDRFPRO and HSM2HOST module.
9
IQ Pro Alarm Controller Reference Manual Table 6: 319 MHz S-Line sensors
Detector Type
Model
IQ Door/Window-S
QS1133-840
UL
, (UL Listed M/N:
60-362N-10-319.5), QS1135-840, QS1136-840,
QS1137-840
IQ Motion-S
QS1230-840
UL
, (UL Listed M/N: 60-639-95R),
QS1231-840
IQ Glass-S
QS1431-840
UL
, (UL Listed M/N: IQ Glass-S)
IQ Smoke
QS5110-840
UL
IQ CO
QS5210-840
UL
Wireless Key
QS1331-840
Tilt Sensor
QS1131-840
Flood Detector
QS5536-840
Temperature Sensor
QS5535-840
IQ Hardwire 16-F
QS7133-840
UL
Table 7: 345 MHz sensors
Detector Type
Model
Door/window contact
5816WMWH
UL RB (NO ULC)
Door/window contact
5815
UL RB
Motion detectors
5800PIR-COM
UL RB
, 5898
UL RB
, 5800PIR
UL RB
Glassbreak detector
5853
UL RB
Smoke detectors
5806W3
UL RF (NO ULC)
Smoke/CO detectors
5800COMBO
UL RF
CO Detectors
5800CO
UL RF
, GG-CO8345 (2GIG-CO8-345)
UL RF (NO ULC)
Note:
Only use UL/ULC listed devices for UL/ULC certified installations.
Table 8: Supported 433 MHz sensors
Detector Type
Model
Door/Window sensor
WS4945NA
UL RB
Motion detectors
WS4904P
UL RB
, WLS914-433
UL RB
Glass break sensor
WLS912L-433
UL RB
Shock sensor
EV-DW4927SS
UL RB
Smoke detector
WS4936
ULRF
CO detector
WS4933UL RF
2-button remote key
WS4949
UL RB
4-button remote key
WS4939
UL RB
Wireless panic button
WS4938
UL RB
Wireless repeater
WS4920
UL RF/RB
IQ Pro Alarm Controller Reference Manual
10 Table 9: Corbus modules
Module type
Model
PowerG transceiver
HSM2HOSTx
UL
8 low-current output module
HSM2208
UL
4 high-current output module
HSM2204
UL
Power supply module (1A)
HSM2300
UL
8-zone expansion module
HSM2108
UL
MX expander module
HSM3105
UL
11
IQ Pro Alarm Controller Reference Manual Installing and mounting
Before installing the equipment
Ensure your package includes the following items:
•
Enclosure with the IQ Pro alarm controller
•
Power supply
•
Transformer
•
Hardware pack
Select a location that is:
•
within an environment that provides a pollution degree max 2, over voltages category II
•
indoor and non-hazardous
•
near a power outlet
•
free from vibration and shock
•
away from exposure to direct sunlight, excessive heat, moisture, chemicals, and dust
•
flat and stable, that allows adequate working room for external wiring
Avoid
•
connecting the alarm controller to the same circuit as large appliances
• installing this equipment near water (bathtubs, sinks, pools)
•
installing this equipment and accessories in areas where risk of explosion exists
•
connecting this equipment to electrical outlets controlled by wall switches or automatic
timers
•
sources of interference
•
installing equipment near heaters, air conditioners, vents and refrigerators
•
installing equipment close to or on top of large metal objects
IQ Pro Alarm Controller Reference Manual
12 Overview of the IQ Pro installation process
The following steps are provided to assist with the installation of the alarm system. Read over this
section to get an overall understanding of the order of installation. Working from this plan can help
reduce problems and reduce the overall time required for installation.
Step
Description
Create a layout
Draw a rough sketch of the site and include all alarm detection
devices, zone expanders, keypads and other required modules.
Mount the panel
Decide on a location for the alarm panel and secure it to the
wall using suitable mounting hardware. See Installing and
mounting
.
Wire zones
Complete all zone wiring. Follow the guidelines provided in
Wiring the zones
to connect zones.
Complete wiring
Complete all other wiring including bells or sirens, telephone
line connections, ground connections, Ethernet connection or
any other wiring necessary. Follow the guidelines provided in
IQ Pro terminal descriptions.
Power up the control panel
When all zone and alarm controller wiring is complete, connect
the battery before applying AC, and power up the system.
The alarm controller will not power up if only the battery is
connected.
Enroll keypads and modules
All keypads must be enrolled in order to operate on the system.
Enroll wireless devices
Wireless keypads and devices are enrolled using the IQ Installer
App. Refer to
Installer app programming
for more information.
Program the system
All programming is completed using the IQ Installer App.
Test the system
Test the panel completely to ensure that all features and
functions operate as programmed. Test the system using the IQ
Installer App.
Installing the IQ Pro
This section describes how to mount the enclosures, wire keypads, modules and install and wire the
battery.
Mounting the enclosures
The equipment enclosure must be secured to the building structure before operation.
Note:
The weight of the enclosure and contents cannot be supported by drywall only. Use
mounting hardware sufficient to support up to three times the panel weight, including
equipment, cables, conduit and hardware (approximately 210 lbs/ 95 kg). Select hardware
suitable for the mounting surface. Minimum screw size: M4 (#8) x 4, 25.4 mm (1 inch) long,
pan head. Select hardware suitable for the mounting surface.
13
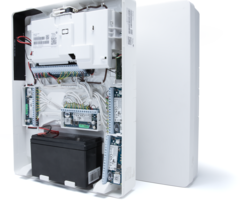
IQ Pro Alarm Controller Reference Manual Mounting the IQ Pro
Figure 1:
Mounting the IQ Pro (metal enclosure)
Callout
Description
1
Mounting holes
To mount the IQ Pro metal enclosure, complete the following steps.
1.
Position the enclosure vertically in the mounting location and mark the two top mounting
holes (refer to
Figure 1.
2.
Remove the enclosure from the wall, then partially install the two top screws (use anchors if
needed).
Note:
Use four screws appropriate for the mounting surface. Ensure they are inserted
through the four mounting holes provided on the back of the enclosure. Use plastic wall
plugs if the cabinet is being mounted on a brick, cinder block, drywall or plaster wall.
Note:
The minimum screw size is #6 (3.5 mm) pan head, with a minimum length of 1 in
(25 mm).
IQ Pro Alarm Controller Reference Manual
14 3.
Hang the enclosure on the installed two screws then mark the two bottom mounting holes.
4.
Remove the enclosure from the wall then install optional modules and wire according to the
associates module instructions.
5.
Tamper protection switches can be installed on enclosure, including door protection and
removal from the mounting position.
6.
Wire the tamper switch into Zone 8. The default setting for Zone 8 is tamper input.
Note:
Changes to Zone 8 programming could removed the tamper protection.
7. Drill the two bottom mounting holes (use anchors if needed).
8.
Hang the enclosure on the top two screws again, install and fasten the two bottom screws
then fasten the top two, making sure all four screws are securely tightened.
9.
Secure the enclosure door by inserting screws through the top and bottom door mounting
holes provided on the right side of the enclosure, or use a key lock.
Note:
Only install the batteries after the enclosure has been permanently secured to the
wall.
Mounting the IQ Pro P
Note:
Install the control panel in the protected area of the protected premises. The wiring
methods shall be in accordance with ULC-S302, NFPA72, the National Electrical Code, ANSI/
NFPA 70, the Standard for Installation and Classification of Burglar and Holdup Alarm Systems,
UL 681, and the Standard for Central Station Alarm Services, UL 827. This control panel should
be installed in accordance with Chapter 29 of the National Fire Alarm and Signaling Code,
ANSI/NFPA 72, (National Fire Protection Association, Batterymarch Park, Quincy, MA 02269).
15
IQ Pro Alarm Controller Reference Manual Figure 2:
IQ Pro P (plastic enclosure)
Callout
Description
1
Mounting holes
2
Enclosure tamper
3
Wall tamper hole
To mount the IQ Pro P (plastic) enclosure complete the following steps.
Note:
Use four screws appropriate for the mounting surface. Ensure they are inserted through
the four mounting holes provided on the back of the enclosure. Use plastic wall plugs if the
cabinet is being mounted on a brick, cinder block, drywall or plaster wall.
Note:
The minimum screw size is #6 (3.5 mm) pan head, with a minimum length of 1 in (25
mm).
IQ Pro Alarm Controller Reference Manual
16 Note:
Only remove the breakaway tabs if required.
1.
Position the enclosure vertically in the mounting location and mark the two top screw holes.
2.
Remove the enclosure, then partially install the two top screws (use anchors if needed).
3.
Hang the enclosure on the installed two screws then mark the two bottom mounting holes.
4.
Remove the enclosure from the wall and install optional modules and wires according to the
instructions provided with the module.
5. Drill the two bottom mounting holes (insert anchors if needed).
6.
Hang the enclosure on the top two screws again, then install and fasten the two bottom
screws.
7.
Fasten the tamper bracket to the wall, then ensure that all other four screws are securely
tightened. Note: Zone 8 comes pre-wired as a tamper input.
8.
Only install the battery and battery wire provided, after the enclosure has been permanently
secured to the wall.
9.
Secure the enclosure cover at the top using the short screw provided.
17
IQ Pro Alarm Controller Reference Manual IQ Pro terminal descriptions
Figure 3:
IQ Pro terminal block
Table 10:
Terminal descriptions
Terminal
Description
BAT+, BAT-
Battery terminals. Use to provide backup power during a power outage. Do
not connect the battery until all other wiring is complete.
18 VDC +/-
The HS40WPSA and HS40WPSNA power adapters supply 18 VDC power input
to the alarm controller.
Note:
ULC Commercial Fire Listed applications and ULC Commercial
Burg Security Level 4 applications use power adapter HS65WPSNA.
BELL+, BELL-
Bell/Siren power (700 mA continous, 2A max short term). Connect the
positive side of any alarm warning device to BELL+, the negative side to
BELL-.
Note:
For UL/ULC listed applications, use maximum 700 mA load on the
BELL output.
CORBUS
RED, BLK, YEL, GRN
Corbus terminals. Use to provide power and communication between the
alarm controller and connected modules. Each module has four Corbus
terminals that must be connected to the Corbus.
AUX1+, AUX1-
AUX2+, AUX2-
Use to power intrusion detectors, relays, LEDs, etc. (2 A max). Connect the
positive side of device to one of the AUX+ terminals and the negative side to
AUX- or COM.
AUX1 - power for intrusion detectors.
AUX2 - power for smoke, heat, CO detectors.
Note:
For UL household fire warning systems, the fire alarm detec-
tion devices should not be powered from the same AUX output (con-
trol panel, zone expander, power supply) as burglary alarm initiating
devices.
IQ Pro Alarm Controller Reference Manual
18 Table 10:
Terminal descriptions
Terminal
Description
PGM1 to PGM4
Programmable output terminals. Use to activate devices such as LEDs, relays
and buzzers. (PGM1, PGM4: 50 mA, PGM2: 300 mA or can be configured for
use as a 2-wire smoke detector interface, max loop current 100 mA, PGM3:
50 mA (negative trigger) or 1 A (positive trigger).
Z1 to Z8 COM
Zone input terminals. Each zone must have one detection device, however,
multiple detection devices can be wired to the same zone.
Note:
Zone 8 is configured as a tamper input at default.
Wiring programmable outputs
You can use the programmable (PGM) outputs to activate devices such as LEDs and buzzers. To
wire an output to the PGM, complete the following steps.
1.
Connect the positive (+) wire from the device to the AUX + terminal.
2.
Connect the negative (-) wire from the device to the PGM terminal.
Note:
If the device requires a current greater than the rated value of the PGM output, a
relay and approved power supply are required.
To wire the LED indicator, see
Figure 4.
Figure 4: LED indicator wiring
Callout
Description
1
AUX terminals
2
PGM terminals
3
LED indicator
4
680 Ω resistor (typical value)
To wire the relay output, see
Figure 5.
19
IQ Pro Alarm Controller Reference Manual Figure 5: Relay output wiring
Callout
Description
1
AUX terminals
2
PGM terminals
3
Relay (RM-1 and RM-2)
4
To normally open connection
5
To normally closed connection
6
To COM terminal
Wiring a 2-wire smoke detector
When you wire a 2-wire smoke detector configured as a 2-wire loop, observe the following
guidelines.
•
You must connect 2-wire smoke detectors in parallel.
•
You can wire a maximum of 18 smoke detectors on a 2-wire loop.
•
Do not exceed a wire resistance of 24 ohms across the entire loop.
•
Do not use smoke detectors from different manufacturers on the same circuit. Refer to the
smoke detector installation sheet when you position detectors.
Note:
For UL residential fire applications, only use the AUX2 output to provide power to
smoke and CO detectors.
If you program PGM2 for use with a 2-wire smoke detector, you must wire it according to the
following figure.
IQ Pro Alarm Controller Reference Manual
20 Figure 6: 2-wire smoke detector wiring
AUX2
1
PGM
3
4
-
+
2
+
-
+
-
Callout
Description
1
2200 Ω end-of-line resistor. Use model EOLR-3 for UL/ULC listed applications.
The following table lists compatible 2-wire smoke detectors.
Table 11: 2-wire smoke detectors
2-wire smoke detector models
C2W-BA (ULC)
2W-B (UL)
C2WT-BA (ULC)
2WT-B (UL)
C2WTA-BA (ULC)
2WTA-B (UL)
Note:
If you use System Sensor detectors on a 2-wire loop, do not combine UL detectors. For
more information, refer to the System Sensor installation manual. The UL compatibility ID for
the System Sensor models is A.
Note:
Do not connect accessories, such as a PRM-2W or any other polarity reversal module, to
2-wire smoke detectors.
Note:
You must calculate and test the current draw.
Table 12: 2-wire smoke detector initiation circuit
Item
Specification
Class, supervised, power limited
Class B IDC. 2-wire smoke detector interface
Compatibility identifier
PG9WLSHW8-1
DC output voltage
10.0 VDC to 13.8 VDC
Detector load
2 mA maximum
SEOL (use model EOLR-3 for UL/ULC listed
applications)
2200 Ω
Maximum capacitance
10 μF
Maximum number of detectors per loop
18 without sounders
Maximum ripple
45 mV
Resting voltage and time
0.2 VDC/ 5 seconds
Loop resistance
24 Ω maximum
Minimum standby impedance
1250 Ω nominal
21
IQ Pro Alarm Controller Reference Manual Table 12: 2-wire smoke detector initiation circuit
Item
Specification
Maximum alarm impedance
707 Ω maximum
Alarm current
102 mA maximum
Wiring a 4-wire smoke, heat or CO detector
The following table lists the maximum current rating at 12 VDC of the hardwired CO detectors that
are compatible with the IQ Pro.
Table 13:
CO detector ratings
Device
Manufacturer
UL file number
Rating
CO1224, CO1224T,
CO1224TR, CO1224A
System Sensor
E307195
E304075
40 mA
CM-E1
Macurco
E354878
40 mA
Note:
If you wire multiple CO detectors on the same loop, you must break the leads between
each CO detector. You must power the supervision relay from the last detector in the loop.
If you use a non-powered heat detector, such as a fixed temperature or rate of rise type, no
supervision relay is required and do not wire the detector to AUX2 or PGM2.
To wire a 4-wire smoke, heat, or CO detector, see the following figures.
Note:
Do not exceed a wire resistance of 100 Ω.
IQ Pro Alarm Controller Reference Manual
22 Figure 7: 4-wire CO detector wiring
NC
NO
-
+
C
NC
NO
C
-
+
+
-
COM
Z
AUX
Figure 8: 4-wire smoke and heat detector wiring
Callout
Description
1
4-wire smoke, heat, or CO detector power terminals
2
4-wire smoke, heat, or CO detector alarm terminals
3
4-wire smoke, heat, or CO trouble terminals, if provided
4
5600 Ω single end-of-line resistor
5
100 Ω alarm initiating loop
6
RM-1 or RM-2 power loop supervisory relay, 12 VDC, 35 mA.
7
Module zone input
Table 14:
System Sensor 4-wire smoke detectors, File S911
Model
Description
4W-B (UL) / C4W-BA (ULC)
4-wire Standard i3 Detector
4WT-B (UL)/C4WT-BA(ULC)
4-wire Standard i3 Detector, Fixed 135° Thermal Sensor
4WTA-B(UL)
4-wire i3 Detector with Fixed 135° Thermal Sensor and Sounder
23
IQ Pro Alarm Controller Reference Manual Table 14:
System Sensor 4-wire smoke detectors, File S911
Model
Description
4WTR-B(UL)
4-wire i3 Detector with Fixed 135° Thermal Sensor and Form C Relay
4WTAR-B(UL)
4-wire i3 Detector, Fixed 135°Thermal Sensor, Sounder, Form C Relay
Note:
Other compatible 4-wire smoke and heat detectors can be used as long as these devices
are compatible with electrical ratings of the AUX2 output.
Note:
You can manually configure PGM2 as a 2-wire smoke loop in panel programming. If you
configure any zone input as a fire zone, PGM2 is automatically set as a 4-wire smoke detector,
and acts as a power reset. You cannot combine 2-wire detectors and 4-wire smoke or heat
detectors at the same time.
Wiring the corbus
The RED and BLK Corbus terminals are used to provide power while YEL and GRN are used for data
communications. The 4 Corbus terminals of the IQ Pro alarm controller must be connected to the 4
Corbus terminals or wires of each module.
The following conditions apply:
•
Corbus should be run with 18 to 22 AWG quad, two pair twisted preferred.
• The modules can be home run to the panel, connected in series or can be T-tapped.
•
Do not use shielded wire for Corbus wiring.
Note:
Any module can be connected anywhere along the Corbus. Separate wire runs for
keypads and devices are not necessary.
Note:
No module can be more than 1000 ft / 305 m (in wire length) from the panel.
Do
not use shielded wire for Corbus wiring.
Figure 9: Corbus wiring
Module (A) is wired correctly as it is within 1000 ft / 305 m of the panel, in wire distance.
Module (B) is wired correctly as it is within 1000 ft / 305 m of the panel, in wire distance.
Module (C) is NOT wired correctly as it is farther than 1000 ft / 305 m from the panel. For
models that require more than 1000 ft / 305 m from the main panel, a power supply/Corbus
extender can be used.
IQ Pro Alarm Controller Reference Manual
24 Current ratings
The power output of the alarm controller and power supply modules cannot be exceeded.
Table 15:
System output ratings
Device
Output
Rating (12 VDC)
AUX 1:
AUX 2:
700 mA. Subtract the listed rating for each keypad, expansion module
and accessory connected to AUX or Corbus.
IQ Pro
IQ Pro P
BELL:
700 mA continuous rating.
Do not exceed the 700 mA load for UL/ULC certified applications.
HSM2300
AUX:
1 A. Subtract the listed rating for each keypad, expansion module and
accessory connected to AUX.
HSM2208
AUX:
250 mA. Continuous rating. Subtract for each device connected.
Subtract the total load on this terminal from the alarm panel AUX/
Corbus output.
HSM2204
AUX:
1 A. Continuous rating. Subtract for each device connected. Subtract
the total load on this terminal from the alarm panel AUX/Corbus
output.
HSM2108
AUX:
100 mA. Subtract for each device connected. Subtract the total load on
this terminal from the panel AUX/Corbus output.
IQ Pro current calculation
Maximum (standby or alarm). Use in conjunction with
Table 23 and
Table 24.
Table 16:
IQ Pro (P) current calculation
Power supply
AUX 1/ 2 (700 mA including PGMs 1, 2, 3, 4)
Corbus (700 mA maximum)
Bell output (700 mA)
Battery charge current (350 mA)
Total
*For UL, ULC listed applications, the total standby and alarm current cannot exceed the values
specified in
Table 23 and
Table 24.
Line loss
Voltage loss through wire resistance must be considered for all installations. To ensure correct
operation, at least 12.5 VDC must be applied to all modules on the system (when power is
connected and the battery is fully charged). If less than 12.5 VDC is applied, the system might not
work correctly.
To correct the problem, try any or all of the following:
1.
Connect a power supply between the alarm controller and the module to provide additional
power to the Corbus.
2. Reduce the length of the Corbus run to the module.
3.
Increase the gauge of wire.
25
IQ Pro Alarm Controller Reference Manual Capacitance limits
An increase in capacitance on the Corbus affects data transmission and causes the system to slow
down. Capacitance increases for every foot of wire added to the Corbus. The capacitance rating of
the wire used determines the maximum length of the Corbus.
For example, 22 gauge, non-shielded, 4-conductor wire has a typical capacitance rating of 20 pF /
foot (which is 20 nF/1000 ft). For every 1000 feet of wire added, regardless of where it is run, the
capacitance of the Corbus increases by 20 nF.
Refer to the table for the total wire distance allowed, depending on the capacitance rating of the
wire used.
Table 17:
Wire capacitance
Wire capacitance (for 1000 ft (300 m)
Total corbus wired length
15nF
5300 ft / 1616 m
20nF
4000 ft / 1220 m
25nF
3200 ft / 976 m
30nF
2666 ft / 810 m
35nF
2280 ft / 693 m
40nF
2000 ft / 608 m
Wiring auxiliary power
You can use the auxiliary power terminals to power devices such as motion detectors and glass
break detectors. The AUX1 and AUX2 terminals provide a combined current of 700 mA.
Note:
For UL combination fire and CO and burglary applications, the fire and CO initiating
devices, such as smoke detectors, heat detectors, and CO detectors, must be powered from a
separate output (AUX2) than the burglary initiating devices (AUX1).
Note:
For UL installations that require 24-hour backup capacity, the maximum AUX power load
cannot exceed a current of 180 mA when using a 7 Ah battery.
Wiring the bell output
Use the BELL terminals to power a bell, siren, or other device which requires a steady output
voltage when the system is in alarm. The panel provides a current of up to 700 mA.
Note:
A 1 kΩ resistor is required across the BELL+ and BELL- terminals, or the system detects a
trouble condition.
Figure 10: Bell wiring
Observe polarity when connecting polarized sirens or
bells.
11.3 VDC to 12.5 VDC, maximum current 700 mA
continuous, current limited at 2 A. Supervised by 1
kΩ, use SEOL resistor model EOLR-1.
IQ Pro Alarm Controller Reference Manual
26 Wiring the zones
You can wire zones to supervise normally open devices, for example smoke detectors or heat
detectors, or normally closed devices, for example door contacts. You can program the IQ Pro for
single end-of-line (SEOL) resistors, or double end-of-line (DEOL) resistors.
CAUTION:
Ensure the alarm controller is turned off before you wire the equipment.
Note:
For UL installations, only use UL listed initiating devices that are compatible with the
auxiliary output power range provided by the converter.
When you wire zones, observe the following guidelines:
• For UL listed installations, only use SEOL or DEOL connections.
•
Use a minimum wire size of 22 AWG and a maximum wire size of 18 AWG.
•
Do not use shielded wires.
•
Do not exceed a wire resistance of 100 Ω. For more information, see the following table.
Table 18: Wiring chart
Wire gauge (AWG)
Maximum distance to EOL resistor (m/ ft)
22
914/ 3000
20
1493/ 4900
19
1889/ 6200
18
2377/ 7800
Note:
Distances are based on a maximum wiring resistance of 100 Ω.
Normally open and normally closed wiring
Wire normally closed devices in series and normally open devices in parallel. To wire hardwired
devices, complete the following steps.
1.
Wire the device to any Zone terminal.
2.
Wire the device to any COM terminal.
Note:
For UL, do not use normally open or normally closed loops.
The following figure shows you how to wire normally closed loops. The image on the left shows
two normally closed contacts with no end-of-line resistor, and the image on the right shows one
normally closed contact with no end-of-line resistor.
Figure 11: Normally closed loops
27
IQ Pro Alarm Controller Reference Manual Callout
Description
1
Zone terminal
2
COM terminal
3
Normally closed contact
Note:
Do not exceed a wire resistance of 100 Ω. For more information, see .
The following table shows the zone status for a given resistance value.
Table 19: Normally closed zone status
Resistance
Description
Zone status
0 Ω
Shorted wire, loop shorted
Secure
Infinite
Broken wire, loop open
Alarm
Single end-of-line resistors
You can use SEOL resistors to detect if a circuit is secure, open, or shorted. Use this option if you
use either normally closed or normally open devices.
You can configure SEOL supervision through zone programming on the control panel.
The following figure shows the different wiring configurations for SEOL resistors. The image on the
left shows one normally closed contact with an SEOL resistor, and the image on the right shows one
normally open contact with an SEOL resistor.
Note:
SEOL resistors can have a resistance between 1 kΩ and 10 kΩ. You must install the SEOL
resistor at the end of the loop. UL only verified functionality with a 5.6 kΩ SEOL resistor, SEOL
resistor model EOLR-2.
For ULC Security Level I burglary installations, use the wiring configurations in
Figure 12. For fire
detection installations that use smoke detectors, powered or non-powered heat detectors, or
CO detectors, use the wiring configuration on the right hand side of
Figure 12. These devices
use separate AUX2 output for power. Make sure that the voltage range of the AUX2 output is
compatible with the input voltage range of the detector you are using.
Figure 12: SEOL wiring
IQ Pro Alarm Controller Reference Manual
28 Callout
Description
1
Zone terminal
2
COM terminal
3
Normally open contact
4
End-of-line resistor. For UL/ULC listed applications use model EOLR-2.
5
Normally closed contact
Note:
Do not exceed a wire resistance of 100 Ω.
The following table shows the zone status for a given resistance value.
Table 20: SEOL zone status
Resistance
Description
Status
0 Ω
Shorted wire, loop shorted
Alarm
1 kΩ to 10 kΩ
Contact closed
Secure
Infinite
Broken wire, loop open
Alarm for burglary zones
and Trouble for fire zones
Double end-of-line resistors
If you use DEOL resistors at the end of a zone loop, the second resistor detects if a zone is in alarm,
tampered, or faulted. Only select DEOL supervision if using normally closed devices or contacts.
Note:
Only use one normally closed contact in each zone.
Note:
Any zone configured for fire or 24 hour supervisory must be wired with a SEOL resistor
regardless of the type of zone wiring supervision selected for the panel. If you change the
zone supervision from DEOL to SEOL, or from NC to DEOL, turn off the system completely and
then turn on the system for correct operation. For ULC Security Level II installations, use the
wiring configuration in the following figure.
Figure 13: DEOL wiring
Callout
Description
1
Zone terminal
2
COM terminal
3
5600 Ω end-of-line resistor. For UL/ULC listed applications use model EOLR-2.
4
Normally closed contact
Note:
Do not exceed a wire resistance of 100 Ω. Refer to the
Table 21 table.
29
IQ Pro Alarm Controller Reference Manual Note:
DEOL wiring is only for burglary use.
The following table shows the zone status for a given resistance value.
Table 21: DEOL zone status
Resistance
Description
Status
0 Ω
Shorted wire, loop shorted
Trouble
5600 Ω
Contact closed
Secure
Infinite
Broken wire, loop open
Tamper
11200 Ω
Contact open
Alarm
IQ Pro Alarm Controller Reference Manual
30 Installing modules
You can install up to 1A in power supply or expansion modules on the IQ Pro security system.
Note:
Remove all power from the system before connecting modules to the alarm control
panel.
Installing modules in the IQ Pro
Figure 14:
Installing modules in the IQ Pro
31
IQ Pro Alarm Controller Reference Manual Installing modules in the IQ Pro P
Figure 15:
Installing modules in the IQ Pro P
Wiring the modules
Remove all power from the system before connecting modules to the IQ Pro.
Zone expanders
The IQ Pro alarm controller board has connection terminals for Zone 1 to 8. Additional zone
expanders can be added to increase the number of zones on the system. Each zone expander
consists of one group of 8 zones. At enrollment, the zone expander is automatically assigned to
the next available 8-zone expander slot/corbus expander slot. Connect the RED, BLK, YEL and GRN
terminals to the Corbus terminals on the alarm panel. Refer to the module installation sheets for
more information.
Note:
For UL residential fire applications, ensure you do not combine fire and burglary devices
on a zone expander AUX output or power supply AUX output. Only burglary devices or only fire
devices can be powered from the same AUX output on these modules.
Installing the HSM2108
Refer to the HSM2108 Installation Instructions for detailed information.
IQ Pro Alarm Controller Reference Manual
32 Figure 16:
HSM2108 zone expander
Callout
Description
1
To tamper switch if used. Connect to BLK terminal if tamper is not used.
VAUX 12 VDC, 100mA Power Limited.
2
To devices requiring power.
3
Corbus to preceding expansion module or to alarm panel.
4
Corbus to additional expansion modules.
Installing the HSM3105 zone expander
Refer to the HSM3105 Installation Instructions for detailed information.
Figure 17:
HSM3105 zone expander
18VDC
+ -
+ -
+ -
+ -
BELL
CORBUS
AUX 1
AUX 2
RED BLK YEL GRN
RED BLK YEL GRN
AC AC AUX+ RED BLK YEL GRN TAM 01 02 03 04
IQ Pro/IQ Pro P Control Panel
HSM2204/HSM2300 Power Supply
HSM3105 MX Addressable Interface
Low power mode
33
IQ Pro Alarm Controller Reference Manual The Corbus wire runs between the control panel and the HSM3105 and shall not exceed 3ft using
22AWG wire.
The MX loop is powered from the Corbus supply power, and allows for a maximum MX loop current
draw of 67mA @ 40V (equivalent to 360mA @11.3V or 325mA @ 12.5V)
Figure 18:
Low power mode – internal mount
AC mains
Power
adapter
IQ Pro/IQ Pro P
CORBUS
MX loop
IQ Pro/IQ Pro P enclosure
HSM3105
Figure 19:
Low power mode – external mount
AC mains
Power
adapter
IQ Pro/IQ Pro P
CORBUS
MX loop
IQ Pro/IQ Pro P enclosure
HSM3105
HSM3105 enclosure
High power mode – external mount
The HSM3105 module can only be mounted in an external enclosure along with one of the
following approved auxiliary power supply units: HSM2204, HSM2300. The power supply unit
provides power to the HSM3105 module and the MX loop. The Corbus wire runs between the alarm
control panel and the HSM3105 will not exceed 3ft using 22AWG wire.
The HSM3105 is designed to handle a maximum allowable MX loop current draw of 400mA @ 40V
(equivalent to 1600mA @11.3V or 1500mA @ 12.5V). Check the manual for the chosen power supply
unit to understand how much current would be available for the MX loop.
Note:
HSM2300 and HSM2204 are only able to provide up to 228mA @ 40V (1000mA @ 12.5V)
or 260mA @ 40V (1000mA @ 11.3V).
IQ Pro Alarm Controller Reference Manual
34 Figure 20:
High power mode – external mount
AC mains
Power
adapter
IQ Pro/IQ Pro P
CORBUS
MX loop
IQ Pro/IQ Pro P enclosure
HSM3105
HSM3105 enclosure
HSM2300
HSM2204
BATTERY
AC mains
Power
adapter
Figure 21:
High power mode - wiring diagram
18VDC
+ -
+ -
+ -
+ -
BELL
CORBUS
AUX 1
AUX 2
RED BLK YEL GRN
RED BLK YEL GRN
AC AC AUX+ RED BLK YEL GRN TAM 01 02 03 04
IQ Pro/IQ Pro P Control Panel
HSM2204/HSM2300 Power Supply
HSM3105 MX Addressable Interface
Wiring the HSM2HOSTx
The HSM2HOSTx 2-way wireless tranceiver module provides communication between wireless
devices and the alarm controller. The HSM2HOST must only be used with the IQ Pro (metal
enclosure).
Connect the HSM2HOSTx to the 4-wire Corbus of the alarm controller according to the following
diagram. After the wiring is completed, reconnect power to the security system. Board current
draw: 35 mA.
35
IQ Pro Alarm Controller Reference Manual Figure 22:
HSM2HOSTx wiring
Callout
Description
1
Control panel
2
Corbus to the HSM2HOST
Note:
When an external HSM2HOST is used, the on-board PowerG card must be disabled. If
a PowerG Host is connected, set the PowerG configurations to default to avoid any problems
with PowerG device communication.
Power supply module wiring
The power supply modules provide up to 1 A of additional current and can be used to add up to
four programmable outputs to the alarm system.
The 4-wire corbus connection provides communication between the module and alarm control
panel.
To wire the power supply module, complete the following steps.
1. Connect the RED, BLK, YEL and GRN terminals to the corbus terminals on the alarm
controller.
2.
If O1 is not used, connect to Aux+ with a 1 K resistor.
The current draw is 35 mA. Battery standby capacity is at least 24 hours for fire applications.
Note:
All terminals are Class 2 power limited, except battery leads.
Note:
For UL residential fire applications, ensure you do not combine fire and burglary devices
on a zone expander AUX output or power supply AUX output. Only burglary devices or only fire
devices are allowed to be powered from the same AUX output on these modules.
IQ Pro Alarm Controller Reference Manual
36 Figure 23:
Power supply module wiring
Callout
Description
1
UL/ULC residential fire applications, ULC Security Level II
2
UL commercial burglary, UL/ULC residential burglary applications
3
Tamper contact (normally closed)
4
To BLK
5
Corbus connection to control panel. RED, BLK 12 VDC at 20 mA.
6
AUX connection to expansion module. Refer to the Specifications Chart for maximum
current draw.
7
AC adapter models HS40WPSNA or HS40WPSA.
Input: 120 VAC, 60 Hz, 1.2 A. Secondary: 18 VDC, 2.22 A, Class 2.
8
Power adapter (120 VAC / 60 Hz)
9
Battery (12 v, 7 Ah. Maximum battery charge current is 360 mA)
10
Battery 1 (12 v, 7 Ah. Maximum battery charge current is 360 mA)
11
Battery 2 (same rating as battery 1)
12
Red (+) to BAT+ ; Blk (-) to BAT-
13
Supervised
14
Unsupervised
Wiring a keypad
You can connect up to 16 keypads to the IQ Pro system.
Hardwired devices can be connected to hardwired keypads that have input zone circuitry. This
saves from running wires back to the control panel for every device.
To connect a zone device to HS2LCD(P) keypads, run one wire to the P/Z terminal and the other to
B. For powered devices, use red and black to supply power to the device. Run the red wire to the R
(positive) terminal and the black wire to the B (negative) terminal.
Keypad zones support Normally Closed Loops, Single End of Line and Double End of Line resistors.
Only use for UL/ULC burglary type applications.
37
IQ Pro Alarm Controller Reference Manual Note:
For UL compliant installations, make sure that the maximum current draw for the AUX
outputs, CORBUS, RED and BLK, and any PGM outputs do not exceed the limits in the technical
specifications. For information on how to use the keypad, refer to the keypad user manual.
To wire a keypad, complete the following steps.
1.
Remove the keypad backplate. For information on how to remove the keypad backplate, refer
to the keypad installation manual.
2.
Connect the RED, BLK, YEL, and GRN terminals to the Corbus terminals on the IQ Pro alarm
controller.
Note:
The Corbus should be run with minimum 22 wire gauge quad. two pair twisted
preferred. Devices can be home run to the panel, connected in series, or T-tapped. Devices
cannot be more than 1000 ft (305 m) in wire length from the panel. Do not use shielded wire
for Corbus wiring.
Figure 24:
Keypad terminals
Callout
Description
1
R terminal
2
B terminal
3
Y terminal
4
G terminal
5
Zone input terminal
When you install multiple keypads and modules, wire keypads using the same partition on the
same module to improve keypad performance. Wire keypads on partition one into module one, and
keypads on partition two into module two.
Note:
When using end-of-line supervision, connect the zone according to one of the
configurations outlined in Zone Wiring. End-of-line resistors must be placed on the device end
of loop, not at the keypad.
Assigning keypad zones
To assign a keypad to a zone, complete the following.
1. In
Installation > Devices > Security Sensors
select an enrolled keypad.
2. Select
Edit > Keypad Input
then
select Enable
or
Disable.
Connecting power
Do not connect the battery or power adapter until all other wiring is complete.
IQ Pro Alarm Controller Reference Manual
38 Mounting the power adapter
You must mount the power adapter outside the IQ Pro and IQ Pro P enclosures.
To mount the HS40WPSNA power adapter, complete the following steps.
1.
Insert two screws into the mounting holes on the power adapter.
2.
Secure the screws to the wall.
Note:
Mount the power adapter close to an AC power outlet so there is no strain on the power
cable. Do not connect the power adapter to a receptacle controlled by a switch.
To mount the HS40WPSA power adapter, complete the following steps.
1.
Mount the supplied mounting bracket to the wall outlet, using the screw provided.
2.
Plug in the power adapter, securing it in the bracket.
3.
Secure by inserting a plastic cable tie through the bracket slots.
Use the following table to determine the distance and gauge for the secondary wiring.
Table 22: Wiring distance and gauge
Distance (m/ft)
Gauge (AWG)
2 / 6.5
22
3 / 10
20
4 / 13
18
Wiring the power adapter
To wire the external power adapter, complete the following steps.
Figure 25:
Wiring the power adapter
Callout
Description
1
IQ Pro (P) 18 VDC terminals
2
Power adapter (HS40WPSA or HS40WPSNA)
39
IQ Pro Alarm Controller Reference Manual Note:
If the knockout is used for power wiring, use grommets to relieve stress on the wiring.
1.
On the power adapter, connect the red wire to the positive
+
terminal, the black wire to the
negative
-
terminal.
2.
Insert the cable through the back of the enclosure. Refer to
Figure 27.
3.
Connect the wires to the 18 VDC terminals on the PCB, the red wire to the
+
terminal, the
black wire to the negative
-
terminal.
Installing and wiring the battery
This section describes how to install and wire the battery for the IQ Pro and IQ Pro P.
Installing the battery for the IQ Pro
To install the 12 VDC, 4 Ah, 7Ah or 14Ah (2 x 7Ah) or 17 Ah battery in the IQ Pro metal enclosure,
complete the following step.
•
Place the battery on the bottom of the metal enclosure.
Wiring the battery for the IQ Pro
Note:
Do not connect the battery until all other wiring is complete.
Note:
A sealed, rechargeable, lead acid battery or gel type is required to meet UL
requirements for power standby times. Replace the battery every 3 to 5 years.
To wire the battery for the IQ Pro, complete the following steps.
1.
Connect the red battery lead to the positive
+
terminals on the PCB and the battery.
2. Connect the black battery lead to the negative
-
terminals on the PCB and the battery.
IQ Pro Alarm Controller Reference Manual
40 Figure 26:
IQ Pro battery wiring
Note:
You must maintain a minimum separation of 6.4 mm (0.25 in.) at all points between
non-power limited battery wiring and all other power limited wiring connections. Do not route
any wiring over circuit boards. You must maintain a minimum separation of 25.4 mm (1 in.)
between all wiring and the PCB.
Installing the battery for the IQ Pro P
To install the 12 VDC, 4 Ah or 7 Ah battery in the enclosure, complete the following steps.
41
IQ Pro Alarm Controller Reference Manual Note:
The battery is sold separately.
1.
Place the battery on the two plastic supports on the bottom of the enclosure.
2. Clip the battery in place.
3.
Optional:
The battery can also be secured in place using a battery strap. To secure the
battery using the battery strap, complete the following steps:
Note:
The battery strap is sold separately.
a.
Place the battery on the two plastic supports on the bottom of the enclosure.
b.
Insert the battery strap through one of the slots.
c.
Wrap the strap around the front of the battery.
d.
Insert the strap through the second slot.
Wiring the battery for the IQ Pro P
1.
Connect the red battery lead to the positive
+
terminals on the PCB and the battery.
IQ Pro Alarm Controller Reference Manual
42 2. Connect the black battery lead to the negative
-
terminals on the PCB and the battery.
Figure 27:
Wiring the battery and power supply
Callout
Description
1
Connect power adapter to the 18 VDC terminals as shown.
2
Battery wiring
3
4 Ah, 14 Ah, or 17 Ah battery
4
HS40WPSA power adapter
5
HS40WPSNA power adapter
Important:
You must maintain a minimum separation of 6.4 mm (0.25 in.) at all points
between non-power limited battery wiring and all other power limited wiring connections. Do
not route any wiring over circuit boards. You must maintain a minimum separation of 25.4 mm
(1 in.) between all wiring and the PCB.
Aux loading and battery selection
43
IQ Pro Alarm Controller Reference Manual Table 23:
IQ Pro
PCB current
draw 120 mA
alarm current
700 mA
UL Resi Burg
ULC Resi Burg
(ULC Security
Level I)
UL Com Burg
UL Resi Fire
UL Home
Health Care
ULC Resi Fire
ULC Com Burg
(ULC Security
Level II)
UL Resi Fire with
Wired CO Det.
UL985 6th Ed
(*)
Standby Time
and Alarm Time
4 h + 4 min
4 h + 5 min
4 h + 15 min
24 h + 4 min
24 h + 5 min
24 h + 4 min
24 h + 4 min +
12 h CO alarm
Enclosure
IQ Pro metal enclosure
Power supply
adapter
HS40WPSNA or HS40WPSA
Battery
capacity /max
loading
Note: 14Ah (2x
7Ah batteries in
parallel)
4 Ah/430 mA
7 Ah/700 mA
14 Ah/700 mA
17 Ah/700 mA
4 Ah/430 mA
7 Ah/700 mA
14 Ah/700 mA
17 Ah/700 mA
7 Ah/130 mA
14 Ah/430 mA
17 Ah/530 mA
14 Ah/250 mA
17 Ah/310 mA
Recharging
current setting
Low setting
(350mA)
(for 4Ah and 7Ah
batteries)
High setting
(700mA)
(for 14Ah/17Ah
batteries)
Low or
High
Low or
High
Low or
High
High
* IQ Pro can be used in conjunction with compatible 4-wire CO detectors or wireless CO Detectors.
Table 24:
IQ Pro P
PCB current draw
120 mA alarm
current 700 mA
UL Resi Burg
ULC Resi Burg
(ULC Security
Level I)
UL Com Burg
UL Resi Fire
UL Home Health
Care
ULC Resi Fire
ULC Com Burg
(ULC Security
Level II)
UL Resi Fire with
Wireless CO Det.
UL985 6th Ed
(*)
Standby Time
and Alarm Time
4 h + 4 min
4 h + 5 min
4 h + 15 min
24 h + 4 min
24 h + 5 min
24 h + 4 min
24 h + 4 min +
12 h CO alarm
Enclosure
IQ Pro P plastic enclosure
Power supply
adapter
HS40WPSNA or HS40WPSA
IQ Pro Alarm Controller Reference Manual
44 Table 24:
IQ Pro P
PCB current draw
120 mA alarm
current 700 mA
UL Resi Burg
ULC Resi Burg
(ULC Security
Level I)
UL Com Burg
UL Resi Fire
UL Home Health
Care
ULC Resi Fire
ULC Com Burg
(ULC Security
Level II)
UL Resi Fire with
Wireless CO Det.
UL985 6th Ed
(*)
Battery
capacity /max
loading
4 Ah/430 mA
7 Ah/700 mA
4 Ah/430 mA
7 Ah/700 mA
7 Ah/130 mA
7 Ah/130 mA
Recharging
current setting
Low setting
(350mA)
(for 4Ah and 7Ah
batteries)
Low
Low
Low
Low
*Only use IQ Pro P in conjunction with compatible wireless CO Detectors.
Standby battery guide
After calculating the battery capacity for each specific installation, use the Standby Battery Guide
table to determine the battery required to support the main control panel in standby mode for:
• 4 hours (UL/ULC residential burglary, ULC commercial burglary)
• 24 hours (UL/ULC residential fire, UL home health care, ULC commercial burglary, ULC
residential fire with wired CO detectors UL985 6th Ed, ULC, fire commercial monitoring- no
bell load allowed.
•
The current values in the table denote the maximum current draw to achieve the preferred
standby time with the listed battery types. The battery size is measured in amp hours (Ah).
Table 25:
Standby battery guide
Battery size (Ah)
Preferred standby time (hours)
4 h
24 h
24 h + 12 h CO
4 Ah
430 mA
N/A
N/A
7 Ah
700 mA
130 mA
130 mA
14 Ah (2x7)*
700 mA
430 mA
250 mA
17 Ah
700 mA
530 mA
310 mA
* Use 2 x 7 Ah batteries connected in parallel, UL/ULC installations only.
45
IQ Pro Alarm Controller Reference Manual Wiring diagrams
IQ Pro system wiring
IQ Pro Alarm Controller Reference Manual
46 IQ Pro P system wiring
47
IQ Pro Alarm Controller Reference Manual Attaching the cover for the IQ Pro P
To attach the front cover to the enclosure, follow the numbered steps.
Figure 28:
Attaching the cover
Installing extension antennas
Extension antennas can be installed to increase the signal strength received by the communicator
modules.
To install the extension antennas complete the following steps.
1.
Insert extension antenna cables through the knockout on the side of the enclosure.
2.
Connect the cable SMA to the appropriate SMA connector on the antenna board.
Note:
The internal LTE primary and diversity antenna automatically switches to the extension
antenna.
Note:
Refer to the associated antenna instruction sheet for more details.
IQ Pro Alarm Controller Reference Manual
48 Callout
Description
1
Diversity antenna
2
Main antenna
49
IQ Pro Alarm Controller Reference Manual Installer app programming
All system configuration can be performed using the IQ Installer App. To download the app, scan
the appropriate bar code.
iOS
Android
Connecting to the IQ Pro panel
Before you begin:
Download the Android or IOs version of the IQ Installer app onto your phone, ensure Wi-Fi is
turned on.
Figure 29: Pairing tab
Callout
Description
1
Pairing tab. Press for 1 to 2 seconds when prompted on IQ Installer App.
2
Scan QR code indicated.
3
Green LED. When pairing tab is pressed the LED flashes red, then flashes blue.
Use the IQ installer app to connect to the IQ Pro panel and complete panel setup. To connect
complete the following steps.
1. Open the IQ installer app, tap
Start
on the screen to begin.
2.
Tap
Scan QR Code
, then position your phone to scan the product information QR code inside
the enclosure.
3.
Tap
Continue
.
IQ Pro Alarm Controller Reference Manual
50 4.
Press and hold the pairing tab on the PCB cover for one second, or until the green LED
flashes red.
5. When the LED flashes blue, tap
Next
on the screen.
6. Enter the default installer code to connect.
7.
When prompted, change the default code to a new installer code.
8. Select
Dashboard
at the bottom of the screen, then tap the
Launch Wizard
icon in the top
right corner to initiate a step-by-step guide to configuring the IQ Pro system.
Dashboard
Use
Dashboard
for easy access to system information and configuration screens.
Wizard
Select the
Launch Wizard
icon in the top right corner to initiate a step-by-step guide to configuring
the IQ Pro system.
Configuration
The following settings can be configured on the IQ Pro Security System.
51
IQ Pro Alarm Controller Reference Manual Table 26:
Configuration settings
Icon
Setting
Description
User Management
The IQ Pro can save up to 242 user access codes. Only Dealer,
Installer and Master codes can create or edit user access
codes.
Installation
Enroll devices, program and configure IQ Pro settings.
About
View information about the IQ Pro system including battery
status, software, hardware, Wi-Fi and more.
Reboot
Resets the system if the panel is experiencing difficulties.
Power Down
Turns off the system.
Wi-Fi
Select to view if the system is connected to the Wi-Fi network.
Date & Time
Program date and time.
Sound
Enable/disable chime, trouble beeps and customize sounds.
Upgrade Software
Upgrade the software version using Wi-Fi.
Partitions
Create and edit partitions, view a list of users and sensors
assigned to a partition.
Note:
Partitions must be enabled under Dealer Settings.
Dealer Branding
Customize your dealer contact information here.
User Management
The IQ Pro can hold up to 242 user codes. Only Dealer, Installer and Admin codes can create or edit
user codes. When a code is created, information can be edited in User Management. To view or edit
an access code complete the following.
1. Select
Configuration > User Management
.
2.
Select a user type from the list.
IQ Pro Alarm Controller Reference Manual
52 3.
Configure the fields on the screen.
4.
Tap
Save
at the top-right corner of the screen.
User types
Table 27: User types
User type
Access level
Partition
access
Dealer
All settings, including Master Reset and access to change Dealer
Contact information
All partitions
Installer
All settings
All partitions
Master
All user-related features and settings, including connecting to Wi-Fi,
User Management, Sound App and Sensors customization
All partitions
User
Arming/disarming
Only assigned
partitions
Guest
Arming/disarming
Only assigned
partitions
Duress
Disarming (sends duress signal to the monitoring station)
Each partition
gets a unique
duress code
Adding users
To add a user to the system, complete the following steps.
1. In the
Configuration > User Management
screen, tap the
+
icon on the bottom right of the
screen.
2. Select one of the options
Master, Guest
or
User
. Inform user to change the default master
code after the first use.
3.
Configure the fields provided.
4.
Tap
Save
at the top-right corner of the screen.
Example:
53
IQ Pro Alarm Controller Reference Manual Deleting users
To delete a user complete the following steps.
1. Select
Configuration > User Management
.
2. Swipe left on the user you want to delete.
3.
Tap the
Remove
icon to remove the user from the system.
IQ Pro Alarm Controller Reference Manual
54 Installation settings
Table 28: IQ Installer installation settings
Icon
Setting
Description
Devices
Add, edit or delete up to 128 devices.
Dealer Settings
Change panel, zone or partitions settings.
System Logs
Upload system logs or program auto-upload.
Sirens and
Alarms
Change siren and alarm settings for alarm events.
Security and
Arming
Change arming settings, entry/exit delays, bypass features and more.
Devices
Configure sensors, Wi-Fi and Z-wave devices and programmable outputs. Access devices in
Configuration > Installation > Devices.
Security sensors
Enroll and configure security devices in
Configuration > Installation > Security Sensors
.
55
IQ Pro Alarm Controller Reference Manual Autolearn
Select
Autolearn
to automatically enroll a sensor.
1.
Tap the
+
symbol then select
Autolearn
.
2. Select
Start Autolearn
.
3.
Open/close or tamper a sensor to enroll, or hold the enroll button until the LED flashes.
4.
When the sensor is displayed, select to configure options.
5.
Configure
Sensor Type, Sensor Group, Sensor Name, Partition, Chime Type, Sensor Input
and
Activation LED
.
6. Select
Save
.
Enrolling a sensor manually
To manually enroll a sensor, complete the following steps.
1. Select
Installation > Devices > Security Sensors
.
2.
Tap the
+
key then select one of the manual options.
3. Enter the sensor ID and select
Save
.
4.
Select sensor to configure options.
IQ Pro Alarm Controller Reference Manual
56 Deleting a sensor
To delete a sensor complete the following steps.
1. Select
Configuration > Installation > Devices > Security Sensors
.
2.
Select the device you want to delete and swipe left.
3.
Tap on the delete icon to remove the sensor from the system.
Configuring sensors
Table 29:
Configuration options
Option
Description
Partition
When Partitions are enabled you can assign a sensor to a specific partition. This
allows independent control and arming of that partition.
Sensor Type
Select to choose a sensor type from the list.
Sensor Group
Change the behavior of the sensor by selecting the preferred option. Refer to
Sensor Groups
to view descriptions of the available
Sensor Groups
.
Sensor Name
Tap to enter a custom description.
Chime Type
Configure each sensor to have a unique chime or select
None
to turn chime off.
Voice Prompts
Voice prompts annunciate the
Sensor Name
when it is opened. Default is on,
select to turn off.
57
IQ Pro Alarm Controller Reference Manual Table 29:
Configuration options
Option
Description
Sensor Input
Select
Reed Switch, Aux Normally Closed, AUX Normally Open
and
End of
Line
, if available for that sensor.
Source
View the sensor's incoming frequency when pairing to the IQ Pro. The IQ Pro is
pre-installed with one or more of the following RF cards.
•
PowerG
• SecurityRF
• SecurityRF-319
• S-Line
• SecurityRF-345
• 345RF 2G
• SecurityRF-433
Note:
PowerG modem radio cards are used also in UL/ULC listed Com-
mercial burglary applications. SRF319, SRF433 (DSC Protocol), PowerG
modem and SRF345 radio cards are used in UL/ULC listed Residential fire
and burglary applications.
Sensor Groups
The IQ Pro system supports PowerG along with one legacy frequency (319.5 MHz, 345 MHz, or 433
MHz) depending which RF card is pre-installed. Sensor Group numbers and behaviors remain the
same across all frequencies.
Assign a sensor group in
Configuration > Installation > Devices > Security Sensors.
Complete the
following steps.
1.
Select the device from the list or add new device. Refer to Security sensors
for details.
2.
Tap the
Edit
button.
3. Select
Sensor Group
from the list.
4.
Select preferred sensor group.
5.
Select the return arrow to save and exit.
Table 30:
Door/Window
Group
Name
Supervised
Description
10
Entry-Exit-
Normal Delay
Y
Gives a period of time to exit the home or to disarm
the system when returning before the alarm
sounds.
12
Entry-Exit-Long Delay
Y
Gives a period of time to exit the home or to disarm
the system when returning before the alarm
sounds. This can be a separate delay from the
normal delay.
13
Instant Perimeter D/W
Y
Door or window that triggers an alarm instantly if
system is armed.
14
Instant Interior Door
Y
An interior sensor that triggers an alarm instantly
while armed in stay or away mode.
16
Away Instant
Follower Delay
Y
Interior door that triggers alarm instantly when
system is armed in away mode only.
IQ Pro Alarm Controller Reference Manual
58 Table 30:
Door/Window
Group
Name
Supervised
Description
25
Local Safety Sensor
Y
This sensor does not report or trigger an alarm.
This is a chime-only sensor when
Activity
Monitoring
is active, regardless of system status.
For example, use for medicine cabinets or chemical
storage.
8
Reporting
Safety Sensor
Y
This sensor reports to the central station and
triggers an alarm when
Activity Monitoring
is
active, regardless of system status.
9
Delayed Reporting
Safety Sensor
Y
This sensor reports to the central station and
triggers an alarm when
Activity Monitoring
is
active, regardless of system status. This sensor has
an entry delay.
Note:
345 MHz door/window sensors have the option to change the loop number to 1 or 2.
This enables the sensor to be programmed twice as 2 different zones.
Table 31: Motion
Group
Name
Supervise
d
Description
17
Away-Instant Motion
Y
Only active when armed in Away mode, triggers
instantly when motion is detected.
15
Stay-Instant Motion
Y
Active in Stay or Away mode, triggers instantly
when motion is detected.
35
Stay-Delay Motion
Y
Active in Stay or Away mode. Triggers an entry delay
when motion is detected.
20
Away-Delay Motion
Y
Active when armed in Away mode. Triggers an entry
delay when motion is detected.
25
Safety Motion
Y
This sensor does not report or trigger an
alarm. This is a chime-only sensor when Activity
Monitoring is active, regardless of panel status. Use
for medicine cabinets, storage or activity tracking.
43
Away- Instant,
Stay- Delay Motion
Y
Active in Stay or Away modes. During Away mode,
triggers instantly when motion is detected. During
Stay mode, triggers an entry delay when motion is
detected.
44
Away- Instant
Interior Motion
Y
Only active when armed in Away mode. Triggers
instantly when motion is detected. Does not follow
entry/exit delay rules and is always instant.
45
Away- Stay- Instant
Interior Motion
Y
Active in Stay or Away mode. Triggers instantly
when motion is detected. Does not follow entry/exit
delay rules and is always instant.
Note:
345 MHz motion sensors have the option to change the Loop number to 1, 2 or 3. This
enables the sensor to be programmed twice as 2 different zones where supported by the
device.
59
IQ Pro Alarm Controller Reference Manual Table 32:
Glass Break
Group
Name
Supervised
Description
13
Glass Break
Y
Active in both Stay and Away mode.
17
Glass Break
Away Only
Y
Active in Away mode only.
Table 33:
Remote key (keyfob)
Group
Name
Supervised
Description
1
Mobile Intrusion
N
Worn or carried, the button(s) are programmed
to trigger a police panic.
3
Mobile Silent
N
Worn or carried, the button(s) are programmed
to trigger a silent police panic.
4
Fixed Auxiliary
Y
Installed in a fixed location such as night stand,
the button(s) are programmed to trigger an
Auxiliary panic.
Note:
Medical functionality has not been
evaluated for UL/ULC.
5
Fixed Silent Auxiliary
Y
Installed in a fixed location such as night stand,
the button(s) are programmed to trigger a silent
Auxiliary panic.
Note:
Medical functionality has not been
evaluated for UL/ULC.
6
Mobile Auxiliary
N
Worn as a wrist watch or pendant, the button(s)
are programmed to trigger an Auxiliary panic.
Note:
Medical functionality has not been
evaluated for UL/ULC.
7
Mobile Silent
Auxiliary
N
Worn as a wrist watch or pendant, the button(s)
are programmed to trigger a silent Auxiliary
panic.
Note:
Medical functionality has not been
evaluated for UL/ULC.
Table 34:
Keypads
Group
Name
Supervised
Description
0
Fixed Intrusion
Y
Installed in a fixed location such us under a desk,
the button(s) are programmed to trigger a police
panic.
1
Mobile Intrusion
N
Worn or carried, the button(s) are programmed
to trigger a police panic.
2
Fixed Silent
Y
Installed in a fixed location such us under a desk,
the button(s) are programmed to trigger a silent
police panic.
3
Mobile Silent
N
Worn or carried, the button(s) are programmed
to trigger a silent police panic.
IQ Pro Alarm Controller Reference Manual
60 Table 34:
Keypads
Group
Name
Supervised
Description
4
Fixed Auxiliary
Y
Installed in a fixed location such as night stand,
the button(s) are programmed to trigger an
Auxiliary panic.
Note:
Medical functionality has not been
evaluated for UL/ULC.
5
Fixed Silent
Auxiliary
Y
Installed in a fixed location such as night stand,
the button(s) are programmed to trigger a silent
Auxiliary panic.
Note:
Medical functionality has not been
evaluated for UL/ULC.
6
Mobile Auxiliary
N
Keypad can be mobile and is programmed to
trigger an Auxiliary panic.
Note:
Medical functionality has not been
evaluated for UL/ULC.
7
Mobile Silent
Auxiliary
N
Keypad can be mobile and programmed to
trigger an Auxiliary panic.
Note:
Medical functionality has not been
evaluated for UL/ULC.
Table 35: Auxiliary pendant
Group
Name
Supervised
Description
0
Fixed Intrusion
Y
Installed in a fixed location such us under a desk,
the button(s) are programmed to trigger a police
panic.
1
Mobile Intrusion
N
Worn or carried, the button(s) are programmed
to trigger a police panic.
2
Fixed Silent
Y
Installed in a fixed location such us under a desk,
the button(s) are programmed to trigger a silent
police panic.
3
Mobile Silent
N
Worn or carried, the button(s) are programmed
to trigger a silent police panic.
4
Fixed Auxiliary
Y
Installed in a fixed location such as night stand,
the button(s) are programmed to trigger an
Auxiliary panic.
Note:
Medical functionality has not been
evaluated for UL/ULC.
5
Fixed Silent
Auxiliary
Y
Installed in a fixed location such as night stand,
the button(s) are programmed to trigger a silent
Auxiliary panic.
Note:
Medical functionality has not been
evaluated for UL/ULC.
61
IQ Pro Alarm Controller Reference Manual Table 35: Auxiliary pendant
Group
Name
Supervised
Description
6
Mobile Auxiliary
N
Worn as a wrist watch or pendant, the button(s)
are programmed to trigger an Auxiliary panic.
Note:
Medical functionality has not been
evaluated for UL/ULC.
7
Mobile Silent
Auxiliary
N
Worn as a wrist watch or pendant, the button(s)
are programmed to trigger a silent Auxiliary
panic.
Note:
Medical functionality has not been
evaluated for UL/ULC.
25
Safety Auxiliary
Pendant
N
Used for local alerts like a nurse call button. This
does not report an alarm to the Central Station.
Note:
Medical functionality has not been
evaluated for UL/ULC.
Table 36:
Smoke/Heat Detector
Group
Name
Supervised
Description
26
Smoke-Heat
Y
Triggers an alarm when sensor detects smoke or
rapid rise in heat.
Table 37:
CO Detector
Group
Name
Supervised
Description
34
CO
Y
Triggers an alarm when sensor detects carbon
monoxide.
Table 38:
Hardwire Translator and Wireless Translator
Group
Name
Supervised
Description
13
Takeover
Y
Triggers an alarm when sensor is tampered in stay
or away mode.
Table 39:
Water
Group
Name
Supervised
Description
38
Water Sensor
Y
Triggers an alarm when sensor detects water.
25
Water Non-
Reporting
Y
Used for local alerts, it does not report an alarm to
the central station.
Table 40: Shock Sensor
Group
Name
Supervised
Description
13
Shock Glass Break
Y
Arms and triggers shock sensors immediately
system is armed in Stay or Away mode.
17
Shock Glass
Break Away Only
Y
Arms and triggers shock sensors immediately
system is armed in Away mode.
IQ Pro Alarm Controller Reference Manual
62 Table 41:
Freeze
Group
Name
Supervised
Description
52
Freeze
Y
Triggers an alarm when sensor detects low
temperature.
Note:
Temperature sensor functionality has
not been evaluated by UL/ULC.
25
Freeze Non-
Reporting
Y
Used for local alerts, it does not report an alarm
to the central station.
Table 42:
High Temperature
Group
Name
Supervised
Description
53
Temp Reporting
Y
Triggers an alarm when sensor detects high
temperature.
Note:
Temperature sensor functionality has
not been evaluated by UL/ULC.
25
Temp Non-
Reporting
Y
Used for local alerts, it does not report an alarm
to the central station.
Table 43:
Temperature
Group
Name
Supervised
Description
51
Temp Non-
Reporting
Y
Only for use with the PowerG Temp Sensor
(PGx905). This sensor group does not report to
the central station. Allows for actual temperature
monitoring (thermometer) with customizable
high and low threshold settings.
52
Freeze
Y
Triggers an alarm when sensor detects low
temperature.
Note:
Temperature sensor functionality has
not been evaluated by UL/ULC.
53
Temp Reporting
Y
Triggers an alarm when sensor detects high
temperature.
Note:
Temperature sensor functionality has
not been evaluated by UL/ULC.
Wi-Fi devices
View and remove Wi-Fi devices connected to your system, also configure Access Point options.
Table 44: Wi-Fi settings
Setting
Description
Access Point Options
Configure the IQ Pro built-in router, enable/disable the router, broadcast
or change the SSID.
Connected Devices
View connected device information such as IP, MAC address and how long
the device has been connected.
IQ Remotes
Pair an IQ Remote touch screen to the system whether it is connected to
the customer's network or the built in Access Point.
3rd Party
63
IQ Pro Alarm Controller Reference Manual Programmable (PGM) outputs
Configure programmable outputs (PGMs) to control external devices such as lights, garage doors
and sirens.
To program PGMs complete the following steps.
1. Select
Configuration > Installation > Devices > PGM Outputs
.
2. Select PGM 1 to 4.
3.
Tap the
+
icon and select
System, Zone, Command
or
2-wire Smoke
.
4.
Configure preferred settings and tap
Save
.
System event follower
Configure PGM name, view system state, assigned partition, output type and action.
Zone follower
Configure zone name, select zone, view zone status, configure output type and action.
Command output
Configure command output name, assign partition, output type and action.
2-wire smoke
Configure 2-wire smoke name, chime type, voice, and assign partition.
Dealer settings
Communication test
To enable
Communication test
complete the following.
1. In the
Configuration
screen select
Installation > Dealer Settings > Communication Test
.
IQ Pro Alarm Controller Reference Manual
64 2.
Tap
Daily, Weekly or Monthly
from the list. Select
Never
to disable this option.
Tap
Installation > Dealer Settings > Communication Test Start Time
to select the time of day the
system will send the communication test.
Note:
If no time is selected, a random time is automatically selected.
Page configuration
Configure the following options in
Configuration > Installation > Dealer Settings > Page
Configuration
.
Table 45:
Page configuration settings
Setting
Default
Description
Home
control page
Disabled
Select to display home control page as part of primary user
interface.
Note:
There must be at least two different types of automa-
tion devices added to the system (lights, locks or ther-
mostats) to enable this option. This feature can not be
enabled if partitions are enabled.
Door lock page
Enabled
Select to display the door lock page as part of the primary user
interface when a door lock is added as a device.
Thermostat
page
Enabled
Select to display the thermostat page as part of primary user
interface when a thermostat is added as a device.
Scenes
support
Enabled
When enabled, a new icon appears enabling the use of Scenes
that have been created on Alarm.com.
Note:
This feature can not be enabled if Partitions are
enabled.
Enabling partitions
Create up to four partitions by first enabling the
Partitions
feature. View and edit partitions under
Configuration > Partitions
(refer to Partitions
) .
To turn on Partitions complete the following steps.
1. Select
Configuration > Installation > Dealer Settings
.
2. Slide the
Partitions
button to the on position.
65
IQ Pro Alarm Controller Reference Manual
Note:
There must be at least one sensor assigned to a partition before it can be viewed or
edited.
Users settings
Configure the following options in
Configuration > Dealer Settings > Users Settings
.
Table 46: Users settings
Option
Description
Customer account
Enter customer account number.
Six-digit user code
Select six-digit user code option.
Installer access
requires user
permission
Not supported
IQ Remote reset
authentication
If enabled, the IQ Remote requires a dealer or installer code to reset.
Default is disabled.
Duress
authentication
Enable to view duress user in User Management.
Upgrade software
Upgrade the IQ Pro system software using Wi-Fi.
Patch tag
Perform an
Automatic Patch Check
for specific software updates or check manually by selecting
Patch Tag
and entering a valid code corresponding to a specific software update on the server.
Auto upgrade
Search the network for updates and install new software.
IQ Pro Alarm Controller Reference Manual
66 Note:
For UL/ULC installations remote software upgrades are not permitted.
Table 47:
Auto upgrade settings
Setting
Description
Background Download
for Updates
IQ Pro checks for new software in the background and download
it to local storage so that it can be applied at a later date. Default:
Enabled
.
Automatic Check
Interval
Determines the interval the IQ Pro checks for software updates.
Available options are
Every Night
,
Once a Week
,
Once a Month
.
Default
Once a Week
.
Zone settings
The following zone settings are available in
Configuration > Installation > Dealer Settings >
Zones Settings
.
Table 48: Zones settings
Setting
Default
Description
Commercial sensor
and device names
Disabled
Enabling this features changes the sensor name vocabulary
from residential naming to commercial naming.
Zone count
10
Number of zone slots occupied or enrolled on the system.
PowerG camera
alarm images
upload count
1
Determines the number of images that are uploaded by any
PowerG PIR CAM when triggered during an alarm. Choose
from 1-10 images.
Open/close
reports allowed for
autolearn
Enabled
Rather than sending a tamper to autolearn a sensor, enabling
this feature allows an open/close of the sensor to trigger
autolearn.
ULC commercial
power restoration
Disabled
If enabled, all sensor activity is ignored for 120 seconds after
power is restored.
Data settings reset
Disabled
If enabled, non S-Line door/window sensors cannot be added.
Table 49: Security RF Jam
Setting
Default
Description
PowerG RF Jam
Detection
Disabled
If enabled, the system can detect when an unusual amount
of RF signals are transmitted in the PowerG spectrum leading
to a potential loss of connectivity. This event reports to the
central station when enabled. Select from Disabled, UL20/20 or
EN 30/60.
SRF Radio Jam
Detection
Disabled
If enabled, the system can detect when an unusual amount
of RF signals are being transmitted on the frequency of the
legacy daughter card installed in the panel (319.5MHz, 345MHz
or 433MHz) leading to a potential loss of connectivity. This
event reports to the central station when enabled.
Jam Detection Local
Alarm
Disabled
If enabled, the system sounds a local alarm. Jam Detection
must be active for this to function correctly.
SRF Jam Sensitivity
Level
Normal
Select High or Normal sensitivity levels.
67
IQ Pro Alarm Controller Reference Manual Table 50: Loss of supervisory signals
Setting
Default
Description
Loss of supervisory
signals for
emergency sensors
4 hours
Select the length in hours (4, 12 or 24) before reporting a loss
of supervision on life safety devices.
Note:
For UL/cUL Resi Fire and UL Commercial Burg
(UL2610) the wireless supervision window for Emergency
sensors (Smoke, Heat & CO Detectors) shall be set to 4h.
Loss of supervisory
signals for PowerG
emergency sensors
4 hours
Select the length of time (20, 30 min, 1, 2, 4, 12, 18 hours)
before reporting a loss of supervision on PowerG life safety
devices.
Note:
For UL/cUL Resi Fire and UL Commercial Burg
(UL2610) the wireless supervision window for emergency
sensors (Smoke, Heat & CO Detectors) shall be set to 2h.
Loss of supervisory
signals for non-
emergency sensors
24 hours
Select the length in hours (4, 12 or 24) before reporting a loss
of supervision on security devices.
Note:
For UL/cUL Resi Fire and UL Commercial Burg
(UL2610) the wireless supervision window for non-emer-
gency sensors (all intrusion sensors) shall be set to 4h.
Loss of supervisory
signals for PowerG
non-emergency
sensors
24 hours
Select the length of time (20, 30 min, 1, 2, 4, 12, 24 hours)
before reporting a loss of supervision on PowerG security
devices.
Note:
For UL/cUL Resi Fire and UL Commercial Burg
(UL2610) the wireless supervision window for non-emer-
gency sensors (all intrusion sensors) shall be set to 4h.
Loss of cell timeout
30 minutes
Select the length in minutes (10-120) before reporting a loss in
cellular signal.
Note:
For UL Commercial Burg (UL2610) the cell supervi-
sion is hard coded to 200s.
General internal
Table 51:
General settings
Settings
SIA limits
Power management
Language
Second preferred language
Location
Temperature scale
Secondary panel
Panel settings downloaded check
Loss of AC power timeout
Master reset
This action results in a reset to factory settings and erases all content.
Note:
When a
Master Reset
has been performed, it cannot be reverted.
IQ Pro Alarm Controller Reference Manual
68 To reset all settings, navigate to
Configuration > Installation > Dealer Settings
then
complete the following steps.
1.
Tap the
Master Reset
icon.
2. Select
Yes, I want to reset to factory settings
.
3.
Tap the
Master Reset
button.
This action returns you to the IQ Installer Start screen.
To revert to factory settings, refer to
Hardware default for details.
System logs
The IQ Pro can send system logs to the server for troubleshooting purposes. No information
identifying the customer is sent.
Select
Auto Upload Logs
to automatically upload system logs every 24 hours.
Log level
allows you to configure the information recorded in the log files.
Refer to the following log level options.
• No log output
• Fatal
•
Error
•
Warn
• Info
• Debug
•
Verbose
Sirens and alarms
Access siren and alarm settings in
Configuration > Installation > Sirens and Alarms
. Edit settings
for the following alarm events.
Table 52: Settings
Setting
Default
Description
Panel Sirens
All
sirens
on
All Sirens Off:
This disables the siren for all alarm types,
except for life safety devices, including any hardwired or
wireless external sirens.
All Sirens On:
This enables the siren for all alarms.
Installer/Test Mode:
This disables the siren for all alarm
types including any paired or hardwired external sirens for
30 minutes, then all sirens are re-enabled.
Note:
Sirens for life safety devices are not disabled.
Fire Verification
Disabled
When enabled, the panel requires two fire events from
smoke detectors (one detector twice or two detectors once
each).
NOTE:
Must be disabled for UL/cUL installations.
Burglary Alarm
Confirmation
Disabled
When enabled, a confirmed alarm requires two sequential
burglary alarms within the
Burglary Alarm Confirmation Timer window.
NOTE:
This
setting is only available when EN Grade 2 is enabled.
69
IQ Pro Alarm Controller Reference Manual Table 52: Settings
Setting
Default
Description
Burglary Alarm
Confirmation Timer
60
Amount of time (in seconds) used for Burglary Alarm
Confirmation.
Severe Weather Siren
Warning
Enabled
When enabled, the siren sounds when the system receives
a severe weather alert. When disabled, the system uses a
severe weather chime.
Dialer Delay
30
Amount of time (in seconds) before the alarm system
attempts call to the central station after an alarm event is
triggered.
When SIA Limits enabled: 15 to 45 seconds.
When SIA Limits disabled: 0 to 254 seconds
Siren Timeout
4
Program how long before the siren stops sounding during
an alarm event (4 minutes to 15 minutes).
NOTE:
For UL/
cUL residential fire/burglary applications the minimum bell
timeout shall be set to 5 min. For UL commercial burglary
installations, minimum bell time out shall be set to 15
minutes.
Water/Freeze/
Temperature
Enabled
When enabled, the siren sounds when a water or freeze
detector is triggered. When disabled, the system emits a
water tone.
Police Panic
Enabled
Allows Police Panic to be enabled.
Fire Panic
Enabled
Allows Fire Panic to be enabled.
Auxiliary Panic
Enabled
Allows Auxiliary Panic to be enabled.
Audible Siren for
Wireless Supervisory
Failures
Disabled
When enabled and the system is armed, supervisory
failures for non-emergency sensors are treated the same as
a tamper and cause an alarm to be generated.
Security and arming
Configure the following security and arming features in
Configuration > Installation > Security
and Arming
.
Table 53: Security settings
Setting
Default
Description
Installer Code
1111
Allows access to installer options only.
Swinger
Shutdown
Enabled
Determines whether the system enables the same sensor
to trigger the alarm more than one time (enabled), or not
(disabled).
Swinger
Shutdown Count
1
Program the number of times the same sensor triggers the
alarm during the same arming period (1-6). Swinger Shutdown
must be enabled in order for this setting to work.
Screen Lock
Disabled
When enabled, a screen lock page appears, restricting access to
the panel unless a valid user code is entered.
NOTE:
This setting
is automatically enabled when Partitions are enabled.
IQ Pro Alarm Controller Reference Manual
70 Table 54: Arming
Setting
Default
Description
Secure Arming
Disabled
Requires a user code for arming the system.
NOTE:
This setting
must be enabled for UL/cUL.
Refuse Arming
when Battery Low
Disabled
When enabled, the alarm system cannot be armed with low
battery (below 8%).
Auto Bypass
Enabled
When enabled, open or tampered sensors are automatically
bypassed.
NOTE:
This setting must be disabled for UL/cUL
installations.
Final Exit Door
Arming
Disabled
When enabled, and the system is armed
Away
then there is
no timed exit delay. Instead, the system is not fully armed until
an Entry/Exit door is opened.
NOTE:
This setting is unavailable
unless EN Grade 2 is enabled.
Auto Stay
Enabled
If the alarm system is armed
Away
but an exit delay door is not
opened, the system changes to
Stay
arm.
Arm Stay No Delay
Enabled
Stay
arms the system immediately with no timer.
Auto Exit Time
Extension
Enabled
Automatically extend the countdown timer if the exit delay
door is opened during a countdown process a second time.
Keyfob Instant
Arming
Enabled
When enabled, turns off the exit delay if a remote key is used to
arm the system.
Keyfob Alarm
Disarm
Disabled
When enabled, a remote key can disarm alarm events except
panic alarms originating from the same remote key.
Keyfob Disarming
Enabled
When enabled, a remote key can disarm the system.
Engineer's Reset
Disabled
If a confirmed alarm occurs on a burglary zone, the system is
locked out after disarming until a 5-digit reset code provided by
the installer is entered.
Table 55: Delay timers
Setting
Default
Description
Normal Entry
Delay
30
The amount of time users have to enter their code after opening
a door (30-240secs).
NOTE:
For UL Commercial Burglary (UL2610) maximum entry
delay must not exceed 60s.
Normal Exit Delay
60
The amount time users have to exit the location before the
system arms itself (30-254secs). Door/Window group 10 follows
the “Normal Exit Delay”
NOTE:
: For UL Commercial Burg
(UL2610) maximum exit delay must not exceed 60s.
Long Entry Delay
100
A second separate entry delay that can be used on a sensor
needing more time when triggered (45-240secs).
Long Exit Delay
120
A second separate exit delay that can be used on a sensor
needing more time when triggered (45-254secs). Door/Window
group 12 follows the “Long Exit Delay”.
71
IQ Pro Alarm Controller Reference Manual Rebooting your system
If the system is experiencing problems, you can often resolve it by resetting the operating system.
Failure to follow these steps correctly could result in data corruption and panel failure.
1. Select
Configuration > Reboot
.
2. Select
Yes, I want to perform this action
.
3.
Tap the
Reboot panel
button and wait for the system to restart.
Date and time
Select
Configuration > Date & Time
to edit the date, time and change the time format.
IQ Pro Alarm Controller Reference Manual
72 Partitions
Access
Configuration > Partitions
to edit users and user names, rename partitions, and view a list
of users or sensors currently assigned to a specific partition.
Note:
Partitions 1, 2, 3 and 4 appear when partitions are enabled under
Configuration >
Dealer Settings > Partitions.
73
IQ Pro Alarm Controller Reference Manual To edit partitions complete the following steps.
1. Select
Configuration > Partitions
.
2.
Select a partition from the list for
Partition setup
.
3.
Tap an option on the list to configure or edit.
Note:
There must be at least one sensor assigned to a partition before it can be viewed or
edited.
Table 56: Partition setup options
Partition option
Description
Arming level
Displays arming status
Name
Enter partition name
Connected devices
View list of connected devices, select device to edit
Connected users
View list of users, select a user to edit
Power down
To turn off power to the system complete the following steps.
1. Go to
About > Power Down
.
2.
Slide the button next to
Yes, I want to perform this action
to the on position.
3.
Tap the
Power Down
button.
Note:
This action powers down the system and cannot be reverted.
Wi-Fi connection
To connect to a Wi-Fi network, complete the following steps.
1.
Enable Wi-Fi if not already active.
IQ Pro Alarm Controller Reference Manual
74 2. Available networks appear in a list.
3.
Select the appropriate network and enter a valid password (if required).
Sound
Configure system and partition sounds, enable/disable voice, chimes, trouble and exit beeps.
Access the sound settings in
Configuration > Sound
.
Table 57: Sound settings
Setting
Default
Description
Voice
Enabled
Configure voice prompt settings for sensors, devices, activity and
system messages.
Chime
Enabled
Enable sensor, system and activity sensor chimes. Indicates whether
the system emits beeps.
Trouble beeps
Disabled
Configure trouble beeps on or off.
Partition
Sounds
Disabled
When partitions are enabled, access this setting to turn chime and
voice on or off in all partitions or in the partition they are assigned.
Exit Beeps
Enabled
Turn exit beeps on or off for Quick exit and Quick access.
Voice settings
This is a global system setting and configures voice prompts for sensors, devices and the system
panel. Access voice settings in
Configuration > Sound > Voice settings
.
75
IQ Pro Alarm Controller Reference Manual Table 58:
Voice settings
Setting
Default
Description
Voices
Enabled
This is a global setting for sensors, panel messages, and
Z-Wave devices. Indicates whether the system emits voice
prompts.
Sensor
Enabled
Turns sensor voice prompts on or off.
Panel
Enabled
Turns system voice prompts on or off.
Activity
monitoring
Enabled
Turns activity monitoring voice prompts on or off.
Chime settings
Configures whether the system or sensors emit a beep. Access voice settings in
Configuration >
Sound > Chime settings
.
Table 59: Chime settings
Setting
Default
Description
All chimes
Enabled
This is a global setting for sensors, panel messages, and Z-wave
devices. Indicates whether the system emits beeps.
Sensor chime
Enabled
Turns sensor chime on or off for all sensors.
Panel
Enabled
Turns system chimes on or off.
Activity
sensor
monitoring
Enabled
Turns activity monitoring sensor chimes on or off.
Trouble beeps
Turn system trouble beeps on or off. Access the trouble beep settings in
Configuration > Sound >
Trouble beeps
.
Table 60:
Trouble beeps settings
Setting
Default
Description
Trouble beeps
Disabled
Turns trouble beeps on or off for all sensor and system troubles.
Sensor low
battery
Disabled
Turn sensor low battery beeps on or off.
Sensor
tamper beeps
Disabled
Turn sensor tamper beeps on or off.
Trouble beep
timeout
30
Set the amount of time between each trouble beep. Length can be set
between 3-60 minutes.
Fire and life
safety devices
Disabled
System emits a trouble beep if a fire safety device is tampered, failed
or has a low battery.
Partition sounds
Turn global partition sounds on or off. Access the partition sounds setting in
Configuration >
Sound > Partition sounds
.
IQ Pro Alarm Controller Reference Manual
76 Table 61: Partition sounds settings
Setting
Default
Description
Global chimes
and voices
Disabled
Configure whether alarms sound in all partitions or only in the partition
they are assigned.
Exit beeps
Turn exit beeps on or off for the Quick access and Quick exit features on the system. The default
setting is enabled.
About
Table 62: About information
Item
Description
Battery
Displays battery status and battery level in %.
Software
Displays software version, build number, Linux and Android OS version.
Hardware
Displays hardware version, manufacturer, PCA serial number, part number, system
configuration, system serial number, RF PIC version, EEPROM format and image
sensor version.
Patches
Details of previous patches applied and last upgrade date..
Panel
Displays Mac address and panel up time.
Cellular
Displays carrier name, cellular connection, cellular strength, IMEI, IMSI, ICCID and
baseband version.
Power G
Displays modem firmware version and build number, radio firmware version and
software ID, and Power G RF band
Ethernet
Displays connection name and IP address
Wi-Fi
Connection, IP address, SSID, Speed and Internet
Corbus
Displays hub type and software version
Dealer branding
Customize the dealer contact information under
Configuration > Dealer Branding > Contact Info
.
Edit dealer name and ID, telephone number, email, web address and tag line content.
Dealer settings
Dealer settings can also be accessed from
Installation Settings
. Refer to
Dealer settings
for
details.
Tests
System tests
The following system tests can be performed to ensure the IQ Pro or IQ Pro P security system is
functioning correctly. To run a specific test, tap the
Test
icon at the bottom of the screen then select
from the available tests.
If you have questions, or if a test results in a
Fail
contact Technical Support.
Wi-Fi test
The Wi-Fi test checks the IQ Pro connection to your network router.
77
IQ Pro Alarm Controller Reference Manual Ensure to connect the panel to the network before running this test.
• Select
Start Test
to begin testing.
A successful test results in a pass and indicates the connection speed, SSID, IP and connection
status.
If the test fails, check the Wi-Fi connection.
SRF sensors test
This test displays the dBm signal strength of each sensor and graphs sensor events against the
ambient noise floor of the environment. Thhis test also displays the traditional packet count
method.
The Advanced Sensor Test shows a summary page of each sensor paired to the panel along with
the average dBm level, the last event’s dBm level and how many packets were received from the
sensor. Select the graph icon to the right of each sensor to view an individual sensor’s graphed
signal strength in real time.
Note:
For UL/ULC, perform a placement test for all wireless devices first. The acceptable result
shall be
Good
.
Cellular test
Test the system's built-in cellular radio connection. You must first activate the radio through
Alarm.com before running this test.
Note:
Cell signal strength is only available after the test has been successfully performed.
To perform a cellular test
• Select
Start
and observe results on the screen.
A successful test indicates the carrier, connection status, IMEI and signal strength.
Power G test
Run a PowerG test to receive the signal strength of your Power G sensor. You can view the average
signal strength over 24 hours.
Strength can be
Strong, Good, Poor
or
No Signal
.
Note:
For UL/ULC installations, the signal strength shall be
Strong
.
Note:
The Power G radio card must be installed to access this option.
Dual-path Wi-Fi test
Dual path connectivity provides you with the option to enable both the cellular and Wi-Fi radios
simultaneously.
Dual-path control
is enabled by default. Slide the control button to the off position
to disable.
You can also perform a Dual-Path Wi- Fi test to ensure that the Dual Path is connecting properly.
Different from the standard Wi-Fi test (which only checks connection to the router), the Dual-path
Wi-Fi test also checks the broadband connection to Alarm.com.
Select
Start
to perform a dual path Wi-Fi test to ensure a proper broadband connection to
Alarm.com.
Note:
The IQ Pro must be connected to a Wi-Fi network to enable the Dual-path option.
Note:
The IQ Pro is compatible with UL/ULC listed monitoring station receivers SG-System I/II/
III/ IV/5. Wi-Fi is for supplemental use only for UL/cUL
Panel test
Perform a panel test to run tests for all panel processes, either simultaneously or one at a time.
IQ Pro Alarm Controller Reference Manual
78 Select
Run
to perform and individual test or
Run All
to test all processes.
Note:
Running all tests at the same time sounds the siren.
Daughter cards test
To test the integrity of the installed daughter cards, tap
Run
and observe results.
If you do not observe a
Pass
result, contact Technical support.
Events
The
Events
page contains logs of events that have occurred on the alarm system beginning with
the most recent.
The
Events
function can record up to 1000 events.
To view
Events
tap the icon at the bottom of the screen to view.
Application settings
To configure settings for your IQ Installer app, access the
Help
menu and view the Privacy Policy,
select the
Application
icon found at the bottom of the screen.
Table 63: Application settings
Setting
Description
Language
Select your preferred language from the drop-down list
Theme
Choose from light or dark theme
Privacy Policy
View the Johnson Controls privacy policy
EULA
View the Johnson Controls end-user license agreement
Help
Access the help menu
Live Events
View the list of events
79
IQ Pro Alarm Controller Reference Manual System operation
Using the keypad
The IQ Pro and IQ Pro P system is compatible with several different keypad types (Compatible
devices).
Using the LCD keypad
Special keys
The scroll symbols
< >
on the LCD displays indicate that options can be viewed by pressing the scroll
keys.
These scroll keys can also be used to position the cursor.
The
*
key is similar in function to the
Enter
key on a keyboard. It is generally used to accept the
existing programming option.
The
#
key is similar in function to the
Escape
key on a keyboard. It is generally used to exit the
current programming section or to return to the previous one.
LED Indicators
Keypads have the following status lights that provide visual indication of basic system status.
Table 64: LED indicators
LED symbol
Name
Description
Ready
Panel is ready to be armed
Armed
Panel is armed
Trouble
System trouble. Enter [*][2] to view troubles.
Power
ON indicates AC is present. OFF indicates AC is absent.
Fire alarm or CO alarm bells silenced
Fire alarms or CO Alarms can be silenced by entering a valid access code.
The message
Fire Alarm/Bells Silenced
or
CO Alarm/Bells Silenced
is displayed on the LCD
keypad that is connected to the corbus.
The message is not cleared until all the fire zones have been restored on system.
Using the IQ Remote keypad
Refer to the IQ Pro User Manual for operating details.
[*] Commands
[*] commands provide convenient access to alarm system features. Refer to the
Table 65 table for
available options.
Table 65: [*] Commands
Command
Description
[*][1]
Bypass zones
[*][2]
View troubles
IQ Pro Alarm Controller Reference Manual
80 Table 65: [*] Commands
Command
Description
[*][3]
View alarms in memory
[*][4]
Door chime on/off
[*][6]
User functions
[*][7]
Command outputs
[*][9]
No-entry arming
[*][0]
Quick arm/exit
[*][1] Bypass zones
The [*][1] command functions differently depending on whether the system is armed or disarmed.
Note:
For UL/ULC listed installations, group bypass is not allowed.
When the alarm system is disarmed
Users can bypass individual zones/sensors or a programmed group of zones using the [*][1]
keypad command. Zones are commonly bypassed if users want to have access to an area while the
partition is armed, or to bypass a defective sensor (bad contact, damaged wiring) until service can
be provided. A bypassed zone does not cause an alarm.
When the partition is disarmed, all zones/sensors that were bypassed using [*][1] are no longer
bypassed, except for 24-hr zones.
Bypassing zones with an LCD keypad
To bypass a zone/sensor with an LCD keypad complete the following steps.
1.
When the system is disarmed, press [*] to enter the function menu.
2.
Press [1] or [*], then enter a valid access code.
3.
Scroll to a zone or key in the three-digit zone number. Only zones enabled for zone bypassing
are displayed. Enter the 3-digit zone number or scroll to the preferred zone and press [*] to
bypass the zone.
4.
To clear a bypassed zone, repeat steps 1 to 4.
5.
To exit Bypass mode, and return to the ready state, press
#
.
Note:
The letter
O
indicates and open zone/sensor. The letter
B
is displayed when a
sensor is bypassed.
[*][2] View troubles
This feature is used to view system troubles. If a trouble is present on an LCD keypad, the trouble
indicator illuminates and an audible indication is emitted (two short beeps every 10 seconds, except
while in AC failure). Silence the audible indicator by pressing
#
. Troubles can be viewed when the
system is armed or disarmed.
The system can be configured to require a user code to view [*][2] system troubles.
To view system troubles press
[*][2]
.
LCD keypads
- scroll to a trouble type then press
[*]
to view details.
IQ Remote/Installer app
- refer to
Troubleshooting
for more information.
81
IQ Pro Alarm Controller Reference Manual Table 66:
LCD keypad [*][2] trouble menu
Trouble
Trouble Description
01
Service Required
02 - Bell Trouble
02
Battery Trouble
01 - Low Battery
04
AC Troubles
01 - Device
07 - System/Panel AC Trouble
Device
Label
05
Device Faults*
01 - Device
Device
Label
06
Device Battery
01 - Device
Device
Label
07
Device Tamper
01 - Device
Device
Label
11
Communications
02 - FTC Trouble
04 - Cellular Trouble
05 - Ethernet Trouble
12
Not Networked
01 - Device
Device
Label
Note:
Device fault is a generic trouble and is used for Aux, RF/corbus, supervisory and low
voltage troubles.
[*][3] Alarm memory
The memory light flashes if an alarm, tamper or fault event occurred during the last armed period
or while the panel was disarmed (24 hour zones).
To view alarms in memory on an LCD keypad, complete the following steps.
1.
Press [*][3].
2.
Press
[#]
to exit.
3.
To clear the memory, arm and disarm the system.
When viewing alarms in memory, LCD keypads indicate the last zone that went into alarm first,
followed by other alarms in numerical order.
[*][4] Door chime enable/disable
When this feature is enabled, the keypad emits a tone whenever an exit/entry is programmed as a
Chime type is opened or closed.
Press [*][4] to enable or disable this feature.
[*][6] User functions
Control sound and brightness of your LCD keypad using the [*][6] commands.
Brightness control
This function is used to change the brightness level of keypad display back lighting. To change the
brightness, complete the following steps.
1. Enter
[*][6]
.
2. Enter a valid access code.
3. Navigate to
Brightness Control
, press
[*]
.
IQ Pro Alarm Controller Reference Manual
82 4.
Use the arrow keys to select the preferred brightness level or enter a value from 00 to 15.
Selecting 00 turns off keypad back lighting.
5.
Press
[#]
.
Contrast control
To change the LCD contrast, complete the following steps.
1.
Press
[*][6]
on the keypad.
2. Enter a valid access code.
3. Navigate to
Contrast Control
and press
[*]
.
4.
Select the preferred contrast level.
5.
Press
[#]
.
Buzzer control
Note:
The keypad buzzer sound level must not be set to 0 for UL/ULC installations.
To control the buzzer volume, complete the following steps.
1.
Press
[*][6]
on the keypad.
2. Enter a valid access code.
3. Navigate to
Buzzer Control
and press
[*]
.
4.
Select the preferred volume level.
5.
Press
[#]
.
[*][7] Command outputs 1-4
This option is used to activate or deactivate command outputs 1 to 4 for each partition.
To activate command outputs on an LCD keypad complete the following steps.
1.
Press
[*][7]
to enter Output Control mode.
2.
Using the arrow keys, navigate to an output and press [*] to select it, or enter a command
output number.
3.
Press
[#]
to exit.
[*][9] No-entry arming
This function is used to arm the alarm system while occupants are on the premises. To activate no-
entry arming complete the following steps.
1.
Press
[*][9]
.
2. Enter a valid access code.
The systems arms without an entry delay on delay type zones and bypasses stay/away and night
type zones.
Note:
Following an exit delay, delay 1 and delay 2 type zones function the same as instant
zones. Stay/away zones remain bypassed. The entry delay can be activated or deactivated at
any time while the system is armed using [*][9].
Note:
If the alarm system is armed using [*][9], disarming is only possible from a keypad
inside the premises unless a wireless key is used.
Note:
Entry of a valid access code is required following [*][9] only when the system is
disarmed.
83
IQ Pro Alarm Controller Reference Manual [*][0] Quick arm/exit
This feature functions differently depending on whether or not the alarm system is armed or
disarmed.
When disarmed
Pressing
[*][0]
arms the alarm system without having to enter an access code.
This provides a fast method of arming for regular users and allows users without an access code to
arm the system.
When armed:
This feature provides a means to exit the premises while the alarm system is armed without having
to disarm then rearm it.
Pressing
[*][0]
starts a 2-minute timer that enables any door programmed as a delay zone to be
opened and closed one time without triggering an alarm.
If the door is not closed at the end of the 2-minute timer, the entry delay sequence begins. Any
additional activity on another zone triggers the associated alarm or delay sequence.
IQ Pro Alarm Controller Reference Manual
84 Working with partitions
A partition is a limited area of the premises that operates independently from the other areas.
Partitioning a system can be beneficial if the property has outbuildings that need to be secured
independently of a main area.
Each partition can have its own keypad or a keypad can have access to all partitions (only if all
partitions belong to the same user code). User access to partitions is controlled with access codes.
A master code can access the entire system and all partitions, while a user code is limited to
assigned partitions.
Setting up a partition requires the following actions.
•
Create the partition
•
Define the bell/siren operation
•
Assign keypads
• Assign zones
• Assign users
Setting up partitions
Partitions are added or removed using the IQ Installer App.
Bell/siren operation
Each partition must have a siren. The system siren connected to the bell output of the alarm
controller can be mounted in a central location within hearing range of all partitions. Only assigned
partitions can also have wireless sirens activated.
Single siren output operation
With a siren shared across all partitions, control over activation/deactivation of the output depends
on the partition that initiated the alarm sequence. Only the partition that originated the alarm can
deactivate the bell output.
Global zones, such as smoke detectors shared by multiple partitions, can deactivate the siren on all
partitions to which the zone is assigned.
Multiple siren output operation
When multiple sirens are used in the installation, they can be programmed to sound alarm
conditions for all partitions, or for individual partitions by using a partition enable mask. If
hardwired sirens are used, this is accomplished with a corbus power supply module with a
supervised high-current output. The output is then programmed as a Fire and Burglary PGM output
type.
Note:
Only the first output of the HSM2204 output module has bell supervision. Some
conditions, such as an installer system test, may override the partition assignment and cause
all sirens to activate. User system tests only activate the sirens/outputs assigned to that
partition.
Interconnected smoke detector operation
When the Fire Alarm toggle is enabled on a zone with a PowerG smoke detector, any fire alarm on
a partition assigned to the detector activates the sounder. Global fire alarms activate the sounder
on all smoke detectors. The sounder on interconnected smoke detectors follows the panel bell for
duration of activation. If this option is disabled, interconnected smoke detectors continue to sound
the alarm until the bell is deactivated on the panel.
85
IQ Pro Alarm Controller Reference Manual The following alarm types cause interconnected smoke alarms to sound:
•
Fire zones
•
[F] key alarms
•
Wire smoke input
Keypad partition setup
Keypads can be configured to control an individual partition or all partitions. In general, a partition
keypad only controls the partition to which it is assigned.
Hardware default
To perform a hardware default, complete the following steps.
1.
Turn the IQ Pro system off by removing AC and battery power.
2.
Remove all wiring between Zone 1 and PGM 1 on the alarm controller.
3. Connect a short between Zone 1 and PGM 1.
4.
Turn on the system, a solid green LED lights and the system automatically resets.
5.
Wait until the system is back on fully, and the solid green LED is on for a minimum 10
seconds.
6.
Turn the system off by removing the AC and battery.
7.
Remove the short.
8.
Turn the system on again, with AC and battery connected. Factory settings are restored.
IQ Pro Alarm Controller Reference Manual
86 Troubleshooting
To perform a local update of the firmware, refer to the IQ Installer app.
The following table describes the trouble states that the module can detect. Refer to [*][2] View
troubles
for additional trouble associated with LED/LCD keypads.
Table 67:
IQ Installer Troubleshooting
Trouble
Trouble Description
Loss of AC
Ensure that there is power to the module, and that the voltage is between the 16
VDC to 20 VDC range at the transformer output.
Module tamper
Ensure that the back tamper plastic is in place and that the front cover of the
enclosure is correctly secured.
Zone fault
Ensure that the zone is correctly wired and ensure that the zone EOL is correctly
programmed.
Aux
Short or overload:
There is a short or overload on the AUX terminals.
Low voltage:
The output voltage is below 9.8 VDC.
Low battery
The battery voltage is below the low battery threshold of 11.5 VDC.
No battery
There is no current detected on the battery terminals.
Fail to Enroll
Press and hold the
Enroll
push button for 10 seconds to reset the module, then
attempt to enroll again.
Bell circuit
The bell circuit is open. The load is less than 1 kΩ.
87
IQ Pro Alarm Controller Reference Manual Regulatory Approvals
This product is UL/ULC listed under the following categories: AM QE/AMCX7 Central Stations
Alarm Units, UTOU/UTOU7 Control Units and Accessories, Household System Type, NBSX/NBSX7
Household Burglar Alarm System Units and MULQ Home Health Care Signaling Equipment. For
further information on this product’s listings, also refer to the official listing guides published at the
UL website (www.ul.com) under UL Product IQ.
This control panel is suitable for the following UL installations: UL/ULC Residential Fire and
Burglary, UL Home Health Care Control Unit, UL Central Station, Police Station, Mercantile Safe and
Vaults Control Unit, ULC Security Level I, II. Signaling Means PSDN (UL Standard/Encrypted Line
Security and ULC Passive P1/Active A1-3), use with Internal Ethernet/Wi-Fi/Cellular communicator.
UL/ULC Residential Fire, Burglary and Home Health Care
The models IQ Pro and IQ Pro P have been tested and found in compliance with the following
standards: UL1023 Household Burglar-Alarm System Units, UL985 Household Fire Warning System
Units, UL1637 Home Health Care Signaling Equipment, ULC-S545 Residential Fire Warning Systems
Control Units and ULC-S304 Security Level I Control Units, Accessories and Receiving Equipment for
Intrusion Alarm Systems.
For ULC Residential Fire Installations refer to the Standard for the Installation of Residential Fire
Warning Systems, CAN/ULC-S540:
•
All input zones shall be configured with SEOL or DEOL configuration. Use model EOLR-2
•
Use only the compatible power supply referenced in this Installation Manual. 24 h standby
power must be provided for fire and home health care applications and 4h for burglary only
applications (AC trouble must be transmitted to SRC within 60 minutes).
•
Priority of signals on the Panel is set as Fire, CO, Burg, Panic, Aux and then Flood.
•
Use at least one compatible listed Smoke Detector for Fire Installations.
•
The entry delay shall not exceed 45 sec (UL) and 180 sec (ULC Security Level 1).
•
The exit delay shall not exceed 120 seconds (UL).
•
The control panel supports the Temporal 3 pattern for fire alarm and Temporal 4 for CO
alarm notification.
•
The minimum Bell Time-out is 4 minutes for UL/ULC residential burglary installations. For
ULC Residential Fire installations, minimum bell time-out is 5 min. For UL Home Health Care
installations, minimum bell time-out is 5 min.
•
A code shall be required for bypassing zones
•
Audible trouble indication shall be enabled
•
AC trouble indication LED shall be enabled
•
For UL residential fire installations, a code shall be required to view the [*][2] trouble menu
•
For UL Residential Fire applications, latching troubles shall be enabled
•
For fire and CO applications, RM-1(C) or RM-2 power loop supervision relay shall be
connected to AUX2 Power Output to report wiring faults if it is used for powering fire/CO
detection devices
•
Test transmission cycle shall be set for 7 days transmission for UL Residential Fire
applications, or 30 days for UL Residential Burglary only applications.
IQ Pro Alarm Controller Reference Manual
88 •
For UL residential fire and home health care applications, there must be at least two UL listed
compatible keypads (one of either one of the models HS2LCDWF(P)(V)9 or HS2LCD(P), or
HS2LCDRFP9 shall be used). Hardwired models shall have communication bus wiring directly
connected to the RED/BLK/YEL/GRN located on the main control panel board assembly.
•
If a Wireless Repeater is required to be employed with RF Smoke Detectors or CO Detectors,
two repeaters must be installed to cover each Smoke Detector and/or each CO detector.
Note:
For ULC Residential Fire and Burglary (ULC-S304 Level I) installations set for
daily test transmission. Wireless Supervision window shall be set to 4 hours for UL/ULC
Residential Fire Installations. Wireless Supervision window shall be set to 24 hours for
Residential Burglary Installations only. RF Jam detection shall be enabled. For UL 985 6th
Ed. Compliant installations using also the Wi-Fi connection or Ethernet, ensure Power
for network equipment such as hubs, switches, routers, servers, modems, etc., is backed
up or powered by an uninterruptible power supply (UPS), standby battery or the control
unit, capable of facilitating 24 h standby.
For UL Residential Fire applications the following guidelines shall be respected when the equipment
is used as a combination alarm system for fire and burglary protection:
•
Fire alarm detection devices shall not be powered from the same AUX output (control panel,
zone expander, power supply) as burglary alarm initiating devices.
•
Power supply wiring for Fire Alarm Detection devices (Smoke Detectors, CO Detectors) shall
be connected to the control panel AUX2 output (located on the main control panel board
assembly).
•
Power supply wiring for Burglary Alarm Initiating devices (Motion detectors, magnetic
contacts, glass break detectors, etc.) shall be connected to the AUX 1 or to the compatible
power supply modules AUX outputs (located on the power supply module board assembly
e.g. HSM2300, HSM2204) or Expander Modules AUX outputs (located on the expander
module board assembly e.g. HSM2108, HSM2208) when these are not used for powering fire
alarm initiating devices.
IQ Pro shall use only combinations of maximum two daughter radio cards in the available slots.
The available radio cards for UL resi fire (UL985) and residential burglary applications (UL1023) are:
PowerG, SRF319, SRF345, SRF433 (DSC protocol). The PowerG, SRF319, SRF345, SRF433 cards along
with the compatible devices are ULC listed for use in residential fire applications as per ULC-S545
and residential burglary applications as per ULC-S304 Security Level I.
UL/ULC Commercial Burglary
The models IQ Pro and IQ Pro P have been tested and found in compliance with the following
standards: UL2610 Central Station Burglar-Alarm Units and ULC-S304 Control Units, Accessories and
Receiving Equipment for Intrusion Alarm Systems, Security Levels I-II.
The subscriber control unit shall provide for the connection of protective wiring, conductors, and
attachments in accordance with the Standard for Installation and Classification of Burglar and
Holdup Alarm Systems, UL 681 in USA and in accordance with ULC-S301, CSA C22.1, Canadian
Electrical Code, Part I, Safety Standard for Electrical Installations and ULC-S302 Standard for the
Installation, Inspection and Testing of Intrusion Alarm Systems, in Canada. Recommended testing
shall be at least once a year.
Note:
This product is not intended for installation outdoors or outside the protected premises.
This product is UL/ULC listed under the following categories: AMCE/AMCX7 Central Stations
Alarm Units, UTOU/UTOU7 Control Units and Accessories, Household System Type NBSX/NBSX7
Household Burglar Alarm System Units. For further information on this product’s listings please
89
IQ Pro Alarm Controller Reference Manual also refer to the official listing guides published at the UL website (www.ul.com) under Online
Directory Section.
Programming
The notes in the Installation Manual describing the system configurations for UL/ULC listed
installations shall be implemented. RF Jam detection shall be enabled. Use of the Bell/Siren is for
supplementary use. When used, the bell timeout shall be programmed for 15 minutes minimum.
Note:
The communication medium between protected property and communications service
provider shall be for the exclusive use of the protected property and is not to be shared with
other communications service provider subscribers..
Use only PowerG for UL/ULC Commercial Burglary installations. Require valid user code to arm this
system must be enabled.
UL2610 Central Station with Standard or Encrypted Line Security Service and ULC-S304 Security
Level I-II/A3 Active communication channel:
•
The installation must use the integral cellular communicator, which sends events over
Cellular Data Network to the compatible Sur-Gard System I/II/III/IV/5 receiver.
•
The communicationpath supervision window is set to 180s with 90s heartbeat and the
compromise detection takes place within 3 minutes. The panel is using encrypted line
security AES256. NIST certificate A2354.
•
Wireless Supervision window shall be enabled and set to 4 hours.
•
Open/Closing acknowledgment shall be enabled.
•
For ULC-S304 compliant installations also using the Wi-Fi connection, ensure Power
fornetwork equipment such as hubs, switches, routers, servers, modems, etc., is backed up
or powered by an uninterruptible power supply (UPS), standby battery or the control unit,
capable of facilitating 24 h standby.
•
The entry delay shall not exceed 60s (UL) and 60s (ULC Security Level II).
•
The exit delay shall not exceed 60s (UL) and 45s (ULC Security Level II).
Note:
For UL certified Commercial Burglary Central Station applications the IQ Pro provides
an acknowledgment signal to the user interface to confirm that a normal closing signal has
been received once the system has been armed. The device causes an audible indication at
the keypad (8 rapid beeps), when it receives the acknowledgment signal transmitted from the
monitoring station compatible receiver.
Protection of the Control Unit
The local control unit and the local power supply must be protected in one of the following ways:
•
The control unit and audible alarm device must be in a protected area which is armed 24
hours a day.
• • Each partition must arm the area protecting the control unit and the audible alarm device
power supply. This may require duplicate protection armed by each partition. Access to this
protected area, without causing an alarm, will require that all partitions be disarmed.
•
In all cases described above, the protected area for the control unit must be programmed as
not-bypassable.
For installations employing packet switched (network) communications such as Cellular/Wi-Fi the
following recommendations shall be followed:
•
Select the Internet Service Providers that have redundant servers/systems and back-up
power.
IQ Pro Alarm Controller Reference Manual
90 •
Routers shall have Firewalls enabled and methods to identify and protect against “Denial of
Service” attacks (i.e. via
“spoofing”).
• • For UL Commercial Burglary applications the loss of communication with the monitoring
station shall be treated as an alarm condition by monitoring station personnel when the
burglar alarm system is in the armed state, and as a trouble condition while the system is
disarmed. Packet switched data network (PSDN) interface equipment, manufactured by
other than the burglar alarm equipment manufacturer, that is not provided with the burglar
alarm system and/or not required for the processing of the signals shall be evaluated to the
applicable requirements of the Standard for Information Technology Equipment - Safety
- Part 1: General Requirements, UL 60950-1, or the Standard for Audio/Video, Information
and Communication Technology Equipment - Part 1: Safety Requirements, UL 62368-1, as
communication equipment. Any network interface device which adds value or manipulates
the original data packet such as changing transmission formats, adding encryption, and the
like, shall comply with the applicable requirements noted in this standard..
User information
• The installer should advise the user and note in the User’s Manual.
•
Service organization name and telephone number.
•
The programmed exit and entry time
• Instructions to test system weekly
• Note that the installer code cannot arm or disarm the system
•
The installer should caution the user not to give system information (e.g., codes, bypass
methods, etc.) to casual users (e.g., service people) and to only give out codes set to expire
within 24 hours
•
Identification of the conditions that might be expected to result in false alarms or impaired
operation of the product(s): arming the system and not respecting the exit delay, entering
the protected premises, and not respecting the entry delay for disarming the system can
cause false alarms..
FCC-ISED Canada Compliance Statement
CAN ICES-3 (B) / NMB-3 (B)
IMPORTANT:
Changes or modifications not expressly approved by Tyco Security Products Canada
Ltd.. could void the user’s authority to operate the equipment.
CAUTION!
This equipment complies with radiation exposure limits set forth for uncontrolled
environment. The antenna(s) used for these transmitters must be installed to provide a separation
distance of at least 20 cm from all persons and must not be collocated or operating in conjunction
with any other antenna or transmitter.
This device complies with Part 15 of the FCC Rules. Operation is subject to the following two
conditions: (1) this device may not cause harmful interference, and (2) this device must accept any
interference received, including interference that may cause undesired operation.
This equipment has been tested and found to comply with the limits for a Class B digital device,
pursuant to part 15 of the FCC Rules. These limits are designed to provide reasonable protection
against harmful interference in a residential installation. This equipment generates, uses and can
radiate radio frequency energy and, if not installed and used in accordance with the instructions,
may cause harmful interference to radio communications. However, there is no guarantee that
interference will not occur in a particular installation. If this equipment does cause harmful
91
IQ Pro Alarm Controller Reference Manual interference to radio or television reception, which can be determined by turning the equipment
off and on, the user is encouraged to try to correct the interference by one or more of the following
measures:
•
Reorient or relocate the receiving antenna.
•
Increase the separation between the equipment and receiver.
•
Connect the equipment into an outlet on a circuit different from that to which the receiver is
connected.
•
Consult the dealer or an experienced radio/TV technician for help.
Déclaration d'exposition aux radiations:
Cet équipement est conforme aux limites d'exposition aux rayonnements ISED Canada établies
pour un environnement non contrôlé. Cet équipement doit être installé et utilisé avec un minimum
de 20 cm de distance entre la source de rayonnement et votre corps.
Le présent appareil est conforme aux CNR d'Industrie Canada applicables aux appareils radio
exempts de licence. L'exploitation est autorisée aux deux conditions suivantes:
1. l'appareil ne doit pas produire de brouillage, et
2. l'utlisateur de l'appareil doit accepter tout brouillage radioélectrique subi, même si le brouillage
est susceptible d'en compromettre le fonctionnement.
Cet appareil et son antenne ne doivent pas être situés ou fonctionner en conjonction avec une
autre antenne ou un autre émetteur, exception faites des radios intégrées qui ont été testées.
Recycling and Disposal
Dispose in accordance with applicable legislation. This product must be disposed of separately
from general household waste. Take it to a designated waste collection point in your area for
safe disposal or recycling in accordance with US and Canadian National, Regional, State and
Local Regulations and Laws. By doing this, conservation of natural resources, protection of the
environment and human health occurs.
IQ Pro Alarm Controller Reference Manual
92 Locating detectors and escape plan
The following information is for general guidance only, consult local fire codes and regulations
when locating and installing smoke and CO alarms.
Smoke Detectors
Research has shown that all hostile fires in homes generate smoke to a greater or lesser extent.
Experiments with typical fires in homes indicate that detectable quantities of smoke precede
detectable levels of heat in most cases. For these reasons, smoke alarms should be installed
outside of each sleeping area and on each story of the home. Additional smoke alarms beyond
those required for minimum protection should be installed.
Additional areas that should be protected include: the basement; bedrooms, especially where
smokers sleep; dining rooms; furnace and utility rooms; and any hallways not protected by the
required units. On smooth ceilings, detectors may be spaced 9.1 m (30 feet) apart as a guide.
Other spacing may be required depending on ceiling height, air movement, the presence of joists,
uninsulated ceilings, etc. Consult National Fire Alarm Code NFPA 72, CAN/ULC-S553-02 or other
appropriate national standards for installation recommendations.
•
Do not locate smoke detectors at the top of peaked or gabled ceilings; the dead air space in
these locations may prevent the unit from detecting smoke.
•
Avoid areas with turbulent air flow, such as near doors, fans or windows. Rapid air movement
around the detector may prevent smoke from entering the unit.
•
Do not locate detectors in areas of high humidity.
•
Do not locate detectors in areas where the temperature rises above 38ºC (100ºF) or falls
below 5ºC (41ºF).
Smoke detectors should always be installed in USA in accordance with Chapter 29 of NFPA 72, the
National Fire Alarm Code.
Where required by applicable laws, codes, or standards for a specific type of occupancy, approved
single- and multiple-station smoke alarms shall be installed as follows:
1.
In all sleeping rooms and guest rooms.
2.
Outside of each separate dwelling unit sleeping area, within 6.4 m (21 ft) of any door to a
sleeping room, the distance measured along a path of travel.
3.
On every level of a dwelling unit, including basements.
4.
On every level of a residential board and care occupancy (small facility), including basements
and excluding crawl spaces and unfinished attics.
5.
In the living area(s) of a guest suite.
6.
In the living area(s) of a residential board and care occupancy (small facility).
93
IQ Pro Alarm Controller Reference Manual Figure 1
Figure 2
Figure 3
Figure 3a
Figure 4
Fire Escape Planning
There is often very little time between the detection of a fire and the time it becomes deadly. It is
thus very important that a family escape plan be developed and rehearsed.
1.
Every family member should participate in developing the escape plan.
2.
Study the possible escape routes from each location within the house. Since many fires occur
at night, special attention should be given to the escape routes from sleeping quarters.
3.
Escape from a bedroom must be possible without opening the interior door.
Consider the following when making your escape plans:
•
Make sure that all border doors and windows are easily opened. Ensure that they are not
painted shut, and that their locking mechanisms operate smoothly.
•
If opening or using the exit is too difficult for children, the elderly or handicapped, plans for
rescue should be developed. This includes making sure that those who are to perform the
rescue can promptly hear the fire warning signal.
•
If the exit is above the ground level, an approved fire ladder or rope should be provided as
well as training in its use.
•
Exits on the ground level should be kept clear. Be sure to remove snow from exterior patio
doors in winter; outdoor furniture or equipment should not block exits.
•
Each person should know the predetermined assembly point where everyone can be
accounted for (e.g., across the street or at a neighbor's house). Once everyone is out of the
building, call the fire department.
•
A good plan emphasizes quick escape. Do not investigate or attempt to fight the fire, and
do not gather belongings as this can waste valuable time. Once outside, do not re-enter the
house. Wait for the fire department.
•
Write the fire escape plan down and rehearse it frequently so that should an emergency
arise, everyone will know what to do. Revise the plan as conditions change, such as the
number of people in the home, or if there are changes to the building’s construction.
•
Make sure your fire warning system is operational by conducting weekly tests. If you are
unsure about system operation, contact your installer.
IQ Pro Alarm Controller Reference Manual
94 •
We recommend that you contact your local fire department and request further information
on fire safety and escape planning. If available, have your local fire prevention officer conduct
an in-house fire safety inspection.
Figure 5
Carbon Monoxide Detectors
Carbon monoxide is colorless, odorless, tasteless, and very toxic, it also moves freely in the air. CO
detectors can measure the concentration and sound a loud alarm before a potentially harmful level
is reached. The human body is most vulnerable to the effects of CO gas during sleeping hours;
therefore, CO detectors should be located in or as near as possible to sleeping areas of the home.
For maximum protection, a CO alarm should be located outside primary sleeping areas or on each
level of your home. Figure 5 indicates the suggested locations in the home.
Do NOT place the CO alarm in the following areas:
•
Where the temperature may drop below -10ºC or exceed 40ºC
• Near paint thinner fumes
•
Within 5 feet (1.5 m) of open flame appliances such as furnaces, stoves and fireplaces
•
In exhaust streams from gas engines, vents, flues or chimneys
•
In close proximity to an automobile exhaust pipe; this will damage the detector
PLEASE REFER TO THE CO DETECTOR INSTALLATION AND OPERATING INSTRUCTION SHEET FOR
SAFETY INSTRUCTIONS AND EMERGENCY INFORMATION.
95
IQ Pro Alarm Controller Reference Manual Legal
Limited warranty
Limited warranty
Digital Security Controls (DSC) warrants the original purchaser that for a period of twelve months
from the date of purchase, the product shall be free of defects in materials and workmanship under
normal use. During the warranty period, DSC shall, at its option, repair or replace any defective
product upon return of the product to its factory, at no charge for labour and materials. Any
replacement and/or repaired parts are warranted for the remainder of the original warranty or
ninety (90) days, whichever is longer. The original purchaser must promptly notify DSC in writing
that there is defect in material or workmanship, such written notice to be received in all events
prior to expiration of the warranty period. There is absolutely no warranty on software and all
software products are sold as a user license under the terms of the software license agreement
included with the product. The Customer assumes all responsibility for the proper selection,
installation, operation and maintenance of any products purchased from DSC. Custom products
are only warranted to the extent that they do not function upon delivery. In such cases, DSC can
replace or credit at its option.
International Warranty
The warranty for international customers is the same as for any customer within Canada and the
United States, with the exception that DSC shall not be responsible for any customs fees, taxes, or
VAT that may be due.
Warranty Procedure
To obtain service under this warranty, please return the item(s) in question to the point of
purchase. All authorized distributors and dealers have a warranty program. Anyone returning
goods to Digital Security Controls must first obtain an authorization number. Digital Security
Controls will not accept any shipment whatsoever for which prior authorization has not been
obtained.
Conditions to Void Warranty
This warranty applies only to defects in parts and workmanship relating to normal use. It does not
cover:
•
damage incurred in shipping or handling;
•
damage caused by disaster such as fire, flood, wind, earthquake or lightning;
•
damage due to causes beyond the control of DSC such as excessive voltage, mechanical
shock or water damage;
•
damage caused by unauthorized attachment, alterations, modifications or foreign objects;
•
damage caused by peripherals (unless such peripherals were supplied by DSC );
•
defects caused by failure to provide a suitable installation environment for the products;
•
damage caused by use of the products for purposes other than those for which it was
designed;
•
damage from improper maintenance;
•
damage arising out of any other abuse, mishandling or improper application of the products.
Items Not Covered by Warranty
In addition to the items which void the Warranty, the following items shall not be covered by
Warranty: (i) freight cost to the repair centre; (ii) products which are not identified with DSC's
product label and lot number or serial number; (iii) products disassembled or repaired in such a
manner as to adversely affect performance or prevent adequate inspection or testing to verify any
IQ Pro Alarm Controller Reference Manual
96 warranty claim. Access cards or tags returned for replacement under warranty will be credited or
replaced at DSC's option. Products not covered by this warranty, or otherwise out of warranty due
to age, misuse, or damage shall be evaluated, and a repair estimate shall be provided. No repair
work will be performed until a valid purchase order is received from the Customer and a Return
Merchandise Authorization number (RMA) is issued by DSC's Customer Service. Digital Security
Controls' liability for failure to repair the product under this warranty after a reasonable number
of attempts will be limited to a replacement of the product, as the exclusive remedy for breach of
warranty. Under no circumstances shall DSC be liable for any special, incidental, or consequential
damages based upon breach of warranty, breach of contract, negligence, strict liability, or any
other legal theory. Such damages include, but are not limited to, loss of profits, loss of the product
or any associated equipment, cost of capital, cost of substitute or replacement equipment, facilities
or services, down time, purchaser’s time, the claims of third parties, including customers, and injury
to property. The laws of some jurisdictions limit or do not allow the disclaimer of consequential
damages. If the laws of such a jurisdiction apply to any claim by or against DSC, the limitations and
disclaimers contained here shall be to the greatest extent permitted by law. Some states do not
allow the exclusion or limitation of incidental or consequential damages, so that the above may not
apply to you.
Disclaimer of Warranties
This warranty contains the entire warranty and shall be in lieu of any and all other warranties,
whether expressed or implied (including all implied warranties of merchantability or fitness for a
particular purpose) and of all other obligations or liabilities on the part of Digital Security Controls.
Digital Security Controls neither assumes responsibility for, nor authorizes any other person
purporting to act on its behalf to modify or to change this warranty, nor to assume for it any other
warranty or liability concerning this product. This disclaimer of warranties and limited warranty are
governed by the laws of the province of Ontario, Canada.
WARNING:
Digital Security Controls recommends that the entire system be completely tested
on a regular basis. However, despite frequent testing, and due to, but not limited to, criminal
tampering or electrical disruption, it is possible for this product to fail to perform as expected.
Out of Warranty Repairs
Digital Security Controls will at its option repair or replace out-of-warranty products which are
returned to its factory according to the following conditions. Anyone returning goods to Digital
Security Controls must first obtain an authorization number. Digital Security Controls will not
accept any shipment whatsoever for which prior authorization has not been obtained. Products
which Digital Security Controls determines to be repairable will be repaired and returned. A set fee
which Digital Security Controls has predetermined and which may be revised from time to time,
will be charged for each unit repaired. Products which Digital Security Controls determines not to
be repairable will be replaced by the nearest equivalent product available at that time. The current
market price of the replacement product will be charged for each replacement unit.
WARNING - READ CAREFULLYNote to Installers
This warning contains vital information. As the only individual in contact with system users, it is
your responsibility to bring each item in this warning to the attention of the users of this system.
System Failures
This system has been carefully designed to be as effective as possible. There are circumstances,
however, involving fire, burglary, or other types of emergencies where it may not provide
protection. Any alarm system of any type may be compromised deliberately or may fail to operate
as expected for a variety of reasons. Some but not all of these reasons may be:
Inadequate Installation
A security system must be installed properly in order to provide adequate protection. Every
installation should be evaluated by a security professional to ensure that all access points and areas
are covered. Locks and latches on windows and doors must be secure and operate as intended.
97
IQ Pro Alarm Controller Reference Manual Windows, doors, walls, ceilings and other building materials must be of sufficient strength and
construction to provide the level of protection expected. A reevaluation must be done during
and after any construction activity. An evaluation by the fire and/or police department is highly
recommended if this service is available.
Criminal Knowledge
This system contains security features which were known to be effective at the time of
manufacture. It is possible for persons with criminal intent to develop techniques which reduce the
effectiveness of these features. It is important that a security system be reviewed periodically to
ensure that its features remain effective and that it be updated or replaced if it is found that it does
not provide the protection expected.
Access by Intruders
Intruders may enter through an unprotected access point, circumvent a sensing device, evade
detection by moving through an area of insufficient coverage, disconnect a warning device, or
interfere with or prevent the proper operation of the system.
Power Failure
Control units, intrusion detectors, smoke detectors and many other security devices require an
adequate power supply for proper operation. If a device operates from batteries, it is possible for
the batteries to fail. Even if the batteries have not failed, they must be charged, in good condition
and installed correctly. If a device operates only by AC power, any interruption, however brief, will
render that device inoperative while it does not have power. Power interruptions of any length
are often accompanied by voltage fluctuations which may damage electronic equipment such as a
security system. After a power interruption has occurred, immediately conduct a complete system
test to ensure that the system operates as intended.
Failure of Replaceable Batteries
This system’s wireless transmitters have been designed to provide several years of battery life
under normal conditions. The expected battery life is a function of the device environment,
usage and type. Ambient conditions such as high humidity, high or low temperatures, or large
temperature fluctuations may reduce the expected battery life. While each transmitting device has
a low battery monitor which identifies when the batteries need to be replaced, this monitor may fail
to operate as expected. Regular testing and maintenance will keep the system in good operating
condition.
Compromise of Radio Frequency (Wireless) Devices
Signals may not reach the receiver under all circumstances which could include metal objects
placed on or near the radio path or deliberate jamming or other inadvertent radio signal
interference.
System Users
A user may not be able to operate a panic or emergency switch possibly due to permanent or
temporary physical disability, inability to reach the device in time, or unfamiliarity with the correct
operation. It is important that all system users be trained in the correct operation of the alarm
system and that they know how to respond when the system indicates an alarm.
Smoke Detectors
Smoke detectors that are a part of this system may not properly alert occupants of a fire for a
number of reasons, some of which follow. The smoke detectors may have been improperly installed
or positioned. Smoke may not be able to reach the smoke detectors, such as when the fire is in
a chimney, walls or roofs, or on the other side of closed doors. Smoke detectors may not detect
smoke from fires on another level of the residence or building. Every fire is different in the amount
of smoke produced and the rate of burning. Smoke detectors cannot sense all types of fires equally
well. Smoke detectors may not provide timely warning of fires caused by carelessness or safety
hazards such as smoking in bed, violent explosions, escaping gas, improper storage of flammable
IQ Pro Alarm Controller Reference Manual
98 materials, overloaded electrical circuits, children playing with matches or arson. Even if the smoke
detector operates as intended, there may be circumstances when there is insufficient warning to
allow all occupants to escape in time to avoid injury or death.
Motion Detectors
Motion detectors can only detect motion within the designated areas as shown in their respective
installation instructions. They cannot discriminate between intruders and intended occupants.
Motion detectors do not provide volumetric area protection. They have multiple beams of detection
and motion can only be detected in unobstructed areas covered by these beams. They cannot
detect motion which occurs behind walls, ceilings, floor, closed doors, glass partitions, glass
doors or windows. Any type of tampering whether intentional or unintentional such as masking,
painting, or spraying of any material on the lenses, mirrors, windows or any other part of the
detection system will impair its proper operation. Passive infrared motion detectors operate by
sensing changes in temperature. However their effectiveness can be reduced when the ambient
temperature rises near or above body temperature or if there are intentional or unintentional
sources of heat in or near the detection area. Some of these heat sources could be heaters,
radiators, stoves, barbeques, fireplaces, sunlight, steam vents, lighting and so on.
Warning Devices
Warning devices such as sirens, bells, horns, or strobes may not warn people or waken someone
sleeping if there is an intervening wall or door. If warning devices are located on a different level
of the residence or premise, then it is less likely that the occupants will be alerted or awakened.
Audible warning devices may be interfered with by other noise sources such as stereos, radios,
televisions, air conditioners or other appliances, or passing traffic. Audible warning devices,
however loud, may not be heard by a hearing-impaired person.
Telephone Lines
If telephone lines are used to transmit alarms, they may be out of service or busy for certain
periods of time. Also an intruder may cut the telephone line or defeat its operation by more
sophisticated means which may be difficult to detect.
Insufficient Time
There may be circumstances when the system will operate as intended, yet the occupants will
not be protected from the emergency due to their inability to respond to the warnings in a timely
manner. If the system is monitored, the response may not occur in time to protect the occupants or
their belongings.
Component Failure
Although every effort has been made to make this system as reliable as possible, the system may
fail to function as intended due to the failure of a component.
Inadequate Testing
Most problems that would prevent an alarm system from operating as intended can be found by
regular testing and maintenance. The complete system should be tested weekly and immediately
after a break-in, an attempted break-in, a fire, a storm, an earthquake, an accident, or any kind of
construction activity inside or outside the premises. The testing should include all sensing devices,
keypads, consoles, alarm indicating devices and any other operational devices that are part of the
system.
Security and Insurance
Regardless of its capabilities, an alarm system is not a substitute for property or life insurance.
An alarm system also is not a substitute for property owners, renters, or other occupants to act
prudently to prevent or minimize the harmful effects of an emergency situation.
IMPORTANT - READ CAREFULLY:
99
IQ Pro Alarm Controller Reference Manual DSC Software purchased with or without Products and Components is copyrighted and is
purchased under the following license terms:
•
This End-User License Agreement (“EULA”) is a legal agreement between You (the company,
individual or entity who acquired the Software and any related Hardware) and Digital Security
Controls, a division of Tyco Safety Products Canada Ltd. (“DSC”), the manufacturer of the
integrated security systems and the developer of the software and any related products or
components (“HARDWARE”) which You acquired.
•
If the DSC software product (“SOFTWARE PRODUCT” or “SOFTWARE”) is intended to be
accompanied by HARDWARE, and is NOT accompanied by new HARDWARE, You may not
use, copy or install the SOFTWARE PRODUCT. The SOFTWARE PRODUCT includes computer
software, and may include associated media, printed materials, and “online” or electronic
documentation.
•
Any software provided along with the SOFTWARE PRODUCT that is associated with a separate
end-user license agreement is licensed to You under the terms of that license agreement.
•
By installing, copying, downloading, storing, accessing or otherwise using the SOFTWARE
PRODUCT, You agree unconditionally to be bound by the terms of this EULA, even if this EULA
is deemed to be a modification of any previous arrangement or contract. If You do not agree
to the terms of this EULA, DSC is unwilling to license the SOFTWARE PRODUCT to You, and
You have no right to use it.
Software produce license
Software product license
The SOFTWARE PRODUCT is protected by copyright laws and international copyright treaties, as
well as other intellectual property laws and treaties. The SOFTWARE PRODUCT is licensed, not sold.
1. GRANT OF LICENSE This EULA grants You the following rights:
(a) Software Installation and Use - For each license You acquire, You may have only one copy of the
SOFTWARE PRODUCT installed.
(b) Storage/Network Use - The SOFTWARE PRODUCT may not be installed, accessed, displayed, run,
shared or used concurrently on or from different computers, including a workstation, terminal or
other digital electronic device (“Device”). In other words, if You have several workstations, You will
have to acquire a license for each workstation where the SOFTWARE will be used.
(c) Backup Copy - You may make back-up copies of the SOFTWARE PRODUCT, but You may only
have one copy per license installed at any given time. You may use the back-up copy solely for
archival purposes. Except as expressly provided in this EULA, You may not otherwise make copies of
the SOFTWARE PRODUCT, including the printed materials accompanying the SOFTWARE.
2. DESCRIPTION OF OTHER RIGHTS AND LIMITATIONS
(a) Limitations on Reverse Engineering, Decompilation and Disassembly - You may not reverse
engineer, decompile, or disassemble the SOFTWARE PRODUCT, except and only to the extent that
such activity is expressly permitted by applicable law notwithstanding this limitation. You may not
make any changes or modifications to the Software, without the written permission of an officer
of DSC. You may not remove any proprietary notices, marks or labels from the Software Product.
You shall institute reasonable measures to ensure compliance with the terms and conditions of this
EULA.
(b) Separation of Components - The SOFTWARE PRODUCT is licensed as a single product. Its
component parts may not be separated for use on more than one HARDWARE unit.
IQ Pro Alarm Controller Reference Manual
100 (c) Single INTEGRATED PRODUCT - If You acquired this SOFTWARE with HARDWARE, then the
SOFTWARE PRODUCT is licensed with the HARDWARE as a single integrated product. In this case,
the SOFTWARE PRODUCT may only be used with the HARDWARE as set forth in this EULA.
(d) Rental - You may not rent, lease or lend the SOFTWARE PRODUCT. You may not make it available
to others or post it on a server or web site.
(e) Software Product Transfer - You may transfer all of Your rights under this EULA only as part
of a permanent sale or transfer of the HARDWARE, provided You retain no copies, You transfer
all of the SOFTWARE PRODUCT (including all component parts, the media and printed materials,
any upgrades and this EULA), and provided the recipient agrees to the terms of this EULA. If
the SOFTWARE PRODUCT is an upgrade, any transfer must also include all prior versions of the
SOFTWARE PRODUCT.
(f) Termination - Without prejudice to any other rights, DSC may terminate this EULA if You fail to
comply with the terms and conditions of this EULA. In such event, You must destroy all copies of the
SOFTWARE PRODUCT and all of its component parts.
(g) Trademarks - This EULA does not grant You any rights in connection with any trademarks or
service marks of DSC or its suppliers.
3. COPYRIGHT
All title and intellectual property rights in and to the SOFTWARE PRODUCT (including but not
limited to any images, photographs, and text incorporated into the SOFTWARE PRODUCT), the
accompanying printed materials, and any copies of the SOFTWARE PRODUCT, are owned by DSC or
its suppliers. You may not copy the printed materials accompanying the SOFTWARE PRODUCT. All
title and intellectual property rights in and to the content which may be accessed through use of
the SOFTWARE PRODUCT are the property of the respective content owner and may be protected
by applicable copyright or other intellectual property laws and treaties. This EULA grants You no
rights to use such content. All rights not expressly granted under this EULA are reserved by DSC
and its suppliers.
4. EXPORT RESTRICTIONS
You agree that You will not export or re-export the SOFTWARE PRODUCT to any country, person, or
entity subject to Canadian export restrictions.
5. CHOICE OF LAW
This Software License Agreement is governed by the laws of the Province of Ontario, Canada.
6. ARBITRATION
All disputes arising in connection with this Agreement shall be determined by final and binding
arbitration in accordance with the Arbitration Act, and the parties agree to be bound by the
arbitrator’s decision. The place of arbitration shall be Toronto, Canada, and the installation manual
of the arbitration shall be English.
7. LIMITED WARRANTY
(a) NO WARRANTY - DSC PROVIDES THE SOFTWARE “AS IS” WITHOUT WARRANTY. DSC DOES NOT
WARRANT THAT THE SOFTWARE WILL MEET YOUR REQUIREMENTS OR THAT OPERATION OF THE
SOFTWARE WILL BE UNINTERRUPTED OR ERROR-FREE.
(b) CHANGES IN OPERATING ENVIRONMENT - DSC shall not be responsible for problems caused by
changes in the operating characteristics of the HARDWARE, or for problems in the interaction of the
SOFTWARE PRODUCT with non-DSC-SOFTWARE or HARDWARE PRODUCTS.
(c) LIMITATION OF LIABILITY; WARRANTY REFLECTS ALLOCATION OF RISK - IN ANY EVENT, IF ANY
STATUTE IMPLIES WARRANTIES OR CONDITIONS NOT STATED IN THIS LICENSE AGREEMENT, DSC’S
ENTIRE LIABILITY UNDER ANY PROVISION OF THIS LICENSE AGREEMENT SHALL BE LIMITED TO
THE GREATER OF THE AMOUNT ACTUALLY PAID BY YOU TO LICENSE THE SOFTWARE PRODUCT
AND FIVE CANADIAN DOLLARS (CAD$5.00). BECAUSE SOME JURISDICTIONS DO NOT ALLOW THE
101
IQ Pro Alarm Controller Reference Manual EXCLUSION OR LIMITATION OF LIABILITY FOR CONSEQUENTIAL OR INCIDENTAL DAMAGES, THE
ABOVE LIMITATION MAY NOT APPLY TO YOU.
(d) DISCLAIMER OF WARRANTIES - THIS WARRANTY CONTAINS THE ENTIRE WARRANTY AND SHALL
BE IN LIEU OF ANY AND ALL OTHER WARRANTIES, WHETHER EXPRESSED OR IMPLIED (INCLUDING
ALL IMPLIED WARRANTIES OF MERCHANTABILITY OR FITNESS FOR A PARTICULAR PURPOSE)
AND OF ALL OTHER OBLIGATIONS OR LIABILITIES ON THE PART OF DSC. DSC MAKES NO OTHER
WARRANTIES. DSC NEITHER ASSUMES NOR AUTHORIZES ANY OTHER PERSON PURPORTING TO ACT
ON ITS BEHALF TO MODIFY OR TO CHANGE THIS WARRANTY, NOR TO ASSUME FOR IT ANY OTHER
WARRANTY OR LIABILITY CONCERNING THIS SOFTWARE PRODUCT.
(e) EXCLUSIVE REMEDY AND LIMITATION OF WARRANTY - UNDER NO CIRCUMSTANCES SHALL
DSC BE LIABLE FOR ANY SPECIAL, INCIDENTAL, CONSEQUENTIAL OR INDIRECT DAMAGES BASED
UPON BREACH OF WARRANTY, BREACH OF CONTRACT, NEGLIGENCE, STRICT LIABILITY, OR ANY
OTHER LEGAL THEORY. SUCH DAMAGES INCLUDE, BUT ARE NOT LIMITED TO, LOSS OF PROFITS,
LOSS OF THE SOFTWARE PRODUCT OR ANY ASSOCIATED EQUIPMENT, COST OF CAPITAL, COST OF
SUBSTITUTE OR REPLACEMENT EQUIPMENT, FACILITIES OR SERVICES, DOWN TIME, PURCHASERS
TIME, THE CLAIMS OF THIRD PARTIES, INCLUDING CUSTOMERS, AND INJURY TO PROPERTY.
WARNING:
DSC recommends that the entire system be completely tested on a regular basis.
However, despite frequent testing, and due to, but not limited to, criminal tampering or
electrical disruption, it is possible for this SOFTWARE PRODUCT to fail to perform as expected.
Copyright and Trademark
The trademarks, logos, and service marks displayed on this document are registered in the United
States [or other countries]. Any misuse of the trademarks is strictly prohibited and Johnson
Controls (JCI) will aggressively enforce its intellectual property rights to the fullest extent of the law,
including pursuit of criminal prosecution wherever necessary. All trademarks not owned by JCI are
the property of their respective owners, and are used with permission or allowed under applicable
laws.
Product offerings and specifications are subject to change without notice. Actual products may vary
from photos. Not all products include all features. Availability varies by region; contact your sales
representative.
© 2022 Johnson Controls. All rights reserved. Johnson Controls, Tyco and DSC are trademarks and/
or registered trademarks. Unauthorized use is strictly prohibited.
Tech support: 1-800-387-3630 (Canada and U.S), or 1-905-760-3036 (International)
- Uploaded