Telguard GDC1 - Installation Manual
Related Products
Related Categories
Document Transcript
1. Product Description 2. Safety Warnings
The Telguard GDC1 is a Z-Wave garage door opener that is based
on Z-Wave mesh networking technology allowing it to integrate
seamlessly with existing Z-Wave controllers from many
manufacturers.
The GDC1 is based on the Binary Switch Command Class and may
show up in your controller as a light switch. The standard GDC1
functionality will work as follows:
• Turn GDC1 “on” = Open the garage door.
• Turn GDC1 “of” = Close the garage door.
The same should be applied to checking the garage door’s
current state: “on” is equal to “opened” and “of” is equal to
“closed”.
The GDC1 takes care of all the required safety steps for the
unattended operation of a garage door. Before moving from an
open to closed position the GDC1 will flash and operate a siren for
five seconds to warn occupants that the door is about to move.
It will make two attempts to close a door, but if this fails twice
consecutively, the GDC1 will ignore further Z-Wave commands
until the door is closed by someone physically in the garage.
This product is for convenience and not for security applications.
You should take care to use listed security products if your
intention is physical security.
Z-Wave is a registered trademark of Sigma Designs Inc. and its subsidiaries.
WARNING
The GDC1 must be mounted in the garage such that its visual and
audible warnings can be seen and heard throughout the garage.
WARNING
Never let children operate or play with door controls. Keep the
remote control away from children.
WARNING
NEVER GO UNDER A STOPPED, PARTIALLY OPEN DOOR.
WARNING
Do not install the GDC1 on garage door operators manufactured
prior to 1993 or on any garage door that does not have an
operational safety beam entrapment detection system.
WARNING
Per UL 325 safety guidelines, only install the GDC1 on sectional
(i.e., roll-up) garage doors. DO NOT INSTALL THE GDC1 ON
ONE-PIECE DOORS!
WARNING
The GDC1 adds the ability to remotely operate a garage door. This
could cause the door to move unexpectedly.
NO ONE SHOULD CROSS THE PATH OF A MOVING DOOR!
3. Package Contents 4. Pairing with Z-Wave Controller 5. Mounting the GDC1
Z-Wave Include Button
Pairing with the Controller
1. Plug in the GDC1 near your
Z-Wave controller.
2. Follow your controller’s
instructions for adding devices and
place it in learn mode.
3. The controller should
automatically discover the GDC1.
4. If that fails:
a) Unplug the GDC1 and open the
enclosure (Fig. 1)
b) Repeat steps 1 and 2.
c) Press the Z-Wave Include Button.
d) Close the enclosure.
Removing the GDC1
1. Open the GDC1’s enclosure and
plug it in near your controller.
(Fig. 1)
2. Follow your controller’s
instructions for removing devices.
3. When instructed by your
controller, press the Z-Wave
Include Button to Remove the
GDC1.
Mount the GDC1 on the ceiling using the
supplied screws and drywall anchors. It
must be near the garage door’s power
outlet and within 5ft of the garage
door operator.
With the door closed, disconnect AC power
to the garage door operator.
The GDC1 is not equipped for permanent
wiring. Contact a licensed electrician to
install a suitable receptacle if one is not
available.
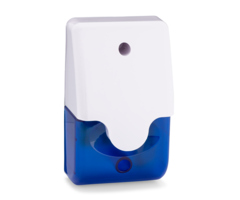
Telguard GDC1
Universal Z-Wave
Garage Door
Control Switch
Installation Instructions
For installation videos and installation assistance
visit www.telguard.com/GDC1
(Fig. 1)
Wired Sensor
Drywall Screws
and Anchors
Double-sided
Tape
Drywall Screws
and Anchors
Status LED
(Under the white cover)
Telguard GDC1
Gray, 16ft
Sensor Wires
AC Power Adapter
Magnet
Cable Ties
Wire Nuts
Black, 5ft
Pushbutton W
ires
Warning LED
(Under the blue cover)
Copyright © Telguard 2014
READ AND FOLLOW ALL INSTRUCTIONS
SAVE THESE INSTRUCTIONS
8. Installing the Sensor 7. Running the Gray 16ft Sensor Wires 6. Connecting the Black 5ft Pushbutton Wires
9. System Operation 10. Troubleshooting
Warning: With the garage door closed, make sure AC Power to
the garage door operator is disconnected to prevent movement
during installation.
1. Mount the wired sensor on the wall just above the top of the
door using the supplied screws.
2. Using the supplied wire nuts, connect the sensor’s wires to the
gray 16ft sensor wires. Either wire can connect to either sensor
wire.
3. Under the white cover of the GDC1 there is a slowly flashing
red light. Position the magnet directly in front of the wired
sensor on top of the door. When the flashing light stops and
remains lit then the magnet is in an acceptable location.
4. Using the supplied double-sided tape, mount the magnet in
that location. Note: the mounting location should be clean and
dry prior to ensure a secure attachment to the door.
5. Reconnect the garage door operator’s power and verify that
the status light flashes slowly only when the door is open.
The pre-wired pair of gray 16ft wires must be run from the GDC1
to the top of the garage door.
Be sure the cable is clear of all moving parts of the garage door
and opener.
Use the supplied cable ties to ensure that the wires, once
installed, don’t shift and become entangled with a moving part
over time.
Since the wired sensor has shorter wires, make sure the end of
the gray 16ft sensor wires near the door opening are within 12
inches of the planned installation location for the wired sensor.
For a clean installation, plan on leaving any excess cable at the
end near the door opening. You can trim this to length once all
the components are installed.
TIP: Often times the cables to the safety beams traverse to the
top of the garage door before splitting and running to the
beam emitters. Use these cables as guides when running the
sensor cable from the GDC1 to the garage door. Use the cable
ties to secure to these cables and to follow the same path.
Wired Sensor
Magnet
GDC1
End of
wires near
door opening
End of wires must be within
12 inches from wired sensor.
Wired Sensor
Gray 16ft Sensor Wires
BEEP
BEEP
BEEP
FLASH
FLASH
FLASH
No maintenance is required after following the
installation steps.
For more information on using the Telguard
GDC1 with various home automation systems
visit www.telguard.com/GDC1.
Connect the GDC1’s pair of black 5ft wires to the pushbutton
terminals on the garage door operator. The terminals may be labeled
“PWC”, “WC”, “PB”, “PUSHBUTTON”, or “RED AND WHITE”. The
terminal locations and names vary by model and manufacturer.
Either black wire can be connected to either terminal on the garage
door operator.
Once connected, you can connect the GDC1’s power supply to the
AC power outlet near the garage door operator.
Note: If a previously illuminated pushbutton stops working, reverse
the wire connections. Some models of garage door pushbutton
terminals are incompatable with GDC1. Your operator must support a
standard simple pushbutton. Consult your garage door
manufacturer’s manual to ensure compatibility.
Be sure all wires are clear of all moving parts of the garage door and
operator.
DO NOT DISCONNECT ANY WIRES CURRENTLY
CONNECTED TO THE GARAGE DOOR OPERATOR.
Pair of
black wires
Pushbutton
Terminals
Sending an “on” or “open” command to the GDC1
will open the door if it isn’t already open.
Sending an “of” or “close” command to the GDC1
will close the door after a five second warning.
The status of “on” or “open” means the garage
door is open.
The status of “of” or “closed” means the garage
door is closed.
•
•
•
•
Warning LEDs slowly flash and
the GDC1 doesn’t respond to
Z-Wave commands.
The GDC1 was successfully
paired with my controller, but
doesn’t work in the garage.
The GDC1 does not pair with
my controller, or
The Status LED rapidly flashes
four times repeatedly.
The Z-Wave status of the
garage door shows “On” or
“Open” even when the door is
closed.
The GDC1 doesn’t power on.
The safety lockout condition has
been triggered. Manually close the
garage door to reset the GDC1.
Z-Wave signals may not reliably
reach the garage and you may need
to install another Z-Wave device to
act as a repeater to increase the
range and reliability of your network.
The GDC1 is a Z-Wave certified
binary switch and should work with
most controllers supporting light
switches. If the auto pairing feature
does not pair with your controller,
you may need to follow the Remove
Process (Step 4) for the GDC1 even
though it may never have been
paired with your controller.
Ensure that the wired sensor is
properly installed. The Status LED
should remain steady when the door
is closed and flash once a second
when the door is open.
The Status LED will either be solidly
lit or flash a status code when
powered on. If the Status LED is not
lit, you may require a replacement
product.
Double-sided
Tape
- Uploaded