Alarm.com Commercial Stream Video Recorder - Install Guide
Related Products

Related Categories
Document Transcript
Commercial Stream
Video Recorder
Installation Guide
ADC-CSVR2000P / ADC-CSVR2008P / ADC-CSVR2016P Pre-installation checklist
• Pro Series CSVR (included)
• A display with an HDMI input (optional)
• An HDMI cable (optional)
• AC power adapter (ADC-CSVR2000P)
• Power cord (ADC-CSVR2008P/ADC-CSVR2016P)
• An Ethernet Cat5e cable (included)
• USB Keyboard and Mouse (optional)
• Rack mount ears and screws (included, for rack installations)
• Dedicated network switch (recommended for ADC-CSVR2000P)
• Ethernet connection to broadband internet (Cable, DSL or Fiber Optic)
• An Alarm.com customer account with a service package that supports
the Pro Series CSVR
• Login and password for the Alarm.com account to which you will add
the Pro Series CSVR
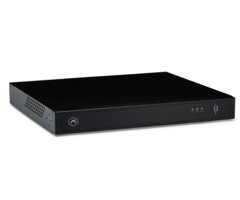
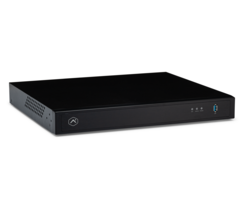
1 Overview
2
❶
Network LED
❷
Status LED
❸
Power LED
❹
USB port
❺
Power input
❻
Power switch
❼
HD Out ports
❽
USB ports
❾
Client RJ45 port
Camera RJ45 port
RJ45 PoE Ports
❺
❽
❼
❾
❶
❸
❷
❹
front (same on all devices)
back (ADC-CSVR2000P) 3
back (ADC-CSVR2008P)
back (ADC-CSVR2016P)
❺
❻
❽
❼
❾
❺
❻
❽
❼
❾ 4
Recommended networking diagram
for CSVR2000P
Router to CSVR
Client
port
CSVR
Camera
port to
dedicated PoE switch
PoE switch to Alarm.com
PoE cameras
5
Recommended networking diagram
for CSVR2008P/CSVR2016P
5
Alarm.com recommends using our Pro Series PoE Cameras with the Pro Series CSVR.
Router to CSVR
Client
port
CSVR
PoE
ports to
Alarm.com PoE cameras 6
LED guide
Network LED
Blinking green
Client uplink active
Not illuminated
Client uplink inactive
Power LED
Solid green
Powered on
Not illuminated
Booting or powered off
Status LED
Solid green
Connected to Alarm.com
Blinking green
Local network connection
Solid red
No connection
Not illuminated
Booting or powered off 7
Adding the device to an
Alarm.com account
❶
Using an Ethernet cable, connect the device to the network.
❷
If you wish to use a display with your Pro Series CSVR, please connect
it to one of the
HD Out
ports using an HDMI cable.
❸
Connect the device to a non-switched, grounded power outlet.
❹
For the CSVR2008P/CSVR2016P: Use the switch on the back of the device
to turn on your Pro Series CSVR.
❺
Wait for the device to boot up. A solid green status LED indicates that the device
is ready to be added to the account. Please use one of the following methods:
Customer Website
a) Using a web browser, enter the following URL:
www.alarm.com/addcamera
. You will need the customer’s username
and password to log in to the Customer Website.
b) Select the Pro Series CSVR from the video device list or enter its MAC address
to begin adding the device. The device’s MAC address is located on the bottom
of the device or on the packaging.
c) Follow the on-screen instructions to finish adding the the Pro Series CSVR.
MobileTech installation
a) Log in to MobileTech.
b) Select the customer’s account.
c) Tap
Quick Actions > Add Device > Video
.
d) Follow the on-screen instructions to finish adding the Pro Series CSVR.
You may associate cameras to the device and configure drives and display
settings on the Customer Website or MobileTech.
Questions?
Visit
answers.alarm.com
or contact your service provider.
8
Mounting the device to a rack
The CSVR20xxP can be mounted to a standard server rack using the included rack mount
kit. The rack mounts are designed to fit into a 1U (rack unit) area.
The kit includes the screws needed to attach the rack mount ears to the device,
but does
not
include the screws needed to mount the device into a rack.
❶
Gently pry off the rubber footpads from the bottom of the device.
❷
Using the included screws and brackets, attach a bracket to each side of the device. 9
❸
Using server rack screws (not included), attach the brackets to each side of
the server rack.
❹
Ensure that there is at least 10 in (25 cm) behind the device for proper airflow. 10
Notices
Note: This equipment has been tested and found to comply with the limits for a Class A digital device, pursuant to part
15 of the FCC Rules. These limits are designed to provide reasonable protection against harmful interference when the
equipment is operated in a commercial environment. This equipment generates, uses, and can radiate radio frequency
energy and, if not installed and used in accordance with the instruction manual, may cause harmful interference to radio
communications. Operation of this equipment in a residential area is likely to cause harmful interference in which case
the user will be required to correct the interference at his own expense.
Rated:
-
ADC-CSVR2000P - 12Vdc, 5A, 60W
-
ADC-CSVR2008P - 100-240Vac, 60-50Hz, 3.5A, 200W
-
ADC-CSVR2016P - 100-240Vac, 60-50Hz, 6-3A, 280W
•
The NVR is only to be connected to PoE networks without routing to outside plants.
•
Ensure that all maintenance and repair work is handled by qualified personnel such as
electrical engineers or network specialists.
•
Connect the system to an earthed main power outlet.
•
CAUTION: RISK OF EXPLOSION IF BATTERY IS REPLACED BY AN INCORRECT TYPE.
DISPOSE OF USED BATTERIES ACCORDING TO THE INSTRUCTIONS.
IMPORTANT: The total power budget for the ADC-CSVR2008P POE ports is 120W, ADC-CSVR2016P POE ports
is 200W. Every 8 ports (#1 ~ #8 or #9 ~ #16) provides 100W.
•
The maximum output for each port is 30W. If a PoE device draws more than 30W, then PoE Power will be
disabled on that port.
Changes or modifications not expressly approved by the party responsible
for compliance could void the user’s authority to operate this equipment. 11
Notes
12
Notes
8281 Greensboro Drive
Suite 100
Tysons, VA 22102
© 2021 Alarm.com. All rights reserved.
210702 | Made in Taiwan
- Uploaded