Honeywell Home PROWLTOUCHDM and PROWLTOUCHWM Installation Instructions - Dated 10/19 Rev. A
Related Products
Document Transcript
PROWLTOUCHWM Installation Guide
Guide d’installation – Montage mural
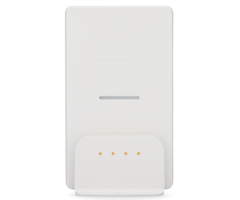
Wall Mount Installation
Kit includes:
power supply and mounting screws.
1. Choose a desired mounting location for the wirel
ess
Touchscreen. It is recommended to mount the touchsc
reen
out of direct sunlight and at a proper height for v
iewing.
2. Using 18 to 22-gauge wires, connect the wires fr
om the 2
terminals on the back of the Wall Mount to the powe
r supply
terminals and observe polarity. The wires can be ro
uted
through one of the channels on the Wall Mount.
Wire Table
AWG
Wire Length
#22 wire
13 ft (4m)
#20 wire
21 ft (6.4m)
#18 wire
34 ft (10.3m)
3. Attach the Wall Mount plate to the wall using th
e 2 screws
provided. Alternately the Wall Mount Plate can be
installed
directly on an electrical gang box.
4. Align the slots one back plate with the hooks on
the mounting
bracket and slide it down until it is secure.
5. Align the slot on the back of the Touchscreen ab
ove the
mounting plate and slide down until fully seated. T
he LED’s
illuminate. When Touchscreen is removed from mounti
ng
plate the LED’s are off.
Installation du montage mural
Kit- WALLMT-WTS comprend:
un bloc d’alimentation et des vis
de montage.
1. Choisissez l’emplacement où monter l’écran tacti
le sans fil.
Il est recommandé de monter le pavé tactile à l’abr
i de la
lumière directe du soleil et à une hauteur lui perm
ettant
d’être visible.
2. À l’aide de fils de calibre 18-22, raccordez les
2 bornes à
l’arrière de la plaque de montage aux bornes du blo
c
d’alimentation. Respectez la polarité. Les fils peu
vent être
acheminés par le truchement d’un des canaux de supp
ort
mural.
Tableau de câblage
Caliber du fil
Longueur du fil
#22
13 pieds (4m)
#20
21 pieds (6.4m)
#18
34 pieds (10.3m)
3. Fixez la plaque de montage au mur à l'aide des 2
vis
fournies. Il est également possible d’installer la
plaque de
montage mural directement sur une boite à gangs
électrique.
4. Alignez les encoches de la plaque arrière avec l
es pinces
de support de montage et faites-la glisser vers le
bas
jusqu'à ce qu'elle soit bien fixée.
5. Align the slot on the back of the Touchscreen ab
ove the
mounting plate and slide down until fully seated. T
he LED’s
illuminate. When Touchscreen is removed from mounti
ng
plate the LED’s are off
ProTouch-006-V0
WALL /
MUR
SCREW / VIS
(TYP-2)
18-22 GAUGE WIRES /
FILS CAL. 18-22
POWER
SUPPLY /
LOCS
D’ALIMENTATION
LED LIGHT
BAR / BARRE
LUMINEUSE
À DEL
SCREW FOR
SECURING
TOUCHSCREEN /
VIS POUR FIXER
L’ÉCRAN TACTILE
TOUCHSCREEN /
ÉCRAN TACTILE
2
3
1
WALL MOUNT
PLATE / PLAQUE
DE MONTAGE MURAL
6. Plug the power supply into a non-switchable 110V
AC, 60Hz
outlet for 24hrs to fully charge battery.
7. If desired, use the screw provided to permanentl
y attach the
Touchscreen to mounting plate.
6.
Branchez le bloc d’alimentation dans une prise s
ans
interrupteur de 110 VCA, 60 Hz, durant 24 heures po
ur
obtenir une charge complète de la batterie.
7.
Si souhaité, utilisez la vis fournie pour fixer
de manière
permanente l’écran tactile à la plaque de montage.
PROWLTOUCHWM Wall Mount Kit
PROWLTOUCHDM Desk Mount Kit
Kit de montage mural PROWLTOUCHWM
Kit de montage sur table PROWLTOUCHDM
PROWLTOUCHDM Installation
Guide d’installation – Montage sur table
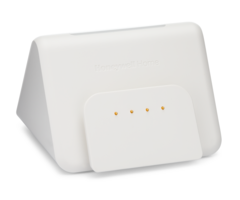
Desk Mount Installation
Using the power supply provided with the PROWLTOUCH
Wireless Touchscreen:
1. Plug the power supply connector into the port on
the desk
mount, as shown.
2. Plug the other end into a non-switchable 110VAC,
60Hz outlet.
3. Align the slot on the back of the Touchscreen ov
er the Desk
Mount and slide down until fully seated. Ensure th
e contacts
on the Touchscreen are aligned with the pins on the
desk
mount. The LED’s on the desk mount will light when
the
touchscreen is installed. When the Touchscreen is r
emoved
from the desk mount, the LED’s will be off.
NOTE:
The touchscreen must be completely seated in the
desk mount to ensure it is connected and charging.
Installation du montage sur table
À l’aide du bloc d’alimentation fourni avec l’écran
tactile sans fil
PROWLTOUCH:
1. Branchez le connecteur du bloc d’alimentation da
ns le port
situé sur le montage sur table, comme illustré.
2. Branchez l’autre extrémité à une prise sans inte
rrupteur de
110 VCA, 60 Hz.
3. Alignez la fente à l’arrière de l’écran tactile
au-dessus du
montage sur table, puis faites-le glisser vers le b
as jusqu’à ce
qu’il soit entièrement inséré. Veillez à ce que les
contacts de
l’écran tactile soient alignés avec les broches du
montage sur
table. Les voyants du support de bureau s’allument
lors de
l’installation de l’écran tactile. Lorsque l’écran
tactile est retiré
du support de bureau, les voyants sont éteints.
NOTE:
L'écran tactile doit être complètement installé da
ns le
support de bureau pour garantir sa connexion et son
chargement.
LED LIGHT BAR/
BARRE LUMINEUSE
À DEL
DESK MOUNT/
MONTAGE SUR TABLE
grip-048FC-V0
PORT INSIDE/
PORT À
L’ INTÉRIEUR
CUT AWAY FOR
CLARITY/
DÉCOUPER POUR
PLUS DE CLARTÉ
This product manufactured by Resideo and its affili
ates. The Honeywell Home Trademark is used under li
cense from Honeywell International Inc.
2 Corporate Center Drive, Suite 100
P.O. Box 9040, Melville, NY 11747
© 2019 Resideo Technologies, Inc
www.resideo.com
ÊR800-25845ABŠ
R800-25845A 10/19 Rev A
- Uploaded