Interlogix 60-924-RF-TS - Quick User Guide
Related Products
Related Categories
Document Transcript
P/N 466-2401 • REV B • 25FEB13
1
Simon XT Talking Touch Screen Quick
Operation Guide
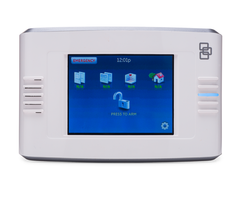
Description
The Simon XT Talking Touch Screen is a color 3.5 inch LCD
screen with a graphical user interface designed to control the
basic functions of your Simon XT
(v1.3 or later) control panel.
You can use the touch screen to
obtain the status of your
home (open doors, movement det
ected, etc.) and to control
your security system:
•
Arm the system (doors, windows, and motion sensors).
•
Disarm the system.
•
Activate a panic alarm to call the central monitoring station
in a nonmedical emergency.
This touch screen works with both Simon XT v1.3 and Simon
XT v1.4. To determine your panel version, go to your Simon
XT panel and use the scroll up button to view the version.
Select Enter to return
to the panel display.
Depending on the system conf
iguration provided by your
dealer, you may also have the following options:
•
Turn system controlled lights on or off.
•
Lock and unlock system-controlled door locks.
•
View and modify home temperature.
•
Access limited online reference information (for example,
weather forecasts).
Note:
This document provides basic operation information for
your touch screen and security system. Contact your dealer for
configuration and option details. For complete Simon XT
system programming and operation, refer to the panel
documentation.
Home screen
There are multiple ways to reach the Home screen:
•
You can access the Home screen by using the close icon,
which will return the touch screen
’s display to the previous
screen. Depending on what display the touch screen is
currently in, you may need to move through multiple levels
of screens to reach the Home screen.
•
The Home screen will appear after a period of inactivity on
any screen (unless you set a blank screen as your default
screen saver).
•
When the panel enters an al
arm, the touch screen will
automatically return to the Home screen.
Time
The current time is located at
the top center of the Home
screen. The time is automatically updated periodically by the
security system time.
Emergency button
In an emergency, touch the Em
ergency button. An Emergency
screen appears. Depending on your system, you may see
either one button (Panic) or three buttons (Panic, Police, or
Fire). Select the appropriate button.
Note:
If your system is connected to a security monitoring
service, the authorities will be notif
ied. Contact your dealer for
details.
If you initiate an emergency alarm by mistake, you can cancel
the alarm by touching the red Alarm button and entering your
code within 30 seconds (typical time limit, contact your dealer
for more information on your system configuration).
Alarms
If an alarm occurs in your secu
rity system, an alarm message
will appear at the bottom of the Home screen. The message
will indicate the time the alarm occurred and the sensor that
sent the alarm. For example,
the message might be, “10:30a
sn x Front Door”, indicating the front door sensor sent an alarm
at 10:30 am.
Home status icons
The four icons across the midd
le of the screen represent the
status of your home. When you
press the status icons, a new
screen opens to provide status details.
2
Simon XT Talking Touch Sc
reen Quick Operation Guide
Doors.
Depicts monitored door status (most typically
external doors). A green che
ck indicates all monitored
doors are closed. A red exclamation point indicates one
or more doors are open.
Windows.
Depicts monitored window status. A green
check indicates all monitored windows are closed. A red
exclamation point indicates one or more windows are
open.
Motion.
Depicts motion detected by the motion sensors
in your home. A green check indicates no recent motion
detected. A red exclamation point indicates motion was
detected within the last 10 minutes. A typical use for this
feature would be to have a touch screen in the garage to
see if movement is detected in the home before you
enter the home.
Property.
Depicts other changes to protected property in
your system. For example activation of a water sensor,
freeze sensor, or the movement of protected items. A
green check indicates no change since the last time you
visited (for movement of a protected item) and all sensors
are closed (water or freeze
sensors). A red exclamation
point indicates either a sens
or is tripped or there is
unacknowledged activity.
Note:
These icons may contain the text “N/A” which indicates
your system is not configured
to support this feature. Consult
your dealer for additional information.
Arming icons
The arming icons are located below the home status icons.
The icons indicate the armed st
atus of the security system.
PRESS TO ARM.
When the icon shows
“PRESS TO ARM”, touch to access the Arm
screen.
or
PRESS TO DISARM.
One of these icons will
display depending on your arming level. Press
to disarm your system (door, window, and/or
motion sensors). Enter your code in the
keypad screen that appears. If you enter an
incorrect code, press the Clear button and
enter the correct code.
Arming screen
When you touch the PRESS TO ARM icon on the Home
screen, the Arm screen appears with the following arming
choices:
Arm All (Away).
This is the typical selection
when you are leaving the home. The doors,
windows, and motion sensors will be armed
and the arming countdown will appear at the
bottom of the screen.
Arm Doors+Windows Only (Stay).
This is
the typical selection when you are staying
home. The doors and windows will be armed
and the arming countdown will appear at the
bottom of the screen.
Motion Sensors Only (Away).
This is the
best selection if you are leaving the home,
but want to keep a door or window open
while you are gone. Only the motion sensors
will arm and
the arming countdown will appear at the
bottom of the screen.
Note: Depending on your configuration, this
button may or may not appear.
Optional arming choices
These settings are optional (for more advanced arming
features).
Silent arming
. Press this button to silence your exit beeps
during arming. (Your exit time will double).
No delay.
Press this button to set yo
ur entrance timer to zero.
(Use the No Delay feature wh
en you are asleep, or when you
are away from home and will carry a wireless touchpad that
allows you to disarm the system before opening a protected
door). When you select the No Delay option, an icon (a clock
with a slash through it) will appear over the lock.
Arming errors
If you select an arming option on the Arm screen, and there is
an arming problem, an arming error message will appear at the
bottom of the screen, indicating what the problem is and how
to correct it. For example, you might see a message that
indicates that you need to close the front door.
Correct the problem as indicated or press the Bypass button.
You will see the arming countdown message at the bottom of
the screen. You can touch the
Cancel button and enter your
code to stop the arming process.
Settings screen
When you touch the Settings icon
on the Home screen,
the Settings screen appears.
Touch screen status icons
The touch screen status icons in
the upper left corner of the
screen represent the health
of this touch screen:
Simon XT Talking Touch Scr
een Quick Operation Guide
3
Battery status icon.
Indicates this touch screen’s
battery life (red = depleted, green = good).
AC power status icon.
Indicates that this touch screen
is plugged in and AC power is on (red = off, green = on).
Connected RF status icon.
Indicates the signal strength
between this touch screen and the security system (red =
no signal, green = signal). In case of loss of connection,
you will receive an error message with instructions.
Setting options
The Setting options allow you to adjust this touch screen’s
features. Typical status indica
tors (excluding light screen):
•
Gold indicates a button is selected.
•
Blue indicates buttons that are not selected.
Use the scroll bar to see all
of the options on the screen:
Event History.
Touch the related Show button to view
system events.
Panel Status.
Touch the related Hear button to listen to the
status of your security system. If you have a Simon XT v1.4,
touch the Clear button to clear status.
Chime.
Touch the On or Off butt
on to toggle the touch
screen chime feature on or off.
This feature will enable this
touch screen to speak or beep when a door opens. The
security panel chime must be enabled. Refer to the security
panel documentation for info
rmation on this feature.
Lights.
If you have a Simon XT v1.4, touch Control to
access the light screen. From the Light screen, you can
select all programmed lights on, or all programmed lights off
or individually select whether
your lights are on or off. (Light
status is not indicated on this screen). If you have a Simon
XT v1.3, touch the On or Off button to control lights within
your system.
Door Locks
. If you have a Simon XT v1.4, touch Control to
access the Door Lock screen. From the Door Lock screen,
you can lock or unlock all programmed doors. You can also
select individual programmed doors. The button will flash
until confirmation is received
from the door lock that the
command was successful.
Note
: Action does not guarantee a door is locked and
closed.
Voice Volume.
Touch the arrow buttons to adjust this touch
screen’s speech volume level (the siren sounds are not
controlled by this setting).
Beep Volume
. Touch the arrow buttons to adjust this touch
screen’s beep volume level (the siren sounds are not
controlled by this setting).
Brightness.
Touch the arrow buttons to adjust the
brightness level of this touch screen’s screen.
Default screen.
Use this feature to set this touch screen’s
screen saver mode. Select “Blank” to have the screen and
LED go dark after a period of inactivity. Otherwise, the
default will be the Home screen and the screen will always
be lit. If AC power is lost, the screen will go blank after 2
minutes of inactivity to maximize battery life.
Note:
The touch screen will automatically blank at 2:00 am
daily for 60 minutes.
RF Test.
For installer use only.
Calibration.
Normally you will not need to calibrate the
touch screen, but if the touc
h screen buttons do not respond
correctly, touch the Show button to access the Calibration
screen. To calibrate the touch
screen, touch the + icons in
the corners on the Calibrati
on screen using a soft, fine point.
If you cannot access the calibration using the above
procedure, use the following steps:
1. Press and hold the Reset button (Figure 1 on page 4).
2. Press and hold anywhere on the screen.
3. While you are pressing t
he screen, release the Reset
button.
4. Follow the calibration prompts.
Help.
Touch the Help button to access the Help menu. The
Help menu will display a list of various help topic buttons.
Touch the buttons for information on the given topic.
Code Required Access.
Touch the On or Off buttons to
toggle this feature. When turned
on, it will require a user
access code to be entered for most touch screen functions.
With code required access, not all icons will be displayed.
Clear and Enroll.
Do not touch this button; it is used by the
installer for installation only.
Battery replacement
When the touch screen batteries are low, the touch screen will
display the red battery icon on the Home and Settings screens.
Note:
We recommend that you replace the batteries once a
year and after any significant power outage.
1. Remove the touch screen
from the mounting plate by
inserting a small screwdriver in
to the slot on the bottom of
the touch screen.
2. Replace all batteries being sure to follow the polarity
instructions (replace with
four 1.5 V, Alkaline AAA
batteries). 4
Simon XT Talking Touch Sc
reen Quick Operation Guide
Avoid touching the touch screen face while you are
replacing the batteries.
3. Briefly disconnect the AC power (this will clear the battery
fault).
4. Reconnect AC power.
Note:
If AC power is lost and batteries are not present or are
depleted, the touch screen will not power up until AC power is
restored (even if new batteries are installed).
Cleaning the touch screen
If necessary, use a soft cloth to clear smudges on the screen;
do not use glass cleaner on the screen.
Reset button
The Reset button is located on
the bottom left side of the touch
screen mounting plate. To power
cycle the touch screen, use a
toothpick to depress the recessed Reset button.
Figure 1: Reset button
Opening slot
Reset button
Note
: Dispose of the touch screen only in accordance with
local regulations.
Contact information
www.utcfireandsecurity.com
or
www.interlogix.com
For customer support, see
www.interlogix.com/customer-
support
© 2013 UTC Fire & Security Americas Corporation, Inc.
Interlogix is part of UTC Climate Controls & Security, a unit of
United Technologies Corporation. All rights reserved.
- Uploaded