Interlogix Simon XT - Quick User Guide
Related Products
Related Categories
Document Transcript
Simon XT Quick Operation Guide
This is the Quick Operation Guide for Simon XT models
600-1054-95R-11 and 600-1054-95R-11-CN.
Operation
Use this document to quickly
begin operating your Simon XT
security system. Refer to your Simon XT User Manual for full
operating details and programming options.
Note:
The default master code is 1-2-3-4 when the security
system is shipped from the factory. You should change your
code after your system is installed.
To operate the security system:
•
Use the fro
nt
panel buttons to
arm/dis
arm the system when
you enter or exit your home and to determine which sensors
are active and the system status.
•
Use the
thre
e fast action keys to communicate with the
central monitoring station to re
port police, fire, or emergency
alarms.
•
Use a combination of t
h
e panel buttons and the display menu
to program certain user features. This method is used by your
installer to establish your system configuration. (Refer to your
Simon XT User Manual.)
Table 1
below
describes the panel keys and features.
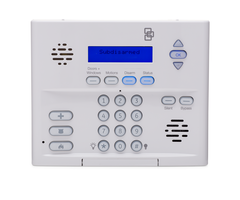
Table 1: Panel keys and features.
Control
Description
Piezo siren
Provides alarm beeps and status beeps.
LCD display
Provides a 2 x 16 character array that displays a
variety of phrases and icons.
Doors+Windows
Press
to
arm
peri
meter sensors.
Motions
Press to arm interior sensors.
Disarm
Press to turn off intrusion/burglary protection for
your system. Only intrusion/burglary sensors are
disarmed. Environmental sensors, such as smoke
and carbon monoxide detectors, stay active at all
times.
Status
Press to determine system status.
Silent
Press to silence exit beeps when arming.
Bypass
Press to bypass a sensor.
Emergency (cross)
Fire (flame)
Police (shield)
Press and hold for 2 seconds (or press twice
quickly) to call the central monitoring station and
notify t
hem of a
nonm
e
dical
call for help.
Microphone
Use to communicate with the central monitoring
station a
fter an alarm.
Control
Description
Scroll up/scroll down
arrows
Press to scroll through lists of similar items.
OK
Press to select a particular menu item or commit
to panel memory a menu item that has just been
programmed.
Numeric keypad
Press the keys (0 to 9, *, and #) to enter access
codes or other numerical data.
*
Press to turn lights on.
#
Press to turn lights off.
Speaker
Provides voice output and sound key beeps
While the panel is idle, the text displays:
Display line 1
Arming level
Display line 2
HH:MMx (Time) and status icons
Arming and disarming
Table 2
below
describes the arming levels that you can set from
the control panel.
Table 2: Arming levels
Level
Function
Description
0
Subdisarm
If
your
system includes
24-hour
protection sensors, you must subdisarm
the panel before accessing these areas
to avoid causing an alarm.
Environmental sensors (such as smoke or
carbon monoxide detectors) stay active
at all times.
1
Disarm
In
this
level,
only
24-hour sensors are
active.
2
Arm door and
window sensors –
exterior
This level arms the door and window
sensors, while leaving the interior motion
sensors disa
rmed.
3
Arm motion sensors –
interior
This level arms the interior motion
sensors, while leaving the exterior door
and window sensors disarmed.
4
Arm
doors/wind
ows
and motion sensors
This level arms all sensors.
1 / 4
P/N 466-2399 • REV C • ISS 9JAN13
To disarm (level 1):
1.
Press
Disarm.
2. Enter your code when the displays shows
Enter Code
.
The panel displays and speaks Disarmed, the Disarm
button lights up, and the panel beeps once.
To arm doors and windows (level 2):
1. Ensure that all doors and windows are closed.
2.
Press
Doors+Windows.
3. Enter your code when the displays shows
Enter Code
,
if a code is required.
The panel displays
Doors + Windows
, speaks Doors and
Windows On, and the Doors+Windows button lights up.
The panel starts an exit dela
y and sounds exit beeps in
groups of two until the exit delay expires.
To arm motion sensors (level 3):
1.
Press
Motions.
2. Enter your code when the display shows
Enter Code
,
if a code is required.
The display shows
Motions
, speaks Motions On, and the
Motions button lights.
The panel starts an exit dela
y and sounds exit beeps in
groups of three until the exit delay expires.
To arm doors, windows, and
motion sensors (level 4):
1.
Press
Doors+Windows.
2.
Enter your code when the display shows
Enter Code
, if a
code is required.
3. While the panel is in the process of arming, press Motions.
The display shows
Doors + Windows & Motions
,
speaks Doors and Windows On, Motions On, and the
Doors+Windows and Motions buttons light up.
The panel starts an exit dela
y and sounds exit beeps in
groups of four until the exit delay expires.
Silent exit
Press Silent after you arm the system to silence status beeps.
The silent exit feature silences the status beeps that accompany
the exit delay. The panel will still beep at the beginning and end
of the exit delay.
Note:
Enabling silent exit doubles the exit delay time.
Alarms
The system provides a series of
alarms that indicate an unusual
occurrence. When an alarm is active, the display shows
Alarm
Alarm Alarm, Press Status
.
To cancel the alarm, enter a valid master or user code. After
alarms are canceled, the system will be disarmed.
System status
Press Status (no code is required
) to cause the system to display
and speak the following types of information:
•
Alarm
conditions
•
Alarm
history
•
Trouble
conditions
•
Open
sensors
•
Bypassed
sensors
The Status button blinks
when an active alarm exists. The Status
button is lit when an abnormal cond
ition such as a trouble or open
sensor exists in the system.
You can clear certain status entries from the system (such as old
alarm history) by pressing Disarm after checking the status.
Touchpads and key fobs
You can use touchpads and key fobs to control the security
system from remote locations in
and near your home. Interfacing
with the system using a touchpad is similar to using the panel.
Refer to the Simon XT User Manu
al and the touchpad or key fob
documentation for details.
Status beeps
The panel sounds status beeps to
alert you to various system
events and conditions as shown in
Table 3
below
.
Table 3: Status beeps
Activity
Beep
response
Doors+Windows
Exit delay and entry delay beeps sound two times
every 5 seconds and two times per second during the
last 10 seconds.
Motions
Exit delay a
nd entry delay beeps sound three times
every 5 seconds and three times per second during the
last 10 seconds.
Doors+Windows
and Motions
Exit delay and entry delay beeps sound four times
every 5 seconds and four times per second during the
last 10 seconds.
Disarm
One
beep.
Chime
Two
beeps.
Special chime
Three beeps.
Property/asset
management
One beep. (Information displays only on the Two-Way
Talking Touch Screen).
Trouble beeps
Six beeps every minute. Press Status to stop beeps for
4 hours.
No activity beeps
Twenty beeps
every minute for 5 minutes (feature
must be programmed by the installer).
2 / 4
P/N 466-23
99 • REV C • ISS 9JAN13 Alarm sirens
Exterior and interior
sirens make three diffe
rent alarm sounds on
the premises, each indicating a diffe
rent type of alarm. Sirens are
programmed by the installer to time out and stop sounding after a
specified time.
Table 4
below
describes the siren sounds used by the security
system.
Table 4: Siren sounds
Function
Fire
Intrusion
Emergency
Interior and
panel siren
Temporal 3
Steady
Fast on/off
Exterior siren
Temporal 3
Steady
Note:
Temporal 3 refers to a continuous pattern of three siren
pulses, then off for 1.5 seconds, three siren pulses, then off for
1.5 seconds.
Panel indicator lights
Table 5
below
describes the indicator lights on the front panel.
Table 5: Indicator light
Button
When button light is on
When button flashes
Doors+Windows
Doors
and
windo
ws
armed
Doors and windows armed
and no entry delay on
Motions
Motions armed
Motion sensors armed and
latchkey on
Disarm
System disarmed
System subdisarmed
Status
System trouble, open
sensor, or bypassed
sensor
System in alarm
OK
There
are
no
ope
n
sensors
Chime (solid bell)
Door will cause chime
Special chime
(outlined bell)
Motion will cause chime
Latchkey on (key)
Latchkey feature on
Trouble beeps
Your security system is able to automatically test itself for:
•
Power
failures
•
Low
batteries
•
Nonworking
sensors
•
Communication trouble with the central monitoring station
When your system detects one of
the problems above, six rapid
beeps sound every minute until the
trouble condition is corrected.
To stop the trouble beeps, press
Status or arm and then disarm
the system while the trouble cond
ition exists. Trouble beeps will
resume 4 hours later unless the trouble condition is corrected.
Refer to your Simon XT User Manual for details.
Programming
Your Simon XT security system allows you to program certain user
options, such as access codes, time schedules, or the system time.
Refer to your Simon XT User Manual for programming options and
details.
Chimes
Use the chime feature to signal wh
en a prot
ected door is opened
while the system is disarmed.
The panel chimes twice when a
chime sensor is tripped, if the chime mode is enabled. This feature
allows you to be notified when
family members are going in and
out of your home. The chime an
d special chime features are
turned on or off in the System menu.
Note:
If there are no chime sensors in your system, the chime
option will not appear in the System menu.
Your installer may have progra
mmed the system to speak the
sensor name or make a custom chime sound when a chime
sensor is tripped. The chime sound
, if programmed, will be played
in place of the stan
dard chime beeps.
To enable or disable the chime feature:
1. Scroll until the display shows
Chime
, and then press OK. The
current setting will flash.
2. Scroll to toggle the chime feat
ure on or off, and then press
OK. The setting will stop flashing.
3. Press Status to exit.
A solid bell icon will appear in th
e display when the chime feature
is enabled.
Special chime
The special chime feature allows you to install motion sensors in a
patio or at the front door, and be notified when someone is
approaching those areas. These motion sensors are not used for
intrusion protection. The panel will
chime three times, if the special
chime mode is enabled.
Note:
If there are no special chime sensors in your system, the
special chime option will not appear in the System menu.
To enable or disable the special chime feature:
1. Scroll until the display shows
Special Chime
, and then
pres
s OK. The current setting will flash.
2. Scroll to toggle the special chim
e feature on or off, and then
press OK. The setting will stop flashing.
3. Press Status to exit.
An outlined bell icon will appear
in the disp
lay when t
he special
chime feature is enabled.
Note:
This menu option will not appear
if special chime sensors
are not in your system.
P/N 466-2399 • REV C • ISS 9JAN13
3 / 4
Contact information
For contact info
rmation, see
www.interlogix.com
www.utcfireandsecurity.com.
4 / 4
P/N 466-23
99 • REV C • ISS 9JAN13
© 201
3
UTC Fire & Security Americas Corporation, Inc.
Interlogix is part of UTC Climate Controls & Security,
a unit of United Technologies
Corporation. All rights reserved.
- Uploaded