Install Honeywell LTE-XA or LTE-XV On VISTA-15P, VISTA-20P, VISTA-21iP
Related Products
Related Categories
Description
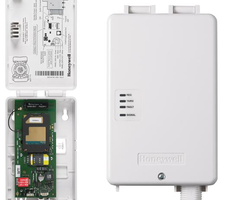
In this video, Michael from Alarm Grid shows you how to install a Honeywell LTE-XA or a Honeywell LTE-XV for a Honeywell VISTA P-Series Panel. The VISTA P-Series Panels that often use one of these communicators include the Honeywell VISTA-15P, the VISTA-20P, and the VISTA-21ip. The LTE-XA and the LTE-XV are both installed in the same manner, and they add cellular communication capabilities to the panel. This means that the system will be able to communicate with the AlarmNet servers across a cellular network for monitoring service.
Cellular connectivity is often recognized as being the most reliable communication path for an alarm system. This is because a power outage or an internet outage will usually take a panel relying solely on IP monitoring offline. But cellular connectivity almost never goes down or becomes unavailable, provided that a strong cellular signal is achieved. That is why many users will upgrade their systems to use cellular monitoring. It is important to note though that a cellular monitoring plan is required if you want to use cellular connectivity with your system. A cellular monitoring plan is typically more expensive due to the cellular service charges involved, Make sure to keep that in mind if you are considering cellular monitoring.
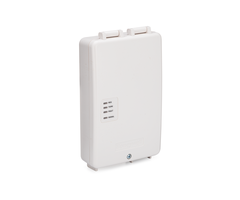
The LTE-XA and LTE-XV are both standalone cellular communication modules. The LTE-XA communicates across the AT&T LTE Network, while the LTE-XV communicates across the Verizon LTE Network. Both accomplish the same purpose. We recommend going with whichever network provides better service in your area. Remember, this decision has nothing to do with the cellular service you use for your personal phone. If you aren't sure which network provides better coverage in your area, then you can check coverage maps to be sure. Choosing one over the other most likely will not save you any money in terms of monthly monitoring expenses.
https://www.alarmgrid.com/faq/how-do-i-install-a-honeywell-lte-xa-or-lte-xv-on-a-vista-p-serie
http://alrm.gd/get-monitored
Transcript
[AUDIO LOGO] Hi, DIYers This is Michael from Alarm Grid. And today, I'm going to be showing you how to install a Honeywell LTE-XA or Honeywell LTE-XV cellular communicator to a Honeywell VISTA P-Series security system, those being the VISTA-10P, VISTA-15P, VISTA-20P, and VISTA-21iP. Those are the P-Series panels. And just to give you a quick reminder-- for Total Connect 2.0, you can't use it on the VISTA-10P. You'll just be using this module for communications with AlarmNet and the central station. You won't have access to Total Connect on a 10P. If you have a VISTA 15P or 20P, then you need a firmware version 9.12 or higher to get Total Connect. And on a 21iP, you need version 3.13 or higher. So check the PROM Chip for your system to verify the firmware version. If you need an upgrade, we have those available. But that's a different topic. Just make sure you're aware of that. So anyway, today, we're using a Honeywell LTE-XA, which is the AT&T version. The LTE-XV is the Verizon LTE version. Go with whichever one works better in your area, whichever network provides stronger cell signals. So we have our VISTA 221IP here today. And we're going to be powering it down and connecting the communicator. So the first thing we want to do is power the system down. And so we're going to just undo the battery right here, just pull the connection there. If you're having trouble getting it, just twist it off and pull it off like that. And then we're going to do the transformer next. In our case, we're using a Honeywell LTE cable, so we can just undo the barrel connection. But I do want to point out that, if you don't have a Honeywell LTE cable, you just have wires at the panel, then a good option is to unplug the transformer, which it's base transformer, like this. Just look at the transformer on your system, and find it, and unplug it. Note that there's a little set screw that you may need to undo. Some people just remove the sets screw because it's kind of annoying. But if you do need to remove it, do that. And if you are having trouble finding the transformer, we don't recommend disconnecting the wires at the panel. Instead, we recommend cutting the power at the circuit breaker. So just as a safety tool, you can go and do that. And the system already knows that the battery is low, because-- I've been going on too much about this, but that's how you're going to disconnect power, you're going to shut off power. But like I said, in our case, we have the Honeywell LTE cable here, so we can just do this. And then the system powers down. You see the keypads went blank. There's nothing on the system. We're going to go. Now, since we are using a 21iP system, we do have to disable the internal IP communicator. This is only for the 21iP. What you're doing is, you're disabling the internet communicator, so that way you can use the cellular communicator, or the external communicator, I should say. Whenever you add an external communicator to the 21iP, you need to disable this internal communicator. And this is done by moving the jumper from these top two prongs to the bottom two prongs. There are three prongs in there. So it was on the top and the middle, and now it's on the middle and the bottom. So you just want to do that, and make sure your system's powered down when you do that. You could damage the system, if you forget to power down before moving the jumper. So make sure you power down first. And now, we're going to begin connecting the LTE-XA-- again, we're using the AT&T model, the Verizon model follows the same process-- to our VISTA-21iP. So we have the module right here. We have it completely not set up at all. And we're going to start from scratch. So we do have to connect this piece to the bottom of it, so it can fit into the panel's metal enclosure, or metal can, so to speak. And I'll show you that in a minute, but the first thing we need to do is open up the module. It's got a Phillips head screw right here, so we'll just go and we'll do that. And there. We've opened up the module, and we've got access to the inside. So we've got our plastic piece here, and we can just insert it into the slot here, so the tabs align. And it just clicks into place, just like that. So that's what you want to do first. So it's going to be sitting on top of the panel right here. That's where it's going to go. That's the slot for it. So what we need to do-- we have a four-wire connection. It has a port for connecting with the communicator, and then four wires for connecting at the panel. So what we need to do, we're going to connect it to this slot here. There we go. And then what I'm going to do first, I'm going to do the washer. This is the washer that secures the communicator to the panel. And it's threaded, and you can just thread it onto here. It's easiest to do this before you start running the wire to the panel. But if you do forget, you can do it afterwards. But we'll just go and screw that in, make sure that's tight. It kind of keeps it a little bit more stable. And there we go. We've got that taken care of. So now, we're going to take our wires, and we're going to just run them through the hole here. And just pull everything together, make sure it's not cut on your systems communicator. And there we go. So we've got our wires run through, and now we can begin connecting at the panel. OK, so we're going to begin doing our four-wire connection. We're going to start with the black wire, which is for negative power, also known as the ground connection. Just loosen up the terminal a little bit to where we can stick it in there. Then we have the red wire, which is for positive power. The black wire went to terminal 4, and the red wire is going to terminal 5. And this is for positive power. OK. And then we have the green wire, which goes to terminal 6, so one of the data connection wires. And last, we have the yellow wire, which goes to terminal 7. You may also see some white wires in there. If you are just matching colors, which a lot of people will do because they'll already have the keypad installed, then just match the yellow with the white wire. Sometimes, you see those instead of the yellow. OK, good. And we'll just give that a quick tug. Looks like our green wire is a little bit loose. We will get that a little bit better. And we're good to go. One thing I do want to note before you go and close the module-- make sure to write down the Mac and CRC codes on the communicator, on the sticker. Take a picture of them, or write them down, and keep them somewhere safe. You will need them for a monitoring service to activate the communicator. And I also want to note that this communicator will draw up to 250 milliamps of current when it's transmitting signals, so make sure to consider that into your current calculation. And add an external power, supply if necessary. But make sure you calculate those 250 milliamps. OK, so we're going to close the module now. We're just going to get the wires out the way there. Well, they didn't really change much, but we can close it there. And we'll just screw this down. OK, we've got that screwed down, taken care of. So now, we're going to begin powering our panel back on. And we're going to do the transformer first. Like I said, we're using the Honeywell LTE cable. [BEEP] If you disconnected power at the breaker, then flip your breaker switch. If you unplugged your beige transformer, then plug that back into the wall. Reapply the set screw, if necessary. But if you do have the luxury of using a Honeywell LTE cable, then just reapply the barrel connection, like we did. And then your system should power back on. You see our keypad's lit up. And we do see some LED lights on the communicator, indicating that it's receiving power. So I'm also going to do the backup battery while I'm over here, just so that stays charging. I'll put that back up there. And you do see that hardware comes included with the communicator, so you can mount this on a wall if you prefer. But we like to just do the can, and it's very easy to do that. If you can get a strong enough cell signal, then by all means, then do this. It's a pretty simple process here. So you will want to check the LED lights on the communicator, to verify cell signal strength. For most people, this won't be a concern. Most areas get covered pretty well by the LTE networks, whether using AT&T or Verizon. But if you are in a rural area, or you have the panel tucked away, maybe in a closet or something, then it can be hard to get a good cell signal. So make sure to check the LED lights. And refer to the manual for more information of what they mean. There should be a manual that came with your LTE-XA or LTE-XV. And you will need to activate this communicator for monitoring service. You will need a monitoring plan that does include cellular communication, as this is a cellular communicator. So if you're signing up for service with Alarm Grid, then we'll contact you at your scheduled activation slot that you chose. And we'll walk you through the rest of the process. A technician will be online with you. We'll tell you what you need to do, and we'll take care of it on our end to get this communicator working properly. So that's how you add a Honeywell LTE-XA or Honeywell LTE-XV to a Honeywell VISTA P-Series system, these being the VISTA-10P, VISTA-15P, VISTA-20P, and VISTA-21IP. Remember, the IP has that jumper, only the 21iP. But if you have any questions about the LTE-XA, or LTE-XV, or about alarm monitoring services in general, send an email to support@alarmgrid.com. If you found this video helpful, make sure to give it a thumbs up below to like the video. And remember to subscribe to our channel for updates on future videos. We hope you enjoyed the video. Thank you.
- Uploaded