Unboxing the ADC-V723 Outdoor 1080P Camera
Related Products
Related Categories
Description
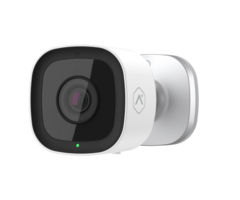
In this video, Joe from Alarm Grid unboxes the Alarm.com ADC-V723 Outdoor Security Camera. This is currently the flagship outdoor camera for use with the Alarm.com platform. This camera offers some great features, making it the premier option for users looking to get started with video surveillance.
There are many things to like about the ADC-V723. For starters, it captures video at up to 1080p quality, and it uses its High Dynamic Range (HDR) capabilities to make recording appear deeper and more luminous. Its 117° viewing angle lets the camera cover a larger area, making it more likely to detect important activity. The camera has an ingress protection rating of IP66, which allows the device to be used reliably in an outdoor environment. It can stand up nicely to rain, snow, dust, intense sunlight, and varying temperatures.
In order to use the ADC-V723, you must have video monitoring service with Alarm.com. The camera cannot be used with any platform outside of Alarm.com. Some examples of monitoring plans that include Alarm.com Video Surveillance include the Alarm Grid Platinum Plan, the Alarm Grid Self-Platinum Plan, and the Alarm Grid Video-Only Plan. Once you have Alarm.com Video Monitoring service, you should get the camera connected to your local IP network. The easiest way to do this is to press the WPS button on your IP router, and then press the WPS/reset button on your ADC-V723 Camera. The camera can connect with 2.4 GHz and 5 GHz WIFI networks.
Once you have the camera online and connected with Alarm.com, you can view its live feed at any time though the Alarm.com website or mobile app. Simply login to Alarm.com using your username and password. Then navigate to the Cameras Menu. Choose the camera to begin viewing its live feed. The camera can also record clips and store them on the Alarm.com Servers.
https://www.alarmgrid.com/products/alarm-com-adc-v723
http://alrm.gd/get-monitored
Transcript
Hi, DIYers. Joe from Alarm Grid. And today, we're going to do an unboxing of a brand-new Alarm.com camera that's really, really nice. And this one here is called the ADC-V723, and this is the one that you're going to want to use if you're planning to install an outdoor camera for the Alarm.com platform. This thing has 117-degree field of view. It's rated IP 66, so it's super durable for outdoor conditions. Its night vision can see up to 40 feet. Its Wi-Fi works on 2.4 or 5 gigahertz. And it comes with a 12-volt DC power transformer. So you got everything you need right in the box to get this thing going, and the specs are going to give you a very, very nice video feed from this unit. Let's take a look at what's inside of the box, though. So as you can see, the box looks like another Alarm.com camera with it right on the front, their name on the top. It's got the specs all on it. So let's go ahead and open this up. Right there on the top, we have this little protective tape, and it actually has a pull tab. There we go. So on the top, we have the user manual in this little bag. Good to have, but everything is electronic, so you can always find what you need online. As we go through the box, right here we have the camera. Let's take a look. So it's really a great-looking unit. Compared to some of the other outdoor cameras that Alarm.com has put out, it's much smaller-- the profile. It's way less conspicuous. So if you're not looking to have a big honking thing on the side of your house or your business, this is great. It's really just a great-looking camera. On the back of it, the mounting bracket has a little groove on the bottom. So if you do just stick it on a wall in an indoor environment, more likely than outdoor for this situation, you can put the wire right down there and it'll give you a nice flush look when you mount it. On the back, we have our power transformer and that's the only plug for the camera, as it communicates over Wi-Fi. Going through the box, we have some wall grommets and some screws. These are great for sheet rock or other such material. As we continue through, this is the mounting bracket. What this thing will allow you to do is install the camera in an outdoor situation. On the back we have a little rubber grommet right there, so when you stick it on the wall, it'll actually make a waterproof seal against whatever you're putting it on. You may need to put some silicone on there, too. But what I'm trying to describe to you is let's say you have an outdoor brick wall on the side of your house. You want to put the camera right there. If you install the camera like this without any sort of grommet, when it's sitting on the wall, if you don't silicone around the base of the camera, you could get some water dripping in the back of it and it could get into the unit and cause some problems. With this, when this sticks on the back of the camera and then you have your hole drilled through the wall with the wire passing through this hole-- might as well just explain it to you 100%. Let me undo this for you. This will pass through here and this will sit on the camera. So you drill the hole through the wall. You'd have to put your power cable in the wall. And then the camera's going to mount on the wall. The first thing that you would mount is this mounting bracket on the wall. Just stick it right there where the hole is. The little grommet right there is going to prevent water from dripping into the hole, getting into the camera, or going the other direction. When this is there, this just simply mounts on this bracket and there you go. You have an outdoor camera. Any outdoor cameras, though, that you do put up, it's recommended to take some silicone-- you can go to your Home Depot, or Lowe's, or any other hardware supply store. Pick up a tube and put it around the edge of it just to make sure that no water does get at it because this grommet here isn't really a heavy duty big grommet, and it may not make that perfect seal that you need. A little bit of silicone, though, will do you just right. So and that thing sticks on there pretty nice. Here we go. The last thing that we have in the pack is the power transformer. Now, Alarm.com has been generous with the wire on this one and they've given a whole lot of slack. With that, we've pretty much gone through the whole box. What we got is we have our transformer, we have our mounting bracket, we have our mounting hardware, and then we have the camera and the user manual for the camera. Nothing else is in the box. That's pretty much it. Again, though, if you are looking for an outdoor 1080p camera with night vision that's rated well and will work with Alarm.com, this is the one that you want to go with. It is new and it's wonderful. Check it out. If you have any questions about Alarm.com cameras-- how to install them, how to extend that wire, or any other camera-related questions-- feel free to give us a call at 888-818-7728, head to our website at www.alarmgrid.com, or send us an email to support@alarmgrid.com. If you did enjoy the video, feel free to subscribe. And if you want to be notified when we post future videos, hit the notification button below and we'll send you an update when we do so. Thanks for watching and have a great day.
- Uploaded