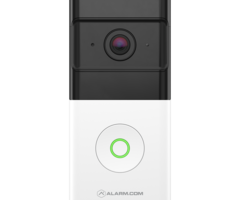
Alarm.com ADC-W115C Smart Chime - Install Guide
Related Products
Document Transcript
Alarm.com Smart Chime
Installation Guide
ADC-W115C Pre-installation
checklist
• ADC-W115C
Alarm.com Smart Chime (included)
• Standard non-switched
electrical outlet
• Broadband Internet connection
(cable, DSL, or fiber optic),
with a Wi-Fi router
• A computer, tablet, or smartphone
with Internet access is required
• An Alarm.com Wi-Fi connected device
• An Alarm.com account with a service
package that supports video
1 Overview
Designed to work seamlessly with the Alarm.com
platform, the ADC-W115C serves as a robust
Wi-Fi extender and customizable wireless
doorbell chime. Simply plug the ADC-W115C into
a wall outlet, pair with the existing router, add to
an account, add a doorbell camera, and enjoy
boosted network signals that provide
instantaneous chime notifications.
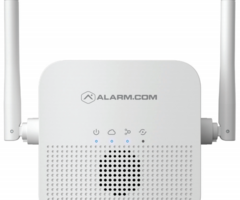
2
❶
Antennas
❷
Power LED
❸
Router LED
❹
Devices LED
❺
WPS LED
❻
Speaker
❼
Reset button
❽
WPS button
3
❶
❶
❷
❹
❺
❼
❽
❻
❸ Connect the
Alarm.com Smart
Chime to your
Wi-Fi network
Choose the appropriate installation
wizard (customer or technician) below
or proceed to the AP mode or WPS
mode section to begin adding
the chime.
Customer - Mobile App
Installation Wizard
❶
Log in to the Mobile App. You will need
the username and password of the
account to log in.
❷
Tap the navigation
menu.
❸
Tap
+ Add Device
>
Video Camera
>
Enter MAC Address
. (If you do not see
the Add Device option, please use the
AP mode or WPS mode instructions
below to complete your installation.)
❹
Follow the on-screen instructions to
finish adding the chime.
Service provider technician -
MobileTech installation
❶
Log in to MobileTech.
❷
Select the customer’s account.
❸
Tap
Quick Actions > Add Device >
Smart Chime.
❹
Follow the on-screen instructions
to finish adding the chime.
WPS mode
To ensure sufficient Wi-Fi signal,
complete these steps with the chime
in close proximity to your router.
❶
Plug the Alarm.com Smart Chime into
a non-switched electrical outlet.
Wait for the Power LED to change
from blinking to solid.
❷
Press and hold the WPS button for
approximately five seconds or until the
LED changes from blinking rapidly to
blinking slowly.
❸
Activate WPS mode on your router.
Consult your router’s user guide for
more information. The Alarm.com
Smart Chime will begin to connect to
the Wi-Fi network. The Smart Chime’s
Router LED will begin blinking when a
connection is established and will
4 become solid when an Internet
connection is successfully established.
❹
Add the device to the account by either
selecting the account in MobileTech or
by using a web browser and entering
the following URL:
www.alarm.com/addcamera
(you will
need the customer username
and password).
❺
Begin the installation by entering the
Alarm.com Smart Chime’s MAC
address, located on the back of the
chime or on the packaging.
❻
Follow the on-screen instructions
to finish adding the chime.
You can now unplug the chime and
install it in its final location.
AP mode
To ensure sufficient Wi-Fi signal,
complete these steps with the chime
in close proximity to your router.
❶
Plug the Alarm.com Smart Chime into
a non-switched electrical outlet.
Wait for the Power LED to change
from blinking to solid.
❷
On an Internet-enabled device, connect
to the Wi-Fi network “
Chime Config
(XX:XX:XX)
” where XX:XX:XX is the last
six characters of the Alarm.com Smart
Chime’s MAC address. The MAC
address and required Wi-Fi password
are located on the back of the chime,
on the packaging, or on the sticker
that is included in the packaging.
Note:
This configuration network will
only be available when the device is
not connected to the home’s Wi-Fi
network. To switch to a different Wi-Fi
network, while actively connected
to the original network, use the
Alarm.com Smart Chime’s Wireless
Network Settings Page on the
Customer Website.
❸
On the same device, open a web
browser and enter:
http://connect.
alarm.com
or
http://192.168.173.1/
in
the URL field. Follow the on-screen
instructions to add the Alarm.com
Smart Chime to the Wi-Fi network.
The Router LED will begin blinking
when a connection is established
and will remain illuminated
when an internet connection is
successfully established.
❹
Add the device to the account by
either selecting the account in
MobileTech or by using a web browser
and entering the following URL:
www.alarm.com/addcamera
(you will
need the customer username and
password).
5 ❺
Begin the installation by entering
the Alarm.com Smart Chime’s
MAC address, located on the back of
the chime, on the packaging, or on
the sticker that is included in
the packaging.
❻
Follow the on-screen instructions to
finish adding the chime.
You can now unplug the chime and
install it in its final location.
Connecting an
Alarm.com Wi-Fi
device to the
Alarm.com
Smart Chime
❶
Unplug the Alarm.com Smart Chime
and move it to a non-switched
electrical outlet between your home
router and your Alarm.com
Wi-Fi devices. Wait for the Power LED
to change from blinking to solid.
❷
If the Router LED begins blinking,
wait for the LED to change from
blinking to solid.
❸
If the Router LED does not begin
blinking, your Alarm.com Smart Chime
is too far from your home router.
Identify a non-switched electrical
outlet closer to your home router and
return to step 1.
❹
Once the Router LED is solid, you
can assess the strength of the signal
being received on the Alarm.com
Smart Chime’s Wireless Network
Settings Page.
Wi-Fi Protected Setup
(WPS) mode
❶
Be sure to add the Alarm.com Smart
Chime to an Alarm.com account
before using WPS mode to add video
cameras or other Wi-Fi devices to
the Wi-Fi network.
❷
To enter WPS mode, press and release
the WPS button on the Smart Chime.
❸
The WPS LED will rapidly flash to
indicate that the device is in
WPS mode.
❹
Press the WPS button on the device
you want to add to the Smart Chime’s
Wi-Fi network.
❺
The Devices LED will flash three
times and will become solid upon
a successful pairing.
6
Accessing the
Alarm.com Smart
Chime’s wireless
network or chime
settings page
❶
Log in to your account on the
customer website
❷
Select
Settings
❸
Select
Manage Devices
❹
Find your Alarm.com Smart Chime
and press the
Options
button
❺
Click
Device Settings
❻
Select either the Wireless Network
Settings or Chime Settings tab
7 Troubleshooting
If you are still having issues using the
Alarm.com Smart Chime, please try the
following troubleshooting options:
Verify your Alarm.com Smart Chime
is connected to your router’s
Wi-Fi network
Check your Alarm.com
Smart Chime’s Router LED:
Router LED is off
If the LED is not illuminated, the
connection to the router has been lost.
Check your router to ensure that it is
on. Next, try moving your Alarm.com
Smart Chime closer to the router to
confirm it is in range. If the connection
is not re-established, try connecting
your device to your Wi-Fi network
using WPS mode. To reconnect via AP
mode, follow the instructions listed in
the
AP Mode
section.
Router LED is blinking
If the Router LED is blinking, there is a
local connection to the router but no
internet connection. If you cannot
access the Internet using your router,
please contact your Internet Service
Provider to restore Internet access.
Verify the Devices LED
If your devices are connected to the
Alarm.com Smart Chime, the Devices
LED will be solid. If you have multiple
devices that are connected to the
Alarm.com Smart Chime, you can view
the currently connected devices on the
Alarm.com Smart Chime’s Wireless
Network Settings page on the
customer website. If the device
experiencing connectivity issues
is not listed or the Devices LED is off,
try reconnecting the device via WPS. If
this does not solve the problem, try
resetting the disconnected device and
reconnecting it using WPS mode.
Power cycle
Unplug the device from power for 10
seconds and plug it back in. Wait for
the Power and Router LEDs to become
solid before trying to use the device
again.
8 Performing a communication test
Press the WPS button for 10 to 15
seconds. The WPS LED will stop
blinking and the Router LED will blink
five times. If the Router LED turns
solid, the test was successful. Please
wait two minutes before trying to use
the device again.
Factory reset
Press and hold the Reset button
(pinhole) for 15 to 20 seconds (use a
paper clip or tool if necessary). All
LEDs will blink simultaneously to
indicate that the device will reset.
This will restore factory-default
settings to the device. All network
configurations will be deleted and all
connected devices will need to be
reconnected using WPS mode.
Questions?
Visit
answers.alarm.com
or contact your service provider.
9 LED reference
Power
Off
- Device powered off
On
- Device powered on
Blinking
- Device booting up
Router
Off
- No local or Internet connection
On
- Connected to Internet
Blinking
- Local connection, no Internet
Blinking (five quick blinks)
-
Communication test initiated
Devices
Off
- No device connected to chime
On
- Device connected to chime
Blinking (three quick blinks)
-
New device connected to chime
WPS
Off
-
WPS mode not enabled
Blinking (slowly)
- WPS mode enabled
to connect to router
Blinking (rapidly)
- WPS mode enabled
to connect to client device
10 Additional states
All LEDs Blinking (escalating)
-
Firmware upgrade in progress
All LEDs Blinking (simultaneously)
-
Reset in progress
Notices
FCC warning statement
This equipment complies with FCC radiation exposure
limits set forth for an uncontrolled environment.
This equipment should be installed and operated with
minimum distance 20cm between the radiator &
your body. This equipment has been tested and found
to comply with the limits for a Class B digital device,
pursuant to Part 15 of the FCC Rules. These limits are
designed to provide reasonable protection against
harmful interference in a residential installation.
This equipment generates, uses and can radiate radio
frequency energy and, if not installed and used in
accordance with the instructions, may cause harmful
interference to radio communications. However, there
is no guarantee that interference will not occur in a
particular installation. If this equipment does cause
harmful interference to radio or television reception,
which can be determined by turning the equipment off
and on, the user is encouraged to try to correct the
interference by one of the following measures:
•
Reorient or relocate the receiving antenna.
•
Increase the separation between the equipment
and receiver.
•
Connect the equipment into an outlet on a circuit
different from that to which the receiver is connected.
•
Consult the dealer or an experienced radio/TV
technician for help.
Any changes or modifications not expressly approved
by the party responsible for compliance could void the
user’s authority to operate this equipment.
This device complies with part 15 of the FCC Rules.
Operation is subject to the following two conditions:
1
This device may not cause harmful interference, and
2
This device must accept any interference received,
including interference that may cause
undesired operation.
Industry Canada statement
This device contains licence-exempt transmitter(s)/
receiver(s) that comply with Innovation, Science and
Economic Development Canada’s licence-exempt
RSS(s). Operation is subject to the following two
conditions:
1
This device may not cause interference.
2
This device must accept any interference, including
interference that may cause undesired operation of
the device.
This equipment complies with FCC and ISED radiation
exposure limits set forth for an uncontrolled
environment. This equipment should be installed and
operated with a minimum distance of 20cm between
the equipment and your body. This device and its
antenna(s) must not be co-located or operating in
conjunction with any other antenna or transmitter.
Cet appareil contient des émetteurs ou récepteurs
exempts de licence qui sont conformes aux RSS
exempts de licence du Sciences et du Développement
économique Canada. Le fonctionnement de
l’équipement dépend de deux conditions :
1
Cet appareil ne doit pas provoquer d’interférence.
2
Cet appareil doit accepter toute interférence, y
compris celles qui pourraient provoquer un
fonctionnement indésirable de l’appareil.
Cet appareil est conforme aux limites d’exposition aux
radiofréquences établies par la FCC et l’ISED pour un
environnement non contrôlé. Cet appareil doit être
installé et utilisé à une distance minimale de 20
centimètres entre l’appareil et votre corps. Cet
appareil et son ou ses antennes ne doivent pas être
situés ou fonctionner en conjonction avec une autre
antenne ou un autre émetteur. 8281 Greensboro Drive
Suite 100
Tysons, VA 22102
210419
© 2021 Alarm.com. All rights reserved.
- Uploaded