Qolsys IQ Shock-S - Quick Install Guide Dated 10/10/17
Related Products
Related Categories
- Wireless Shock Sensors
- Wireless Door Sensors and Window Alarm Sensors
- Wireless Shock Sensors
- Wireless Door Sensors and Window Alarm Sensors
Document Transcript
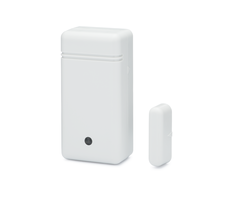
Dimensions: 23.97mm D x 39.91mm W x 79.60mm L
Frequency: 319.5MHz
Battery: 3V lithium CR123A
Magnet gap: 1 inch max
Operating Temperature: 32°-110°F (0°-45°C)
Operating Humidity: 5-85% RH non-condensing
Compatible with Qolsys control panels
Supervisory signal interval: 60 min (approximately)
Potentiometer: Shock sensitivity adjustment
✓
Exterior Doors
✓
Sliding
glass
doors
Windows
✓
✓
✓
IQ SHOCK-S QUICK INSTALL GUIDE
CHOOSE
INSTALLATION
LOCATION
This is a quick guide for experienced installers only. Refer to http://dealers.qolsys.com (login required)
Three dip switches allow you to customize the behavior of this device:
STEP
2
DIP
SWITCH
CONFIGURATION
SPECIFICATIONS
STEP
1
DS#1 - Test Mode:
Enables sensitivity test
mode.
Please note, when test mode is
enabled (ON) the IQ Shock will
NOT transmit signals to the IQ
Panel. This mode is only used
for initial installation of the
shock sensor.
ON:
OFF:
Disables sensitivity
test mode.
DS#2 - Pre-Warn:
ON:
Enables pre-warn
sounder and red LED.
OFF:
Disables pre-warn
sounder and red LED.
DS#3 - Reed Switch:
ON:
OFF:
Enables reed switch.
Disables reed switch.
ON
1
2
3
MAX
MIN
SENSOR
MAGNET
TAMPER
SWITCH
POTENTIOMETER
SHOCK
SENSOR
DIP
SWITCHES
LED
BUZZER
BATTERY
IMPORTANT NOTE:
The IQ Shock is intended to be installed on doors with or without glass inserts and
on window frames but not on the actual glass surface. Adjusting the Shock Sensitivity:
Adjust the shock sensitivity from the final mounting position. Test shock sensitivity by moving dip switch 1 to ON (enable test mode). While in
this mode a short beep and green LED will flash when the unit detects a pre-warn threshold. A long beep and red LED will flash when the unit
detects a shock level strong enough to trigger an alarm at the control panel.
Please note that no RF transmission from the sensor occurs during
sensitivity test mode.
Gently hit (using the palm of your hand) the surface on which the device is installed. Gradually increase the pressure or turn the shock sensitivity
adjustment dial clockwise with a small screwdriver until the desired response is obtained. Ensure that the device is not triggered by accidental
vibration (e.g., wind, birds, window coverings) hitting the protected window or surface. Normal traffic or operation of the door/window should not
trip the shock sensor. When testing the sensitivity of the unit, do not cause stress or damage to the mounting surface or to the glass.
WARNING:
In order to avoid personal injury while testing sensitivity, do not apply pressure to glass inserts or windows.
Move dip switch 1 to OFF (disable test mode) once shock sensitivity has been set to the desired level. Verify that the IQ Shock properly
communicates properly with the IQ Panel.
Open/close magnet
Tap cover
OR
STEP
3
OPEN
DEVICE
CASING
STEP
5
SECURE
SENSOR &
MAGNET
Document#: IQSS-QG-10-10
Revision#: 10/10/17
Issue Date: OCT 2017
Qolsys Product #: QS1138-840
Qolsys Inc. proprietary.
Reproduction without permission is not permitted.
FCC ID: 2ABBZ-RF-ARSHK
IC: 11817A-RFARSHK
TechSupport@Qolsys.com
CONTACT TECH SUPPORT
GOT QUESTIONS?
This device complies with part 15 of the FCC Rules. Operation is subject to the following two conditions: (1) This device may not cause harmful interference, and (2) this device must accept any interference received, including interference that may cause undesired
operation. Changes or modifications not expressly approved by the party responsible for compliance could void the user's authority to operate the equipment. This device complies with Industry Canada licence-exempt RSS standard(s). Operation is subject to the
following two conditions: (1) this device may not cause interference, and (2) this device must accept any interference, including interference that may cause undesired operation of the device. Cet appareil est conforme avec Industrie Canada exempts de licence
standard RSS (s). Son fonctionnement est soumis aux deux conditions suivantes: (1) cet appareil ne doit pas provoquer d'interférences et (2) cet appareil doit accepter toute interférence, y compris celles pouvant causer un mauvais fonctionnement de l'appareil.
Push tab to open
the device.
Magnet
Sensor
1”
MAX
Place your panel in
“autolearn" mode
Customize name and
settings as desired and
touch “ADD”
ADD
STEP
7
ADJUST
SHOCK
SENSITIVITY
STEP
4
PULL
BATTERY
TAB
STEP
6
LEARN
INTO
PANEL
*If dip switch #1 is on, no RF transmission is generated by the sensor and it
will not auto learn. Dip switch #3 must be on for the reed switch to work.
- Uploaded