2GIG SMKT3-345: GoControl Programming
Related Products
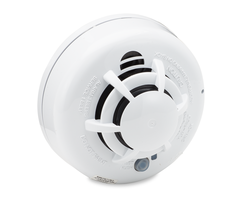
Description
2GIG SMKT3-345: http://alrm.gd/2gig-smkt3-345
2GIG Go!Control: http://alrm.gd/2gig-gocontrol
Get Monitored! http://alrm.gd/get-monitored
The SMKT3-345 is an excellent smoke detector made by 2GIG specifically for the 2GIG Go!Control security system. The 5808W3, Honeywell's competing version of it is as nice and works for the 2GIG systems, but we have found occasionally has supervision problems with this system. So for those looking to use the 2GIG Go!Control, we generally recommend using the sensors that are originally designed for the unit. In this video, Sterling gives homeowners a run-thru on how exactly to program the SMKT3-345.
http://alrm.gd/get-monitored
Transcript
Hi, DIYers. Sterling with Alarm Grid here. Today, we're going to show you how to program a 2GIG-SMKT3-345 wireless smoke and heat detector. This is a great device to add to your 2GIG Go! Control panel as it will add value to your burglary alarm system by turning it into a system that can detect for smoke alarms, high heat alarms, and even low temperature or pre-freeze conditions. It's got an integrated high heat temperature sensor that activates on a 135 fixed heat detector-- 135 degree fixed heat detection. It'll activate the pre-freeze condition at 41 degrees. And then, of course, it will also detect from smoke alarms. On the underside of the device, which we remove by twisting the head from the base counterclockwise, we have our three batteries providing power to our SMKT3. We have our test button on the top. And we're going to now show you how to program this device to your 2GIG Go! Control panel. Whenever doing zone programming, we do security, menu, toolbox. We enter our installer code, which is 1561 by default unless you've changed the code. 1561 gets you to your toolbox. From here, we hit our right arrow twice to go to installer toolbox and System Configuration. Now, we're on question number one in our system programming. The 2GIG Go! Control is a question-based programming and question number one is always for our wireless zone programming. You can see at the top it says 01 to 48 because this system supports 48 wireless detectors broken out over 48 wireless zones. So on the white line, the first option we see is 01. That means we have not yet programmed anything to this system and therefore, we can go ahead and hit the down arrow to say, yes, we want a program zone 1. If we already had zones programmed, we could advance to the next available zone and program it on whatever number that may be. In our cases, this is the first one. We hit the down arrow and now we choose our RF sensor type. Now, there's a list of sensor types for the panel. Every sensor type is a different action that will happen when the device programmed in that sensor type is activated. The sensor type will also determine how the sensor will operate or when it will operate. In our case, for a smoke detector, we can do all three actions smoke, heat, and low temp. The only way the panel would know that is if we use three different zones and each zone has its own sensor type. So first we're going to learn in our smoke detection zone. So we hit the right arrow until we see 24-hour fire, OK? So smoke and heat, we want to make 24-hour fire. That means it's going to send a fire alarm to the Central Station, and 24 hours means it will happen with whether the system is armed or disarmed. So obviously with smoke and heat, it really should not matter if the system is armed. You would want that alarm to go to the Central Station no matter what. So we lock in our 24-hour selection with a down arrow. Now, we choose our equipment code. 2GIG Go! Control wants us to tell the system what kind of sensor, specifically model number or manufacture number that we're using. So in this case, we hit the right arrow until we get to not SMKT3 because that would be our GE1. We actually want our 2GIG smoke detector, which is the SMKT3. You can see if you go further, you have SMKE1. So you have a couple of different smoke options and it'll give you a description of which one we want. This is our 2GIG option. This is what we want. Hit the down arrow and now we can enroll our serial number. On this, the serial number and transmission ID sticker looks a little different than other sensors. You'll notice instead of a seven-digit number like we're used to, we have a lot of digits on here. And if you're confused about which one to put in, instead of typing it in, what you can always do is auto enroll your device by hitting Shift and Learn. If we close this up by lining up our arrows or our tabs on the base in the head, you put them offset just a slight 5-10 degrees, twist clockwise, and now it's waiting for a sensor transmission. A way to transmit the sensor is to tamper the device. You can see that it's now enrolled. And if we look back at the sticker, it makes a little more sense. The transmission ID is actually these last seven-digits, 0121250. If we hit OK, you can see that numbers there. So again, you could have typed that number in. Now that you know out of all of these digits on here and all these numbers on this sticker which one is the actual transmission ID, you could have typed it in. But to avoid confusion and mistakes or user error, if you auto enroll by tripping the tamper, you really can't mess it up. So now we hit the down arrow, and they want us to choose whether the device is new or existing. If this was a takeover or we were putting a system into a house that already had some sensors, you may have a sensor that's out in the field that you didn't-- that was there before you got in the house and you could tell your monitoring company that it is an existing sensor so they know, OK, they don't-- well, it just gives them better info in case they ever have to troubleshoot the device so they know if they sold it to you or not. In our case, this is a brand new device we're going to hit the down arrow. Now, we have loop number. Now, if you've watched other 2GIG zone or sensor programming videos on our channel, you've noticed that we nearly always use loop number 1 for this type of sensor or for a 2GIG sensor rather. On this one, we're going to do the same. We're going to use loop number 1. But I want to point out all that will do is alert on smoke detection. So if there was a fire that got really hot in the room, hit 135 before smoke got to this sensor, we would not know that if we're only programming loop number 1. We also would not know if the room got to 41 degrees on the pre-freeze condition because loop number 1 will only trigger off of the smoke detection. But that is a critical aspect of this device and definitely something we want to program. So we're going to go ahead and lock in that loop number 1 and now we're going to tell the system that this zone with that loop is our smoke detector. And to do that, with every 2GIG Go! Control panel, we get our nice handy quick programming guide. And on the back of that guide, we have a voice descriptor list. We also have this list on our website if you ever need that information because you've misplaced your guide or you didn't buy the system new and you don't have this guide. And you can see every word in the available library, from A to Z, has a three digit number that's associated for that word. So instead of typing the word on the screen with an alpha keypad, what you're actually doing is hitting insert which puts in the first available word of abort. Abort is 002. Of course, we don't want abort because we want to call this a smoke detector. So if we look down the list smoke is 208. So with abort highlighted, if we hit 208, we now see it says smoke. Now we want to say the second word of detector. And we can do insert to get a second word and do 052. If you had more than one smoke detector, you could exit there, do insert, and then you could say master, 140, bedroom, 02f4-- oops, forgot to hit Insert to lock in the master. So if we do 140 again and then insert, and then we do bedroom, 024, insert again. And now we can call it a smoke, 208. And then finally, detector was 052. And now we have a nice clear description of where this device is in the home. So that in case someone wasn't familiar with the way the system was programmed and had an alarm showing that the smoke went off, they would know where the event occurred. And it's nice useful information there. So we hit the down arrow to lock that in and we're on the option for reporting. If your system is monitored with a Central Station, you always want this to be enabled. The only time you would disable that is if you had a local system where it was just making a loud noise here, then you don't necessarily need the alarm event to go anywhere. This question is supervision. Do you want the system to know about a low battery event on the smoke detector, and also perhaps more critical, do you want the system to know if the smoke detector is out of range? So when you enroll it, you're here at the panel perhaps and now if you go mount it and you mount it outside of the wireless range of this system without supervision, you would not know that the detector, when it goes off, it's not going to alert the panel. With supervision enabled, this panel will periodically check the sensor and say, are you there? And as long as it says, yes, I'm here, then we're good. If the sensor never checks in, you would get a supervision error and you could know that there's a range issue. So we always encourage you to do supervision on a smoke detector. We hit the down arrow and now we have the option for chime. I can't imagine why anyone would want the panel to chime on smoke because it's a 24-hour zone. An alarm activation is going to set the alarm off so chime is not something we set up on a smoke detector. So now we have our summary screen and we can verify we've set everything up properly. We have it set for device type 24-hour fire. It'll activate in away or stay mode. We have a 2GIG smoke detector as the equipment code. We have the proper serial number. We've told it that it's a brand new device on loop number 1, which again, is doing the smoke detection. And then we have our voice descriptor master bedroom smoke detector. We are reporting our alarm events to the Central Station. We are supervising our sensor to know about low battery and range issues, and we have chime disabled. Again, if you've watched other 2gig panels or 2GIG programming videos, you'll notice that one of the other questions that you see on a lot of the other ones is dial delay. And on a burglary alarm, like a door contact or motion, you can program the system so that it would hold the alarm at the panel and not send it to the Central Station until a programmed delay time period has timed out. With a life safety device, like a smoke and heat detector, you certainly would not want to delay any transmissions of that alarm to the Central Station. They don't even give you the option to do that with this type of sensor. And that's based on the device sensor type at the top. So, now if we do skip, we're back to question number 2. We're not done yet because we want to program the other two types of alarm events that this detector can tell you about, the high heat on the 135 temperature and also the 41 degree pre-freeze condition. So we're going to go to, we're going to hit question 1. So we're going to do question number 01 and we're back to question number 1, which is our wireless. We can see zone 1 is now programmed as master bedroom. If we advance to zone number 2 and hit the down arrow, we can program a second zone with a unique loop, something different than loop number 1 for our heat detection. So for the sensor type, even though it is the smoke detector, smoke and heat both get programmed as 24-hour fire again, active in away and-- I'm sorry-- arming and disarming modes. So we hit the down arrow and now we do our equipment code. Again, we hit the right arrow until we get to 2GIG smoke detector we hit the down arrow to lock it in, and we can either type in our serial number since we now know which number to put in or we could have auto enrolled by tampering the device again. When we hit the down arrow, we still have a new device. So we're locking that in. And here on the loop number, if we try to do loop number 1, we're going to get a duplicate loop number error. So we're going to choose loop number 2 because this zone is for the high heat detection. Hit the down arrow and we're going to tell the panel that it's unique on the high heat by giving a unique descriptor different than master bedroom smoke detector. We'll call it master bedroom heat detector. So again, master is 140. I first insert to get the word. And then 140, insert again to get the second word. Bedroom is 024, insert again. And we're going to do heat, which is 111. Insert again and do detector, which is 052. And now we have a unique zone. Same device, but zone 1 is smoke, zone 2 is heat. Now the Central Station will know, OK, was it, the smoke detector that went off or the heat detector that went off. When they can relay that kind of information to the authorities when dispatching, it'll help them know what they're dealing with when they show up. We definitely want this to be reporting to the Central Station because our 2GIG Go! Control will be monitored. And if we hit the down arrow, we're asked about supervision. Same as for the smoke detector, we would want to know supervision on this device. And chime, again, is not going to be something we would want on a smoke or heat. We have our summary screen and we can confirm all of our settings are good. And then we hit skip. Back to Q2. Go to 01. Now we're back to question number 1, which is the wireless zone programming. And because we also want to know about low temperature alarms in our master bedroom, we hit the right arrow to go to zone 3. We hit the down arrow. And even though it is a smoke detector, we're not going to choose 24-hour fire for this one. We're going to choose 24-hour auxiliary. That's a unique kind of alarm sound different than smoke or heat on the pre-freeze condition. Obviously that's not life safety. That's more to protect for burst pipes or flooding things like that. So we're going to do 24 hour auxiliary for our loop 3, our third zone that we're using with our SMKT3. We hit the down arrow to lock it in. , On our equipment type, we hit the right arrow to go to freeze and when we hit the down arrow, we do our equipment code over to 2GIG smoke and heat or rather 2GIG smoke detector, we hit the down arrow and we either auto enroll or type in the serial number. In this case, we're going to auto enroll. We hit Shift and Learn, tamper the device, and we now have our unique transmission ID number for this device. We hit OK, hit the down arrow, choose that it's a brand new device and auto enrolled on loop 3 because it already had a loop 1 and a loop 2. This is the next and only other available loop. Hit the down arrow. We don't want to delay transmissions of the smoke of the low temperature alarm to the Central Station. We want it to go through immediately. So we hit enabled. And now we do our voice descriptor. So we know this is going in our master bedroom. And just like we did before, we hit Insert to put the first word. We do a 140 for master. We hit Insert again. We do a 024 for bedroom. We hit an insert again. And there's a couple options here. You could say low temperature or whatever. But in our case, we're going to do freeze, which is 096 master bedroom freeze. Down arrow to lock it in. We do want it to report to the Central Station. We do want it to be supervised for low battery and range issues, and we do not want it to chime. And we can now look and see that we have all of our settings set up the way we would want for our loop number 3 for our pre-freeze condition in our bedroom. We hit skip. Now that we're at Q2 and we've learned in all three possible loops for this device, we're simply going to end our programming and save our changes by exiting. When we exit, you'll see the screen goes dark. The panel literally reboots itself. And once it comes back up, you'll hear the system say disarmed. The screen will come back up and we know that we've learned in our SMKT3. System disarmed. Ready to arm. System disarm. Ready to arm. A few more seconds and we'll see the screen light up. System ready. Not armed. If we were to tamper the device, we get a "not ready to arm" and we have an alert we have a trouble on all three zones. Because this device is programmed to three zones, when we tamper it, it's tampering all three zones. We close the tamper again, close the device up, tamper goes away. System is ready. We have now verified that our SMKT3 is properly programmed to our 2GIG Go! Control. We hope you've enjoyed this video on programming your 2GIGs wireless smoke, heat, and low temperature alarm. And if you have-- and we invite you to subscribe to our channel. And if you have any questions when programming your SMKT3-345, please email us, support@alarmgrid.com.
- Uploaded