Adding a Wireless Motion Sensor on an Interlogix Simon XTi
Related Products
Related Categories
Description
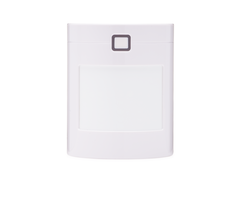
In this video, Jorge shows users how to add a wireless motion detector to an Interlogix Simon XTi System. Sensors are added to the panel through programming. The user will need to provide the system's Installer Code to access programming. The sensor can be learned in by activating the tamper switch.
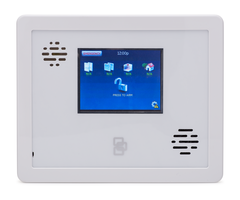
The Interlogix Simon XTi System has a built-in wireless receiver for using wireless security sensors. The wireless receiver will support sensors that operate at the 319 MHz frequency. This includes any sensors from Interlogix/GE and Qolsys. Please note that encrypted Qolsys "S-Line" sensors will work with the system, but they will function as non-encrypted sensors when used with the Simon XTi.
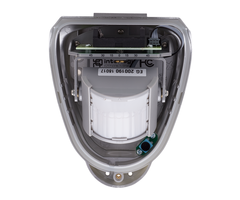
When enrolling the sensor, the user will first need to access programming. This requires providing the Installer Code for the system. The default Installer Code for the Simon XTi is 4321. From there, the user should choose "Sensors" and the option "Learn Sensor". This will put the system into a mode for auto-enrolling sensors. A sensor is then recognized by the system by activating the device's tamper switch. This is done by removing the device's back cover. Once the sensor has been recognized, its settings can be adjusted.
Each sensor learned-in with the Simon XTi will be assigned a Zone Number so that it can be identified. A sensor will be automatically assigned to the next available slot on the system, but a user can assign it to a different slot if desired. The Sensor Group will determine how the system responds when the sensor is activated. This is also referred to as a Response Type. Most motion sensors are set to 17 for Interior Follow or 19 for Interior with Delay. The difference between the two is that Interior Follower will trigger an alarm immediately if the sensor is activated while the system is armed. But Interior with Delay will allow the user to disarm the panel with a valid user code within an entry delay period before an alarm occurs.
http://alrm.gd/get-monitored
Transcript
hey di wires I'm George here with longer today we're going to be adding a wireless sensor to an inter logic Simon XTi panel so that's going to be this system right over here and we're actually going to be working with the TX East 721 this is a wireless pet immune motion detector now just to start off you usually want to use motions in a area where a door or window sensor won't necessarily be quite logical to use and right so like if you have like an open area like a living room this would be a really good place to put it in you can also use these as a backup to any windows so if you have a window and you're worried about someone smashing it instead of actually just opening which would set off the windows sensor you can actually add this to protect the window as well so once they step through the motion will pick up on it now this motion sensor here it is a pet immune motion sensor so it actually does up to 40 pound pets yeah so 40 pounds would actually be on the normal sensitivity and then if you actually switch it to high sensitivity it drops that pounds down to 20 so make sure you pick carefully what setting you do choose and I'll show you after I program it in how we can switch the sensitivity on this motion detector so to start off I'm just gonna go ahead and start by learning it learning it into the Simon XTi panel so first thing you're gonna do is the Simon screen is at the home screen it'll say press the arm and then in the bottom right you'll see a little gear icon you're gonna go ahead and hit the gear now this touch screen it's not just a simple touch right you actually have to push in now it takes us to our status in settings we're gonna go ahead and hit the down arrow key all the way to the last page that's gonna bring us down to system test and programming we need to go into programming to program this in so we're gonna hit program it's gonna ask you for the access code now the access code for most or actually for the Simon panels so whether the xci RX t i5 or the Simon XT the installer code is four three two one so sorry I backed out because I took too long I'm gonna go ahead and go back gear icon hit the down arrow key all the way down hit programming enter in the installer code four three two one hit okay and now I'm in system programming now keep in mind that installer code I used is the default one you or your monitoring company may have changed it at one point so you want to make sure that you're using the correct installer code all right now once we're in system programming you we're gonna make our way over to sensors once you're in sensors you do learn sensor this is gonna put the system into a learning mode now any sensor that you're learning into the Simon XT xti panel or any Simon panel the way to trip the sensor which is what it's saying is to just set off the tamper so if you look at the top of my motion right here there's a little button once I take the back plate away so I push down the button I pull the back plate away it'll set off the tamper and it'll learn it in to the trip sensor mmm-hmm struggling here there we go it tripped the it tripped the tamper and it automatically as you can see brings up the the sensor right so I learned into sensor number one that's the zone number the sensor group this is going to be the the response type right so whether it's going to be a perimeter an entry exit and interior follower interior follower with delay now you can actually edit either one of these so if you wanted to switch the zone number you could just hit edit on that you can switch the zone number I'm gonna leave it as one because it's my only Zone in the panel the sensor group I don't want it set to ten I want either four motions you want to use 17 or nineteen seventeen means it's an interior without delay or interior follower right that means basically when somebody walks past this motion while the system is armed the alarm will go off immediately right so that's 17 and you can actually scroll down or enter in the number I'm gonna school sorry I'm gonna go up to 17 the zone 19 or I'm sorry sensor group 19 that one is interior with delay that means if somebody walks by this while the system is armed the system will start counting down for the entry delay so it's gonna give you time to go in and disarm the system so you may want to use that if let's say this sensor is facing the front door and you use the front door to enter the house you may want to set that motion to an interior with delay that sensor group 19 and that way once you open the front door the alarm doesn't go off right away you actually have time to walk by the front door get to your system and disarm it sensor group 17 again that's the one without delay that could be used for something in the living room or in the garage so if you know while the system is armed away you don't enter the house through the living room or the garage and anyone walks by it it sets off the alarm immediately yeah so I'm gonna leave mine at 17 I'm just gonna go ahead and hit save sensor name you can actually change this yeah it'll give you a couple of options if you want to change it you hit edit again and it actually gives you a library of all the possible words available so what you're gonna do is use down and up arrow keys to scroll through I'm actually gonna set mine to living room so as you can see all that you have to do is keep hitting the down arrow key it's an alphabetical order so for me I'll put living room it's changes it in the top left you can confirm hit save and then just so that I know it's a motion I'll make it even clearer I'll put number two and I have to scroll all the way down to my ends after emotion so you see there's a whole library you can just keep scrolling down and I see my mo Shin I'm just gonna leave it off motion I don't want to set it as a motion detector it's save and now you'll see item 1 living room item 2 motion so once you're done there you can hit close and then hit save it'll say please wait processing requests it learns a zone in and then it's ready for you to learn in your neck zone whether its motion smoke door sense or window sense or whatever you want you just trip the tamper and that's it I'm done learning sensors in this is my only motion I'm gonna learn in 4 today I'm gonna hit close in the top right again hit close and hit close one more time and you're back out to the main screen you now have a motion sensor learn into the panel now as you can see the motion it's actually just letting me know that it was faulted yeah one thing I want you guys to keep in mind with this motion is that it does have a three-second timer or time-out delay right or I'm sorry 3 minute timeout delayed so what that means is a lot of people usually think that they set their motion off once and it stops working because they try to do it immediately after what you guys fail to realize is that these motions actually have a three minute timeout so whenever this motion detector while it's armed if it's tripped it actually goes into a sleep mode for three minutes so that it can actually conserve battery yeah so if you guys are ever testing out the motion and you guys set off an alarm and then within seconds you try to do it again and you're wondering why it's not working it's because it is doing the 3 minute timeout delay yeah so you want to allow it give it the three minutes and then try it again one other cool thing about this motion is that every 64 minutes it actually sends a supervisory signal back to the panel what that means is it's basically checking in it's letting the system know hey I'm still here my battery is still good and I'm still within range nobody has tamper with me it also lets you know whenever there's a low battery so usually with sensors they'd have a low battery signal so there I actually send you up to 30 days in advance usually that there's a low battery that gives you a whole month to get a new battery for it now as you can see this motion just uses a basic I believe it's just this one says it's a CR 1735 and lithium battery so if you just go purchase one of those replace it you can do that now that I have the cover actually turn off you'll see here this is gonna be my sensitivity setting right now it's set to standard so that means that the little black jumper is off to the right the left pin is free that means that standard sensitivity if I want to set it to high sensitivity I pull the jumper off the little black piece and then I place it on the left - so the left - is high sensitivity and then the right - is the standard sensitivity now remember this is what I was telling you about the pet about the pounds right so if it's standard it does 40 pounds if I place it on the other end so high sensitivity it only those 20 pound pets so you want to keep in mind when you're placing this one other common mistake here you may see is this is actually the upright position make sure you don't not place it upside down when you're mounting it you do want to make sure it's mounted at about 7 and 1/2 feet up from the ground you want to make sure it's not facing any air ducts or any air vents as that could cause false alarms and when you're mounting it this is actually the part that goes flat so if you're placing it on the wall this part goes flat and it goes there yeah do not place this part on because then it'll be tilted up so flat down and that's pretty much it for this motion if you guys do have any questions whatsoever regarding this you can email us at support at alarm grid comm if you guys like this video make sure you hit like underneath subscribe to the YouTube channel and hit the little bell icon so enable notifications that way you guys are notified whenever we upload new content which is daily and yeah that was just a quick video on how to learn in a wireless motion sensor to a Simon XTi panel thank you guys I'll see you next time bye
- Uploaded