Connecting an LTE-XV to a Vista-21iP
Related Products

Related Categories
Description
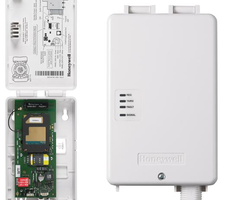
In this video, Joe shows users how to connect a Honeywell LTE-XV to a Resideo VISTA-21iP Panel. The Honeywell LTE-XV is a Verizon LTE Cellular Communicator that allows a VISTA Series Security Panel to connect with the AlarmNet360 Servers and Total Connect 2.0. A monitoring plan is needed to use TC2.
The VISTA-21iP comes with an integrated IP-only AlarmNet Communicator known as a 7847i. In order to add a Honeywell LTE-XV to the system, you will need to disable this internal communicator. This means that adding a Honeywell LTE-XV to a VISTA-21iP will not make the system dual-path. If you want the VISTA-21iP to use dual-path communication with both cellular and IP connectivity, then you will need to add a dual-path communicator. A great option for this is the Honeywell LTE-IV. This communicator will also allow for connectivity with the Verizon LTE Network, but it provides hardwired ethernet capabilities as well.
That being said, many people find that cellular only is a perfectly serviceable option for a VISTA-21iP. Cellular connectivity is extremely reliable, and cell service almost never goes down or becomes unavailable. It is also unaffected by power outages, which will take an IP router offline unless a backup battery is used. Many users don't mind having to disable the IP communicator in order to use cellular with their VISTA-21iP Systems. But keep in mind that you will need a special monitoring plan that include cellular connectivity. For Alarm Grid customers, this is a Gold Plan or higher.
However, if you plan on using a cellular only communication path, then you are better off using a VISTA-20P System instead of a VISTA-21iP. The VISTA-20P is exactly the same as a VISTA-21iP, except that the 20P does not have the 7847i IP Communicator. Since you will need to disable this internal communicator anyway to use the LTE-XV, you may as well just get a 20P System instead. The only real reason you would add a LTE-XV to a VISTA-21iP is if you already owned the panel. In other words, if you plan on buying a new panel to use with an LTE-XV, get a VISTA-15P or VISTA-20P. Don't get a VISTA-21iP for this purpose, as you will just be spending extra money for no reason.
By using an AlarmNet Communicator and accessing Total Connect 2.0, you will be able to control your system in many new ways. Most notably, you will be able to access your system remotely using the Total Connect 2.0 Mobile App on Android and iOS devices. Once you have accessed TC2, you can arm and disarm your system, check current system status, control Z-Wave devices (Z-Wave controller needed) and more. Remember, you will need an alarm monitoring plan. Also consider that you can just use the internal 7847i IP communicator to access AlarmNet and TC2. The only difference with the LTE-XV is that you will use cellular instead of hardwired ethernet. Cellular connectivity is more reliable and consistent than IP connectivity.
http://alrm.gd/get-monitored
Transcript
Hi, DIYers. Joe from Alarm Grid. And today, we're going to show you how to install a Verizon LTE-XV communicator onto your Vista-21iP. And as you may know, the 21iP does have a built-in internet communicator, and you can also install the proprietary Vista GSM 4G communicator right onto the board. The Verizon LTE-XV communicator, though, is going to let the system connect to the LTE network that Verizon has which is faster and more reliable than the older 4G network that you can install on the system. Downside to this, though, is that you're going to lose your ethernet connection when you install this communicator, so you won't be able to do dual-path with this system if you are using the cellular communicator. The upshot, though, is that the communicator is working on the LTE network, which is super reliable and will provide your system with a solid connection outward to report alarms or to support your Total Connect 2.0. Verizon has also said they're going to be supporting this network for a few years to come, so it is going to be very reliable. And if this does make sense for you to install, this is a perfectly valid and fine upgrade. To do this, though, there's a few things that we have to do. The first thing that we're going to do is we're going to power down the system. Then we actually have to move our jumper on the board to the off position, which is going to turn all of the onboard IP and cellular communication. So you will not be able to use the ethernet jack. After you do that, we're going to install the communicator, then we're going to wire it up to the ECB bus, and you're going to be good to go. So first thing is let's power it out our system 100%. We have our main power from the AC transformer connected to this LT cable going into our power terminals. So I'm going to unplug that, and I'm also going to unplug our backup battery. Now as you can see, the system is 100% powered off. So the first thing I'm going to do is I want to move this jumper into the off position, which is the bottom two pins. Next, we're going to take our LTE-XV and we're going to install it on the system. So I'm going to take all of the wires that come with it. I'm going to slip them through this punch out. It's going to sit right there. It also comes with a lock nut that will keep it in place. If you are installing this at home, I do recommend taking a screwdriver or some flat tool and making sure the lock nut securely holds your communicator in place, which is going to let you avoid any issues that you could have from a loose communicator. Today, though, I'm just going to tighten this up with my hand. All right. So our communicator is set and stable. Now I have to attach the wires to the ECB bus. So as you can see, we do already have some wires on our ECB bus. I'm just going to loosen up these terminals and I'm going to slip the communicator wires right underneath. What I'm going to do-- because we have so many wires under each terminal, I'm just going to slip out the whole bundle and twist them together so I can securely wrap our communicator wires around them. Now everything is powered off, so there's no risk of any shock. Just make sure that all your stuff is turned off before you do anything like this. So there's our black bundle. Here's our communicator wire. I'm going to lay this here and twist it around the wires. And now we're sure that we're going to have a good connection on that one. So next, I'm taking the red wires. I'm just going to place them together. Twist them around. We'll take our red wire from our communicator right here. And I'll lay this next to it, twist it around. Make sure it's nice and stable. Now ideally, if you have a pair of pliers or a lineman, using a tool will save your fingers and it'll make this process much easier. Just grab it, turn it around, and make sure your splice is nice and secure. Next, I have the green bundle. I have my communicator wire right here. Lay it next to it. Twist it around. And then I have my yellow bundle as the last bunch of wires. And there's no rush to do any of this. Make sure you take your time and that your splices are good. Sometimes, this will happen, where a wire may break off and you have to restrip it. As you can see, if that happens, we just restrip the wire, wrap it around, and it's ready to go. So now we'll take our yellow wire, twist off the end, lay it in there, twist it up. Cool. So now when we install this back on our system, we know that our connections are likely going to be just fine. So because our bundles are a little bigger, I'm just going to make sure that my terminals are loose enough so that we can easily slip them under. First, we'll do the black. Then we'll do the red. Then we'll do the green. And then we'll do the yellow. All right. So now our connections are all made up and we're ready to power the system back up. First thing I'm going to do is plugin the backup battery and then plugin the system. [ELECTRONIC BEEPS] And as you can see, our communicator has some activity lights powering up. And the next step would be to get this activated with your alarm company so that the system can start to communicate using the Verizon LTE-XV. If you do have any questions about how to install the communicator, the Vista 21iP, or alarm systems in general, feel free to give us a call at 888-818-7728, send us an email to support@alarmgrid.com, or head to our website, www.alarmgrid.com. If you enjoyed the video, feel free to subscribe. And if you want to be notified when we post future videos, hit the notification button below and we'll send you an update when we do so. Thanks for watching and have a great day.
- Uploaded