Deleting a Wireless Zone from a Simon XT
Related Products
Description
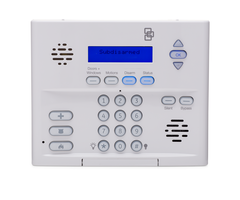
In this video, Michael from Alarm Grid shows you how to delete a wireless zone from an Interlogix Simon XT, which is also known as the GE Simon XT. All versions of the Simon XT feature forty (40) wireless zones. When you delete a wireless zone from the system, it opens up the zone so that it can be used with a new sensor. This can be very useful if you have run out of wireless zones on the system and you really need to enroll a new one. Deleting a sensor is also useful if there is a sensor on the system that you no longer want to have trigger system responses. Once you delete a sensor, it must be re-enrolled if you ever want to use it again.
All versions of the Interlogix Simon XT and the GE Simon XT use 319.5 MHz wireless sensors. These sensors are sold by a variety of different manufacturers. Interlogix and GE have made their own throughout the years, and there are also some from Qolsys. You may also encounter some third-party 319.5 MHz sensors, such as the VERSA-GE Door and Window Contact. In any case, these sensors can all be auto-enrolled with the Simon XT. Once a sensor is enrolled with the Simon XT, it can then be deleted from the system if needed. Only sensors that have been enrolled with the Simon XT will appear in the deletion menu.
In order to enroll or delete a sensor, you must provide the system's Installer Code. The default Installer Code for a Simon XT is 4321. The Sensors Menu is accessed by scrolling down to the Programming option from the main screen. Enter the appropriate Installer Code, and click OK. Then locate the Sensors Menu. This is where you will go to add, edit, and delete sensors for the Simon XT.
https://www.alarmgrid.com/faq/how-do-i-delete-a-wireless-zone-from-a-simon-xt
http://alrm.gd/get-monitored
Transcript
Hi DIYers. This is Michael from AlarmGrid. And today I'm going to be showing you how to delete a wireless zone from an interlogix or GE Simon XT security system. We have our interlogix Simon XT here. Might also be known as the GE Simon XT. There have been many variations of this wireless system released through the years. And now interlogix is out of business but you still find them pretty commonly. But they all use the same process for deleting a zone. If you aren't aware all versions of the interlogix Simon XT or GE Simon XT use 319.5 megahertz wireless sensors. They enroll with this system pretty easily. In fact sensors are manufactured by Qolsys, Interlogix and GE made their own various third party ones. Today I'll actually be demonstrating a verse of GE sensor. It's also 319. And they can all enroll nicely with the system. But one limitation of the Simon Series Systems, at least this Simon XT is that it can only do 40 wireless zones. It only has 40 zone slots available. So if you ran out of zones and you need to add a new one then there's a good chance you'll be deleting a zone from the system or if there is a sensor you're not using same case. And you'll actually see when I get into programming that the cell module also takes up a zone slot. So we don't have anything enrolled with the system right now. I'll show you the enrollment process during the video. But first I want to get us into programming so I can show you how you would do the zone. So we're at the main screen of the system and we're going to scroll down until we reach system programming and then we're going to press OK. Then it's going to ask us for our code, and we're going to add our installer code and ours is that the default-- looks like I didn't do it fast enough, we'll have to go back to programming and we'll click OK. And we'll enter the default installer code for 4 3 2 1 and then we press OK to confirm. And now we're in programming. So now I'm going to scroll down to Sensors, right there, we're going to press OK. And I'm going to show you the delete sensor option first even though we don't have anything enrolled with the system just to show you that you can only delete sensors that are enrolled with the system. In this case, we don't have any sensors enrolled with the system we just have our cell module. It says GSM module, it looks like we need to upgrade to LTE. But we're going to back out because we're going to enroll the sensor first and so we're going to we're back in the sensor menu. And we're going to go up to learn sensor and now it's looking for a sensor and this sensors learn in by a tamper cover. So we have our sensor here. And that's just a warning of the system but don't worry about that. And we're going to open up the sensor real quick. Got that part done and then we just need to get under there. Versa-GEs can be a little tricky to open. But there we go. We got it. We Got it open that's releasing the tamper cover and you see it's decided to sensor number one group 10. For our demonstration purposes that's fine. We'll just click OK. And we'll just keep the name front door and we're good. So we've added the sensor to the system. So now I can show you how you would go about deleting it. So you're going press status again to get back into the sensor menu. And then you go down to Delete sensor. And you see that now we have our sensor that we just enrolled with the system displayed. We go down, we can see the cell module in this case which we don't want to delete that. But we do have the sensor here. And we just press OK and then we get the message deleted. So just like that we have deleted a sensor from the Simon XT security system. And just to back out we can just keep pressing status until we're back at the main screen. And that's how you delete a sensor from a GE or an interlogix Simon XT security system. We freed up the zone so that way we can use it with a new zone. If you found this video helpful, make sure to give it a thumbs up below to like the video. If you have any questions about this Simon XT or any other security system or about alarm monitoring in general, send an email to support@alarmgrid.com and remember to subscribe to our channel for updates on future videos. We hope you enjoyed the video. Thank you.
- Uploaded