Enrolling the DSC PG9944 w/the Qolsys IQ Panel 2 Plus
Related Products
Related Categories
Description
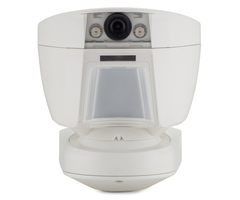
In this video, Michael from Alarm Grid shows you how to enroll a DSC PG9944 Outdoor Image Sensor with the Qolsys IQ Panel 2 Plus. The PG9944 will enroll as a motion sensor, and that's how it will mostly operate on the system. It's only when the PG9944 triggers an alarm that it will capture an image.
All versions of the Qolsys IQ Panel 2 Plus offer the ability to support PowerG Wireless Sensors. This includes the DSC PG9944 PowerG Image Sensor. In order to enroll the sensor, you must first put the Qolsys IQ Panel 2 Plus System into its enrollment mode. Then access the battery compartment for the PG9944 Sensor. This is where you will find the enrollment button for the device. The space for accessing the enrollment button is very thin when batteries are installed, so you may need a thin object like a screwdriver to press and hold the button. You should hold the button down until the orange LED goes solid. You can then release the button. The Qolsys IQ Panel 2 System should recognize the sensor and allow you to auto-enroll it. You must then configure the zone settings.
In order to use the camera portion of the PG9944 Image Sensor, you must have the Qolsys IQ Panel 2 Plus System set up with an Alarm.com account. This will require an alarm monitoring plan that includes access to Alarm.com. Your monitoring company will need to enable the "Panel Camera Images" feature for your Alarm.com account. Additionally, you must also enable the Panel Camera Alarm Image Uploads feature from the customer version of the Alarm.com website. Remember, the PG9944 will only capture images when it triggers an alarm on the system. The images will be made viewable on the Qolsys IQ Panel 2 Plus as a stop motion video. Also, the first captured image will be forwarded to Alarm.com for remote viewing.
https://www.alarmgrid.com/faq/how-do-i-enroll-the-dsc-pg9944-with-the-qolsys-iq-panel-2-plus
http://alrm.gd/get-monitored
Transcript
Hi, DIYers. This is Michael from Alarm Grid. And today I'm going to show you how to enroll a DSC PG9944 outdoor image sensor-- that's PowerG Outdoor Image Sensor to your Qolsys IQ Panel 2 Plus Security System. Now, we have our DSC PG9944 Outdoor Image Sensor right here. And so what you're going to have to do first, you're going to have to locate the enrollment button on the sensor. So we've already removed the outer cover here, the battery cover and the outer cover, the tamper cover, if you will, so we can access the enrollment button, which is right there next to the battery. And you probably have trouble getting at this button with your finger with the batteries installed, and you do have to have the batteries installed. For auto-enrollment you have to have the sensor powered on. So we're going to-- what we're going to do today, we have our screwdriver here, a flat head screwdriver. And we can just press the button like that. But before we do that, I do want to show you the things that we removed to access this compartment here, the battery compartment. First, we removed this outer cover. And both of these covers I'm about to show you, they use a Phillips head screwdriver. So make sure you have Phillips head on hand to remove the screws. So this is the outer cover that goes on top like that over the whole thing. So remove that first. Then once you've done that, there'll be another smaller part down here that actually just covers the battery like that. And it also uses a Phillips head screwdriver. So just under the screw, release that, pull it out, and you'll be able to access the battery compartment and the enrollment button. And the enrollment button's what you're going to need for auto-enrollment. And so I'm going to show you how to do this on the Qolsys IQ Panel 2 Plus System here. It's just like enrolling any Power D sensor, really. So you're going to click the small gray bar at the top. You're going to choose Settings, Advanced Settings. You're going to enter your installer code or your dealer code. We're going to use our installer code today, And that's 1, 1, 1, 1. And keep in mind, that's the default code. If you changed it, yours might be different. But we recommend keeping yours at the default. And then we're going to choose Installation. We're going to choose Devices. We're going to choose Security Sensors. And we're going to go to AutoLearn Sensor. And now the IQ Panel 2 Plus System is in an auto-enrollment mode. Apparently, it detected a different sensor there. That's not our PowerG-- PG9944 image sensor, so we're going to click Cancel. And we're going to hope that doesn't happen again. And we're going to take our screwdriver here, and we're going to press the Enrollment button. And what we're going to do-- I haven't pressed it yet-- you're going to hold it down until the orange LED light is solid. And I'll try to do my best to show that on camera here. Hopefully, it gets in the image here. But we're going to just go ahead and pull that down. And now it's solid orange. And you can see that it detected the sensor, and that is the correct serial number. We checked earlier. And you can see it says AutoLearn PowerG sensor. That's a good way to know that it detected the PG9944. Because if it was a different sensor like you saw before, it wouldn't say PowerG sensor. And this is PowerG sensor. So we're going to use OK. And now this is where we'd configure the settings. So I'm going to set this down. And I'm just going to give you a brief overview of the settings here. I won't go too in-depth. We have this sensor DL ID. That's basically the serial number for the sensor. This is considered a motion sensor. Even though it is an image sensor, it basically operates as a motion detection sensor. The difference is that this can produce images when your system goes into alarm. So motion is fine here. For sensitivity you have options for low, medium, and high. To prevent false alarms, we usually recommend either a medium or a low sensitivity. If you're worried about pet immunity, this PG9944 offers pet immunity for small animals weighing up to 40 pounds. If you have a dog or a cat moving around your backyard regularly, you might want to set it to low just to prevent any false alarms on your system. If you're in a very secure environment-- maybe it's a warehouse or something where nothing should be moving around, then maybe you'd set it to high sensitivity. But we'll go ahead and set ours to a happy medium. We don't have any animals at Alarm Grid, unfortunately, so we don't have to worry about pet immunity. So we'll just keep it at medium. And then sensor group's important. That's actually going to determine how the system responds when the sensor is activated. So in certain arming settings this might be automatically bypassed. It might also determine-- well, this will also determine whether the system goes into an immediate alarm, or whether you have a chance to disarm the system before an alarm occurs. So we'll keep our eyes at the default Away Instant Motion. That one means that if our system's armed Away and this sensor is activated, the system is going to go into an immediate alarm. Now, if it's armed Stay, as in someone's supposedly in the building or someone's on the premises, I guess, because this is an outdoor image sensor, then it will automatically be bypassed. This sensor will only be active when your systems in an armed Away mode. And once it activates, it's going to trigger an immediate alarm on your system, and the device will produce an image. Remember, it produces images during alarm events only. So we'll keep ours 17 away-- instant motion. High traffic shut-down-- you can just leave that at the default. That basically prevents the sensor from activating repeatedly. It will shut down for two minutes to conserve battery life. That's a good thing. So you can just keep that at the default. You can set whatever sensor name you want. We'll just keep ours at motion detector. But you can-- see, you can do a custom description or some other default preconfigured ones. Use whatever works for you. We'll just keep ours at the default. We won't enable a chime, but there are chimes here. I'll show you some of them. There's doorbell, and there's sonar, which sounds like a nice spacey thing or something. But we'll set ours to none. We don't want a chime activating when this sensor activates. And voice prompts-- that will actually have the panel speak out the name of the sensor, whatever you set in the sensor name. So you can set that if you need to. And source-- you can just leave that alone. It's a PowerG sensor, so it has the correct source. And we'll just go ahead and add new. Sensor added successfully. And now we have the censor added successfully. It's set up with the IQ Panel 2 Plus system. And we'll just go back to home. Select armed system type. And so we won't arm our system right now. But we're good to go. We have our sensor enrolled with our Qolsys IQ Panel 2 Plus System. Now, a couple of things I do want to remind you about when you go to set up your PG9944 image sensor. First of all, if you want to use this as an image sensor, like, actually have it take photos, you're going to need to have your panel monitored with service for alarm.com. It's going to need to be connected with the alarm.com servers. And that's the only way you can have this operate as a camera, because it is for use with alarm.com. And that's going to require two things. You're going to have to have your alarm monitoring company enable the image sensor feature on alarm.com. This will require adding an add-on to your account. Alarm Grid customers get this add-on at no additional charge. So just ask-- if you're an Alarm Grid monitored customer, just email us at support@alarmgrid.com, and we'll be happy to set it up for you. If you're monitored by a different company, you're going to have to talk to your monitoring provider to enable the feature. And the other thing you're going to have to do, you're going to have to enable the automation rule within the alarm.com customer website. Now, this isn't done by your monitoring company. This is done by you on the alarm.com website. So open up a web browser. Log into alarm.com. And you're going to go to the automation section. And then you're going to make sure that the rule is enabled. And once you have it enabled by your monitoring company, and you've enabled it on your customer end, then it will produce images whenever your system goes into alarm. You can check the images. You can check them locally at the IQ Panel 2, which we have some already taken. I'm not going to show you them here. But we do have some from a previous enrollment of this PG9944. But what really comes in handy is that it sends 10 images to the panel, but then the first of those images is forwarded to alarm.com. And you can view that image from the alarm.com website or the alarm.com mobile app. So if you suddenly see that there is an alarm on your system, you can pull out your phone, and you can go into alarm, and you can see the first image that was taken. And that's a great way to confirm that an alarm is legit, that there's a serious situation at home, and you need to contact help. You can see if there's potentially an intruder in your home, or if your home is on fire. And that can be very useful for knowing whether or not an alarm is serious, or if something just fell, and it was just a false alarm. So that's why an image sensor can really come in handy. And also keep in mind you don't need to have a video monitoring plan to use one. You can use these on any alarm.com account that is set up for monitoring and automation as long as the feature is applied to your account, which we are happy to apply to your account. So this is a great alternative if you don't want to pay a little bit extra for video surveillance with full motion alarm.com security cameras. So that's how a sensor like the PG9944 can really come in handy. And if you don't need one for outdoors, we also have an indoor model available-- the DSC PG9934P. And this one's for indoor use only. So if you're just looking for sensors to put in your home or your office, this one's great. But if you want one that can be used outdoors, then the PG9944 is for you. You just need a system that supports PowerG sensors, such as the Qolsys IQ Panel 2 Plus Security System. If you found this video helpful, please click the thumbs-up button below to like the video. Also click the bell icon to subscribe to our channel and get updates on future videos. You can also send an email to support@alarmgrid.com if you have any questions about our monitoring services, any of our products. Maybe you're an Alarm Grid customer, and you need to have the image sensor feature enabled for your alarm.com account. Send us an email to support@alarmgrid.com. And also check out our website alarmgrid.com. We have a lot of cool stuff on there, a lot of important information. Hope you enjoyed the video. Thanks. Have a great day.
- Uploaded