Honeywell 5811: Programming to an L5200
Related Products
Related Categories
Description
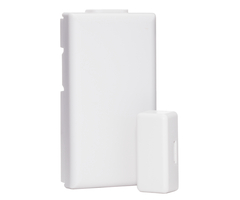
The 5811 is Honeywell's most popular thin door/window sensor. For those who are looking to install a sensor that doesn't impinge on their aesthetic sensibilities, the 5811 is the perfect sensor for your installation. Programming it to the L5200 couldn't be easier. In this video, Sterling gives us a great little explanation of how to program the 5811 to the L5200 wireless security system.
Transcript
Sterling: Hi DIYers, Sterling with Alarm Grid here. Today, we're going to show you how to program a Honeywell 5811 wireless door or window contact. This is the most popular sensor that we offer, along with these LYNX Touch L5200 panels. Most of our kits on our website are going to include either three or ten of these sensors, depending on how many your home may call for. And these sensors can be used to protect any opening, door, window, cabinet, shed, anything that opens.
So the sensor involves a backplate, which you use to mount to your door or window frame. It has 3M double-sided tape on the back that you can peel off and stick on. It also has some screws that you can use to screw it to the wall for a more permanent installation. On the front cover, we have our actual circuit board. For our wireless transmitter, we have a tamper switch, which is held down by the cover. That's this contact here. We have our battery contact and our battery compartment. And we have a little reed switch, which, you can see, lines up with these two little hash marks to indicate the proper magnet position. And of course, we get our magnet in our box. When the magnet is closed, the door would be closed, and the zone would be happy. When the magnet pulls away from the contact, that would be the door or window opening, which would fault the device or set it off into a full alarm if the system is armed.
We have a little bag with our battery. We have three-volt CR2032 battery. And that's the battery that we should always use with this sensor. Batteries last about five years. So you should not have to replace this very often. And the panel will alert you when it's going low. So if you can see, it might be hard to pick up on the video, but there is a little minus icon on the plastic here. This minus icon indicates that we want the negative side of the battery down. And you can see there's a big positive sign right on top of the battery. So to give power to the sensor, you simply slide it in. It snaps shut. And it's held into place on all the contacts. So you get your positive side here, and the negative's on the back.
So now, our sensor has power. And we're ready to enroll it to the LYNX Touch 5200 system. So to do any sensor programming, we need to get to the zone programming page of the panel. To do that, from the Home screen, you hit Security and then More. Your Home screen may not look like this. This is an active system. It has monitoring. So if you don't see this dashboard screen, you would see a more basic screen that just had Security, Automation, and Video. In either case, hitting Security takes you to the page you need to go to go to Programming. You hit More at the bottom right. And you have the option for Tools. And from Tools, you're prompted for your code. In this case, we want our installer code. 4112 is the default Honeywell installer code that gets you into the programming of this system. And we can hit Program to take us to System Programming. This doesn't mean that the panels actually do anything. It's just an indication that we are now in System Programming.
Next thing we do is Zones. And we're back to our zone programming page. Each device gets set to an individual zone. You can see we already have some zones programmed. So we drop down. And we go to zone number 7, highlight it, and click Edit. Now, we're ready. We have a blank template zone, ready to enroll. The number you're going to need to enroll the sensor is this serial number. It's indicated on a sticker on the inside of the backplate, which is Alpha 0514623. That same exact number is on the back on a bar code sticker, Alpha 0514623. You have to select the Serial Number box to enroll that number, and you can type it in, 0514623. Or even better than that, you clear that out. And what you can do is simply activate the sensor three times to auto-enroll it. We prefer that option because not only is it making it a little easier, you can't type it wrong, you don't have to worry about finding the number doing that. The other advantage of auto-enrolling is it takes care of two things in one action. It programs the sensor and learns in right serial number and the loop. And at the same time, it verifies that our sensor is good and that there's no issue with the reed switch detecting the magnet.
So we're going to go ahead and show you the auto-enrollment. So we close our door, aka we bring our magnet in line with the reed switch. We're in between the two little hash marks on the side. We do not want to be on the other side or along one of the short edges. We need to be right next to reed switch. So now, our door is closed. And we open our door. You can hear the beep. That was the first of the three activations required. We now open it again. And it enrolled the serial number and the proper loop number on the second activation. We are not quite done. We do it one more time. And now, it's fully enrolled the sensor to our Zone 7.
And we're ready to tell the system where this device will be going. So we're going to choose device type. We've done our front door with our 5816 sensor. So we're going to choose now our back door. The device type of door allows us to choose the applicable response type for this zone. The response type tells the system how to respond to this sensor. And in our case, for the front door, which is the door we use to come and go when we're arming the system, we had that set to Entry Exit 1. That means we have a delay period to leave through that door when we arm it, and we have a delay period coming back in when we open the door when it's armed. For our back door, we never come through the back door when the system is armed. And therefore, anyone coming through that door when it's armed would be an intruder or a criminal. And therefore, we want an instant alarm. That's what Perimeter will do. Perimeter sensor means instant alarm, no delay. So we select Perimeter.
And then the last thing we want to do for the naming is to give it the type of door or the location of the door in the home. This allows us so that we do not have to remember Zone 7 is back door, Zone 8 is side door, Zone 10 is the garage door, and so on. If we can put a name on it . . .
Device: BB Back.
Sterling: Now, when the zone is faulted or activated, the system will display the word "back door," and it will give us the audible indication of which door was open.
The last three options or questions is Alarm Report, Yes or No, that's a toggle option, Yes or No. Yes means that we'll report this zone's activation to the central station. This panel is monitored, so that's what we want. Chime, you can scroll through this selection. But this is the different audible alert you would hear when the door opens. So there's a lot of options. And they normally have one option plus . . . plus a longer version of that same option. The longer version normally just repeats the sound over and over. So you can choose whatever sound works best for you and your family. We're going to leave it on Ascend option. And then the last question is Supervision. Do we want this sensor to be supervised? Supervision, when it's set, the panel every 12 hours will look for the sensor. So it will pull, and it will say, "Okay, I know you have a serial number. I'm going to look for you and see if you're there. If you say you're there, I'm happy. Everything's good. If I check for you in 12 hours, and I don't see you, I'm going to throw up a Zone 7 supervision trouble." And that would indicate that we're either too far from the panel or installed in a location where there might be interference back to the panel. Or perhaps, the sensor's been completely damaged so it's not being seen at all. And that Supervision allows us to know every 12 hours if any our sensors have an issue. So we always want that for protected zones.
Finally, we save it, and we exit to the Home screen. Before we fully exit, I'm going to go ahead and close up my sensor so that we don't have a tamper fault. This cover when on will hold down this switch. And that keeps the tamper, so it's not indicating a tamper trouble. The reason that there's a tamper is in case there was an inside job and they were popping the sensor open, you would have an indication at the panel that someone was messing with your system.
So now that we have the tamper or the cover closed, we're going to show you what happens when the zone is programmed, and the door is open. So we have our door closed, our magnets in line with our device. We're in between the two little hash marks. We're on the right side of the device. And we open the door.
Device: Back door.
Sterling: We hear a nice ascend chime tone. The panel goes from Ready To Arm at the top to Not Ready To Arm-Fault. And it gives you an indication visually that it's the back door that was open. You also heard say "back door." So you have as much information as you would need to say, "Okay, I can't arm the system till I go close my back door. Now, I'm ready to arm, and I'm good to go."
So that is how you would program your 5811 sensor to your LYNX Touch L5200 system. We invite you to subscribe to our YouTube channel to be kept up-to-date with all of our new sensor programming and product videos. And we look forward to work with you.
- Uploaded