Honeywell 5814: Program to an L5100
Related Products
Related Categories
Description
This video is about Program 5814 to L5100 Wireless Security System
Transcript
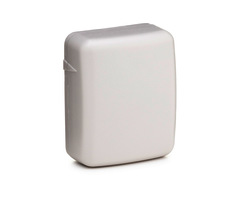
Hi, DIY-ers. Sterling from Alarm Grid here. Today we're going to show you how to program a 5814 ultra-small wireless door and window sensor to our Links Touch L5100 security system. 5814 is a popular model of the door and window because it's got a very small profile. You can see it's about half the size of the more traditional 5816 both in length and in depth. So, it looks really nice on the door or window. The one drawback of the 5814 is that as it's a little bit of an older sensor, the transmitter inside, because it's smaller, doesn't have the same range as the 5816 or the more popular and newer 5811 sensor. So, just keep that in mind.
Where you get about 200 feet from a sensor back to your panel when it's a 5816 or a 5811, the 5814 is really about half of that, about 100 feet from the panel. You can use a repeater, a 5800 RP. If you want to use the 5814 and your door or window is too far away from your panel, the repeater will boost the signal another 100 feet so that you can use this and you won't have RF supervision issues.
So, the 5814 consists of two items. You have your sensor and your magnet, and you can see on one side of the sensor, there's this little triangle which designates the side that the magnet should be on. So when the magnet is touching the contact, the zone is happy. When the door or window opens, the panel would fault and cause an alarm if it was armed.
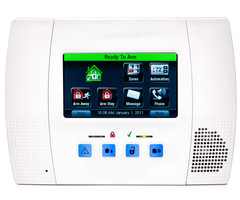
So, obviously it's not learned in now. It's not doing anything. So we're going to show you now how to program this to learn it into here. So what you do is, from the home screen you hit More. We go into our Tools option and we enter our installer code. Not our master code, our installer code, default 4112.
Then we go into Programming. System programming shows at the top letting you know you're in, and you go to your Zones option to learn in a sensor. We're going to scroll to our first available new zone. We're ignoring zone one because that's the hardwired zone. Most people with a Links Touch will not use that hardwired zone. You can see that we're not.
We do have other wireless sensors, so we use the down arrow to scroll to our first available new zone. We're going to choose zone 14. Toggle it, click Edit, and we are in our zone programming screen. The first thing you want to do when you're in this is to do the serial number.
Every Honeywell wireless device has a unique seven-digit code, which the panel uses to sync this piece with the system. So, if you have your sticker, you can simply toggle into here and type it, 0442882. You click Done. You have to make sure you choose your loop number. The 5814 uses a loop number of one, so we don't need to change it. That's one way to enroll it.
If we go back in here and we clear it out and save it, back to default, another way to enroll it - let's say you were using a sensor from an old installation or you moved into the house and you upgraded to the Links Touch and you wanted to re-enroll your sensors. You already have all this mounted. Maybe the sticker is not there anymore. There is a hand Auto Enroll Mode.
So to auto enroll, the other handy way to do it, you would open your window with the installed sensor. It beeps. Do it again. It'll auto enroll the number, which we can confirm is the right one because our sticker is here.
But again, if it's up there and you don't have your sticker, you're confident it's learned in, it's using the sensor, and then one last activation saves the information, takes you back to your zone screen. So a nice handy way to go around when you're retrofitting an older system or using sensors that were already installed, Honeywell sensors, an easy way to enroll without having to go around looking for all your serial numbers.
Now that we've got it learned in we need to name it. This is going to go in our living room and it's going to be a window. So we can simply type in L. It takes us to our available L words. You could scroll down. There are a lot of L-A words, so one way to skip down to living room is to enter an I. It's a shortcut. It'll jump to the first L-I word and then you use the down arrow. We're going to choose living room. We get to use two words in one by doing that. Click Done, and this is the only window in our living room so we don't need a Zone Description 2. But we do want to choose "window" for Device Type. By choosing window, it'll actually speak living room window and it'll cut down our response types to the available response types you would use for a window. So you can see we've got Perimeter, Entry/Exit, Day/Night, Resident Monitor, Resident Response, General Monitor, General Response. These are the typical response types for a door or window. More often than not you're going to use Perimeter or Entry/Exit 1.
Perimeter means that it'll be an instant alarm when the zone is tripped. Entry/Exit means that when the zone is tripped you have a programmed delay, 30 seconds by default where the alarm will not sound until 30 seconds after the zone is tripped, giving you time to enter your home and disarm your system. For a window, you're not going to be really coming through the window when the system is armed, so we want to set Perimeter, instant alarm. We want Alarm Report to be set to Yes. Our system is monitored by the central station, therefore we want all alarm signals from this sensor to go to the central station.
Chime we want to toggle on for Yes. We want to know if our window is opened, and it will speak that if it happens when the system is off with chime on. Finally, Supervised, we want that on. The panel will look to make sure that this sensor is in range, battery has enough charge. All of the things to supervise the zone, you want to have that toggled on. Save it, exit back to the home screen and to demonstrate that our 5814 has been learned in properly, we're going to simulate the window opening. The magnet breaks from the contact. The zone faults. The panel chimes and speaks "living room window" so we know exactly what zone is open.
Let's say we were going to arm the system and we were looking at this screen, this would give you an easy indication of, Okay, I've got to go close my living room window. Now I can arm my system. So that's how to enroll a 5814 wireless ultra-small sensor. Try not to drop them, and if you have any questions on enrolling it, please leave us a question in our comments section below. We'll make sure to answer your questions. Please subscribe to our YouTube channel to keep an eye out for all new videos that we release.
- Uploaded
- Duration: