Honeywell 5818MNL: Program to 2GIG GC3
Related Products
Related Categories
Description
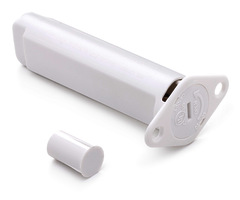
The Honeywell 5818MNL is a wireless door/window sensor that’s notable for its slim profile and recessed design.
Unlike other models, it’s not mounted on the exterior of the door. Instead, you drill out a small hole and insert the magnet sensor in it. The other half of the device, the wireless transmitter, is roughly the size of the AAA battery that powers it.
Door/window sensors send an alert to your home security system when that door or window is opened and the alarm is armed.
The Honeywell 5818MNL does that without makings itself visually noticeable. It’s designed specifically for those that don’t want their security system to distract from the overall décor and style of their home. It’s virtually invisible when installed.
Our comprehensive video shows you exactly how to program this device to your 2GIG GC3 wireless security system.
It starts by giving an overview of the Honeywell 5818MNL before moving onto programming and installation instructions. It finishes up with brief mentions of how to mount the device as well as how to test it to make sure it works properly.
The video instructs you to begin programming by navigating to the “Installer Tool Box.” Here the video takes you through the most important settings to choose, including wireless zones, system configuration, transmission delay, and more.
Transmission delay is a particularly important setting. As explained in the video, it relates to how quickly the alarm is triggered.
Turn the delay on and you have a few moments to turn the security system off before an alarm is triggered. Turn the delay off and the alarm triggers as soon as a door or window is opened.
Most people opt for the transmission delay turned on because it helps prevent false alarms. It allows you to enter your home like normal and have a few seconds to turn the security system off before it triggers.
Our video also discusses text/email alerts. The 2GIG GC3 can be programmed to send text/email alerts to your phone/computer every time the Honeywell 5818MNL is tripped. This makes it easy to monitor the activity in your home while you’re away.
The Honeywell 5818MNL adds an additional layer of security to your home. It works very well when paired with other devices like the 2GIG GC3 as well as glass break detectors and motion detectors.
We have other videos that discuss these other devices in more detail, including what their benefits are as well as how to program and install them.
That’s the value of programming the Honeywell 5818MNL wireless mini recessed door/window contact sensor to the 2GIG GC3 wireless security system – it allows you to monitor the use of your doors and windows with a virtually invisible device.
Transcript
Hi DIYers. This is Frank at Alarm Grid. Were back in the Alarm Grid video lab working on the 2GIG GC3 self-contained wireless alarm system. And today, we'll be programming the Honeywell 5818MNL.
This is a wireless, fully-recessed sensor. You can see here it has the profile of the AAA battery that it comes with, and this basically would insert into your door jam. And then, you have the magnet, this small, little, tiny 3/8 magnet that would go into the door itself.
So you need to drill out a 3/4 inch hole for this device, and then insert this into the door. You can then screw this in using the two holes here. And then, you can drill out the 3/8 inch hole for the small magnet here.
One thing I noticed when opening the box is that the-- and this is actually something that happens in a lot of the new Honeywell sensors-- the main sensors in the compartment that you open, depending on which side of the box you open, if you open the side with this in it you may be searching for the magnet. You may be searching for the magnet and not find where it is.
If you open the other end of the box, there's actually a different little compartment down there that you can't see when you open one side. So just keep that in mind when you're opening this box up. So we have the magnet-- sorry, the sensor, the battery, and then we have our tiny little magnet here.
So what we'll first do is put our battery right into the sensor. So we'll take a little flat head screwdriver. We can turn this counterclockwise, and I'll drop the cap on the ground. We have the board here that actually can come right out. This board will come right out of the actual case.
We can put our cap down, and you'll see here we have the positive on this side. So we'll land the positive out, and you can actually document while we're in here. You can see that there's also the serial number listed right here on the inside. So if this ever gets washed out or damaged and you can't view it and you ever need it again, you can just open the board up and pull it out from there. So we can put that right back inside there.
And we'll take our cap. You can push the cap right in place, turn it clockwise, and lock it in. So now, we have our sensor with our battery in. We have our magnet right here. So now, we have our powered up 5818MNL, and we're going to program it to the 2GIG GC3.
So we'll pop into programming, so hit the Home button back in the 2GIG icon on the top right. 1-5-6-1 is our installer code by default. If you've changed your installer code, you can go ahead and use that. We'll then hit system configuration, wireless zones, and we've already programmed a few zones here. If you've already done that on your system, just go to the next open slot.
Wireless Zone 4 is our next open one, so will edit zone on the bottom right. For the sensor type, this will actually be used on a side door where we will not need an entry delay. So we're going to set that to perimeter, which is type three. That means that there's no entry or exit delay when the system is armed, and it's active during arm away and arm stay.
If you have this on an entry point like a front door, back door, garage door, any entry point that you'll be coming in and out of and want a delay when the system is armed, then you can use entry/exit one or entry/exit two. You can set these delay periods in deeper level programming, and we have another video for that which will walk you through setting those delay periods.
So we'll keep it on perimeter for now. But again, if this is a delay door for you then you can put it on entry/exit one or two. We can now move down to equipment code. So this is the code map to this specific product the, 5818MNL. This happens to be one that's listed right in the library, so you can either hit the little icon here on the right and scroll down to Honeywell 58-- whoops-- Honeywell 5818MNL or you can just type in the code, which is 0-4-7-0. If you're watching this video, you can just basically type that in as you're going through.
We have the serial number as the next field here. So as we've shown you in other videos, you can auto enroll by faulting the sensor or you can manually enter it. We'll go ahead and auto enroll. So we'll do listening and put this magnet away and back. And it'll show the sensor receives.
We can then Accept that. After you accept it, you can verify on the side of the device the serial number, 0-6-7-3-5-3-7. 6 So that matches up just fine.
Be cognizant when you're learning in devices if you have any motion detectors that are powered up, they will learn in if they trip and send the signal before this device does. So just keep that in mind. I know in our lab we've had some issues with that, and that's why I've since turned them off. So just keep that in mind so that you don't learn in the wrong device. To avoid that issue, you can just double check the serial number after you enroll it.
So we'll hit Equipment. Age is new, sensor loop. We always want to have loop one on the 5818MNL. Transmission delay disabled. So by default, transmission delays are enabled on the GC3. It's a false alarm prevention tactic that us at Alarm Grid don't really agree with.
We like that when there's an alarm it's logged to the central station. There are other security measures, such as setting this to an entry exit zone any elongating delays or creating more phone calls to verify alarms before dispatching that we prefer over holding an alarm at the panel.
If you had a situation where there was an alarm and then the panel was compromised during the transmission delay, that signal would never reach the central station and we would never know. As an alarm company or monitoring station, they would never know. So that's why we disable transmission delay.
We can hit a voice descriptor. It's the next section here. So we can hit edit voice descriptor. This will be our side door, so we'll go ahead and start typing. You'll see side here on the top list, and then we'll do a door. And you always want to select from that white tab area of the top so that it will voice enunciate from the keypad.
If you make a custom word, that's fine. It'll show on alarm.com. It will show on the keypad. It will not voice enunciate. So censor reports, we always want to have our sensors reporting out to the central station unless you just wanted text or emails through alarm.com and no reporting, where you could disable this. Right now we'll keep it enabled.
Sensors supervised. That means that the panel will supervise this device and make sure that it is in constant communication with the panel during the supervisor intervals that go out to this device. If the ping does not come back to the system and basically it determines that this is out of sync or just out of range, unable to communicate, it'll get an RF supervision trouble.
So we'll keep that enabled. We can hit sensor chime. Here's where we can set this. We already have ding-dong number one with voice, which is a chime tone generally for doors. I have that on the main entry points on the entry delay doors.
So I'll let you set this to ding-dong two just so we can differentiate when the side doors open, and I'll pretty much use that ding-dong two with voice and enunciation for any of my perimeter doors. And then, we can go ahead and return to system config. We'll back out to the home screen.
You can verify. This will be a triple check here. Make sure that the serial number is correct, 0-6-7-3-5-3-7. We'll show that here as well. Save that.
We'll back out to the home screen here. And at this point, we can hold our magnet to the contact and we'll remove it. So you'll see it says it chimes, and then it voice enunciates at the keypad. We'll close it, and it's back to ready to arm.
So that's how you program your Honeywell 5818MNL. If you have any other questions on this product or anything regarding the 2GIG GC3, you can email us at support@alarmgrid.com, and don't forget to subscribe to our channel.
- Uploaded