Honeywell iLP5: Installing Communicator Into a Honeywell L5200
Related Products
Related Categories
Description
Sterling installs the iLP5 into the L5200 home security system. This unit allows an user to get the Total Connect 2.0 service with Honeywell's most secure panel. It connects to the ethernet in a home via a hardwire cable. This cannot be installed with the GSMVLP5-4G. But for those that want a hardwired internet connection for monitoring, this is the perfect solution.
Transcript
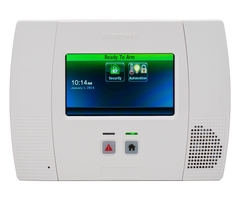
Hi, DIYers. Sterling, with Alarm Grid, here. Today, we're going to show you how to install the iLP5 Ethernet communicator into our L5200 Honeywell wireless security system. While the L5200 has a few different options for alarm communications, you can do WIFI Internet connection. You can do the hardwired Ethernet connection with the iLP5. You can also do cellular. Cellular can be a primary path or a backup path to the WIFI.
One note we'd like to make. If you are going to go with the iLP5 because you want a hardwired Ethernet connection, you're worried about the WIFI; you cannot also do the GSM, the cellular backup. So, while the hardwired Ethernet connection is always better than a WIFI connection, you lose the ability to back up your Internet path with a cellular path. So, we actually recommend to consider going with the WIFI backed up by the cellular.
But if you're sure that your Internet is nice and secure, the wire can't be cut on the outside of the house, your modem and your router have a battery backup, and you just don't want to deal with a WIFI connection, then you can get the iLP5, and it's a great option.
You do need to have an Ethernet cable coming from your router to the panel location, another reason why the WIFI is popular. But if you have that connection already, then you can just simply do the iLP5. So, we're going to show you how to install this device. And again, this device is used for monitoring services. So, if you want your system to do anything other than make a loud noise when it goes off, if you want total connect service, or if you want central station service, you do need to have some sort of communication path, and the Internet is a great way to do it.
First thing we're going to do, open up the panel. We are using the desk mount here, which is how we have the panel sitting nice at the angle like this. So, what we do is we tip it forward, and we see there are two tabs on the top. Simply depress each tab one at a time, pressing towards the front. The panel opens up. You hear the beeping because of the cover tamper. It's alerting you to the fact that someone has opened up your unit. Obviously we are intending to do that. So, we just press a button to silence it.
Before we install any of our modules, whether it's iLP5, WIFI, Z wave, cellular, we always want to power down. So, the first thing we're going to do is unplug our LT cable, which is feeding our power from the AC outlet. Then secondly, we're going to disconnect our battery. Now, the panel is powered down. Buttons don't do anything. Lights are off. Now, we're ready to install.
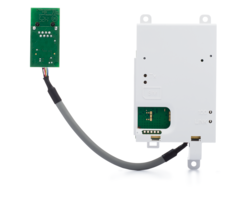
The iLP5 consists of the unit here with a cable to the RJ45 connection to plug in your Ethernet. It also has this little green connector. You can see we have teeth on the top and the bottom, and you can see on the control panel, we have a horizontal port. We have a matching horizontal port on the iLP5. This connector board allows the two female connections to be plugged in. So, you plug in the circuit board. It doesn't matter which way you do it. You can upside down, backwards. There's no wrong way. You just plug it in until it's flushed.
Then, you take your iLP5, line it up, plug it down. If it's plugged down properly, you'll see that there are matching screw holes in the back to keep it in place. So, we have our three little screws, one at the top and two at the bottom. This will keep the iLP5 from moving around. As especially when we have a desk mount, we want to make sure that these screws are nice and tight, because you don't want this module coming unplugged.
There was a plastic tab here that we already broke out to be able to plug in our LT cable. This is called the iLP5 spacer. It will sit like that. You just wiggle it until it snaps. This piece helps the RJ45 connection sit nice into the back of the panel. There's a little slot at the bottom here. You slide it into place. This little plastic piece, the spacer, fits into the notch there and is held down between the RJ and the plastic. So, you have a nice tight little connection. Push our wiring there.
Finally, we're going to route our power cable off the right wire track. We're going to bring in our RJ45 Ethernet connection through the left wire track, so that the panel sits flat on the counter. We plug in our Ethernet to the RJ45. And now, our panel is all set up for Internet communications.
We plug in our LT cable. We plug in our battery. Close everything up, and we have now installed the Honeywell iLP5 Ethernet communicator. If you have any questions about the iLP5 or the Internet alarm communications, shoot us an email at support@alarmgrid.com. Make sure to subscribe to our channel.
- Uploaded
- Duration: