Honeywell IPCAM-WO: Review
Related Products
Related Categories
Description
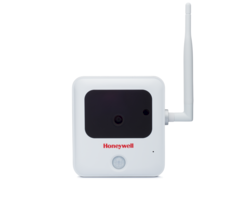
The IPCAM-WO from Honeywell is an option for those looking to enhance the security services at their home or office.
On the front face of the camera, you’ll find the lens, along with a motion sensor and IR illuminators designed to help provide clear video in low or no light situations. The rear case of the camera is made from metal.
On the rear of the camera, there are connections for an Ethernet cable as well as system power. The Ethernet jack is covered with a silicon plug designed to prevent rain, snow, and sleet from entering the Ethernet jack.
Many home or business owners choose to connect the IPCAM-WO with wifi as opposed to a wired Ethernet connection. At that point, you may want to further reinforce the protective plug over the Ethernet jack with silicon to ensure a watertight seal.
The included power cord and Ethernet cable include silicon boots which are designed to fit over their receptacles. These boots provide similar protection from the elements as the silicon plug that comes affixed over the Ethernet port.
The camera also includes a power extension cable for applications where outlets are not available in proximity to where the camera is located. The barrel jack on the extension cable connects to the power port, and the actual transformer can then be plugged into the female barrel plug located at the other end of the extension cable.
Many users choose to attach the IPCAM-WO to the soffit on the exterior of their home or business. Once mounted, the power and/or Ethernet cables can run into the home or business through a small hole in the soffit.
This unit also includes a Wi-Fi antenna which may be useful for applications where the owner would like to connect the camera to Wi-Fi, but the router or access point is too far away to achieve a strong signal.
Pairing the camera to Wi-Fi involves depressing a small button located next to the DC plug on the rear of the camera. Once that button has been pressed, the owner can then switch the router to WPS mode so the router can discover the camera and complete the pairing.
In some cases, it can be helpful to have a partner working with you as you connect the camera to Wi-Fi. Once the button on the rear of the camera has been pressed to allow wifi discovery, there’s only a short period where you can pair the router and camera. During this time, it can be helpful to have another set of hands at the router so that the router can be put into WPS mode immediately once the button on the rear of the camera has been pressed.
For mounting to the home or business, the camera includes a circular plate and three screws which can be attached to the exterior of the home or business, or to a pole or tree nearby. The camera itself mounts to the circular plate with the help of a wooden dowel which secures to the center hole on the mounting plate.
Transcript
So we're going to open up the IPCAM-WO. Let me get these cameras out of the way here. And we're going to first put together the base. So we'll start by pulling out the main camera, and you can see here we have the motion detector at the bottom end of the camera. There's also some IR illuminators on here built into it, as well, for night vision. So you can get some black and white video at night, which is nice.
And this you can see has a nice rugged case on it with metal back. And also there's a silicone rubber plug here designed to plug up the back of the ethernet jack. Now, if you're not using ethernet, you want to be sure to keep this on. I would even recommend using some silicone and putting it around the edges, so that you don't get any water in there.
On the power plug, there is a boot that comes with it, so that water doesn't get inside. Same thing with the ethernet actually, so if you are using ethernet, you can use this boot, as well, to simply plug-in the RJ45, and then use the boot to protect the internal electronics from any water. These boots are great. If you don't have these boots, unfortunately, Honeywell does not sell them separately. So unfortunately, I mean, you can look online for some sort of rubber boot, but we don't currently have any option for that. We've been asked that question before.
So this would be how you connect the ethernet and then would run back to your existing router or an access point or switch. We'll disconnect that for now, assuming that we're going to be setting this up on the Wi-Fi. We'll plug this back up, and let's look at the power connections first here. So we're first going to get the DC plug with that little booty on there. And we physically plug-in the barrel connector into the back of the camera first, and then slide the rubber booty over it.
So this is basically an extension cable, so there's a female DC port on it, as well. A barrel connector-- that would connect to the actual transformer. That's going to plug into a wall outlet. In some cases, you may have to use an extension cord or you can run a new AC receptacle. A common installation for this device would be on the soffit, on the edge of your roof around the house or business.
You could run the power cable through a small hole in the soffit and then plug-in the transformer in your attic or crawl space or whatever it may be. Once you have this connected, you want to plug-in the DC extender here and then plug-in your transformer right into wall power. So that's just 120 VAC. And then once you are powered in, you can then pair on Wi-Fi which we're going to show you in a few moments in a different video.
There is an antenna that comes with this unit. It helps a lot, especially when you're on farther throws from the router. So you can just basically tighten that right on and situate it and aim it. You can orient it aiming towards the router, just the general direction of the router, depending on wherever that is. And the last thing here is the mounting bracket.
So we're not going to mount the camera today, but there are some pieces that come with the kit. It says, camera mounting bracket black, on there. And there's a few pieces, including some right angle brackets, and there's a small, little, metal dowel that you can connect the base plate to. The base plate is just a round cylindrical object where you can use three anchor points to screw that unit to the underside of the soffit, the side of the house, a pole, whatever it may be.
You can get other retrofitting objects to put on a pole, as well, if you basically just use this same dowel, and you can put that into some other objects to put around a pole and then the three screws. You can use your own screws, as well, if it's going into like concrete or something, you could use Tapcons for that with a masonry bit. So that's pretty much all the hardware involved with this unit. Once this is physically mounted and screwed to where you need it, you can pair it with the system.
Now, some people will do this with a partner because in some cases, if this is up on a ladder far from the router, the WPS enrollment involves a short period of time when you get the router in enrollment-- in the WPS enrollment-- then you only have about three minutes until it times out, sometimes sooner than that depending on the router.
So if you have a partner who's at the router, puts it into WPS mode as you're are on the ladder, you can then go ahead and press the enrollment button on here which we're going to show you shortly. And it does require a small little paperclip or something. It's right next to the DC plug, so you actually are going to have to have the boot. You can slide the boot back, plug-in the unit, have it plugged in. And there's a little tiny hole just to the right of the plug, and I'm not sure if you can see that there, but I can unplug this, and you might get a better angle.
Once this is plugged in and powered up, and the green LED is solid green and ready, you can press and hold this. Just press and release, actually, once the router is in the encryption mode, and it will pair to the system, and you just give it a few minutes until it's fully paired up. So that's how you would install and use the IPCAM-WO. If you have any specific questions on this camera, or you have any issues with enrolling it, you can email us at support at alarmgrid.com and please subscribe to our channel.
- Uploaded