Honeywell WAP-PLUS: Review
Related Products
Description
While the AlarmNet system and cameras will work on most wireless routers that are WPS enabled, this video will discuss the points and ease of using the Honeywell WAPPLUS router. Designed specifically for IP camera usage, it is the secure way to go for your home security.
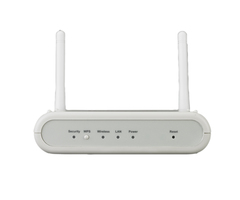
As you can see in the video, the router is small and designed to be non-intrusive by being easily placed next to your router. The first thing out of the box, as always, is the instruction sheet.
Once you have everything out of the box, the video will walk you through the instructions. The wireless router comes with an instruction sheet, and it is highly recommended that you read through it while watching the video. Once you are finished with the setup, you should keep the instruction sheet in a safe place for future reference.
Next, in the video, you will find the ethernet cable. You will use this to direct connect the WAPPLUS to your existing router. The WAP includes two powerful antennas that you simply screw on for excellent WiFi signal strength.
As the video shows, you just screw the antennas on, position them as needed and then plug the ethernet cable from the incoming port on the WAP and the outgoing post on your router. You will see how this is done in the tutorial.
Once that is complete the power supply is plugged in, and the WAP will power up. You can follow along with the video and learn how to make your WPS connections. Here you simply press the WPS button on the WAPPLUS box for 3 seconds. As we discuss here, this will put the WAP in enrollment mode. To connect the camera, you simply press the WPS button on your camera within a minute.
Once enrolled you can view your cameras on the Total Connect software. You will need to send the MAC addresses for each of your cameras to the AlarmNet service prior to use. Our video shows you where to find the MAC address label and how to enroll the cameras on the network.
You have several options when viewing your cameras. Depending on your system you can see the video feeds on your computer, cell phone or the control panel touch screen (if available). The video will cover all of these options for you.
The tutorial will cover all of your options with the Total Connect software. This includes cloud storage for motion detection snap shots, downloading video clips and controlling the cameras that are connected tot he network.
This video wraps up the review section for the WAPPLUS and the available cameras for the AlarmNet system using the Honeywell cameras and WAP. Follow along for full details on the entire system and view the other videos to find the perfect set up for your needs.
Transcript
And we're going to move ahead to the WAP plus, which is the wireless access point that you can use to connect your cameras wirelessly to your Wi-Fi network, assuming your router does not have a WPS button. This is a secure way to enroll your cameras with your network. And it's a very small little unit that will just sit beside your router. So we're going to show you how to use this and how to pair the cameras to it. So that will be our next video here. We're going to open up the WAP plus.
So we have an ethernet cable in here. We have the transformer that's going to connect to the back side of your WAP and power it. So this is the Honeywell WAP. There's two antennas on the backside of it. We can screw on the included antennas here. This will give you better range out to the cameras, especially for the outdoors. If you have any metal structures or anything that would impede an RF signal or the Wi-Fi signal. I'm going to straighten these out.
We got our antennas on here for good Wi-Fi access. The ethernet cable we would use to plug into the router. You want to go into a LAN port on the router, so an outgoing port. Now, the key here is to use the yellow WAN port-- that's the incoming feed to the WAP, OK? So this is a very important-- if you use one of these other ports here, it's going to do nothing. It won't feed internet to this. The incoming ethernet feed is going to be on this yellow port. So you would just plug-in to that. Take the other end of the cable here and plug right into your router, into one of the outgoing LAN ports. And then you can use these to plug cameras in, or you can wirelessly connect to them by using the WPS button on the front of the unit. You would press and hold this button for three full seconds. And it would put this WAP into enrollment mode. When you're in enrollment mode, you have to get over to the camera within the first minute and press and release the WPS button on that camera.
Now, we showed you in the other videos where the WPS button is located. So basically, you've just gotta get this thing in enrollment mode. And once it's in that mode, you then are going to go over the camera and press that WPS button. Be patient. Give it a few minutes. Sometimes it takes a little bit of time for it to enroll in the network. Once it's enrolled, then you can check the video feed on total connect. If you haven't sent over your Mac addresses to the cameras, you can find the Macs listed on the backside of your cameras. And you can basically send those over to your AlarmNet dealer, who set you up with the total connect service.
If you don't have service, you can checkout AlarmGrid.com for video monitoring as well. And the Macs are listed on the sticker. This is not to be confused with the Mac address that your router may assign this unit after it's on your network. So the terminology is a little confusing, but Honeywell uses the term Mac for a unique identifier of this specific camera, not necessarily the Mac assigned to it by your router after it acquires an IP. So just basically take a snapshot of these before you install them. And you can keep them handy, so that when your alarm company asks for them, you can just email them over or call them in.
Once those are given in and you've enrolled them using your WAP plus, or hardwired them, then you should be able to see your cameras in the video section on Total Connect. You can also view these cameras on your local links touch panel, your Honeywell links touch. If you have a L5100-WIFI module, that module would just install inside of the links panel. You have a couple right behind me here.
And once you have the Wi-Fi enrolled to the links panel, you can then scan using the video camera button at the home screen, at the main menu, and you'll actually be able to pull in your cameras, assuming that they are on the same network. And then you'll be able to view video right there from the screen if you like as well. So that's how the WAP plus works.
The IP cam series of cameras here that we have are great, especially if you're a Total Connect customer. They're going to offer you the motion detection, video recording. I don't know if we got into the cloud storage, but all four of these cameras do support cloud storage. So they'll upload eight second video clips to AlarmNet and they'll also be stored on your Total Connect account. You can set up alerts based on when videos are captured. You can also go into your event log and download those video clips or snapshots and view those at any time. You can also download them and send them to authorities. In the event that you ever did have a break in or you needed to send video clips to any sort of authority that would need that for some sort of intrusion.
So this is all we discuss here for today for the IP cam suite of cameras. And if you have any further questions for us on AlarmNet video, whether it be installation or configuration with your network or setting up Total Connect video plans, you can e-mail us at support@alarmgrid.com. And please subscribe to our channel.
- Uploaded