Install Honeywell LTE-XA or LTE- XV On a VISTA TURBO
Related Products


Related Categories
Description
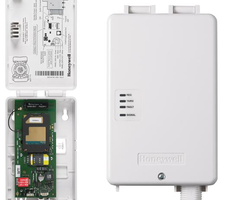
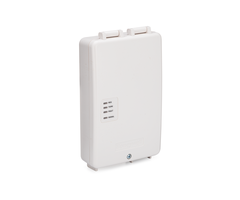
In this video, Michael from Alarm Grid shows you how to install a Honeywell LTE-XA or a Honeywell LTE-XV for a Honeywell VISTA TURBO Series Panel.
Transcript
[MUSIC PLAYING] Hi, DIYers. This is Michael from Alarm Grid. And today, I'm going to be showing you how to install a Honeywell LTE XA AT&T LTE communicator, or a Honeywell LTE XV Verizon LTE communicator, to a Honeywell Vista Turbo series panel-- those being the Vista 128 BPT and the Vista 250 BPT. The Turbo series panels-- the 128 BPT, and the 250 BPT OK. So the reason you're adding one of these to the panel-- either the XA or the XV, you only need one-- is to provide cellular communication for your panel, so that it can communicate with the AlarmNet servers via cellular connection. And AlarmNet forwards these signals to Total Connect 2.0 and/or a central monitoring station, depending upon your monitoring plan. So that's pretty much the basis of alarm monitoring right there. So you will need a monitoring service to activate one of these communicators. You will need cellular, specifically cellular monitoring service-- a plan that includes cellular communication-- because these are cellular communicators. So we're going to be adding one to our Vista 128 BPT. And we're going to start by powering down the panel. So the first thing we need to do-- it doesn't really matter the order-- we're going to start with just the backup batteries. We have two connected. I'm just going to take the red wire. We're going to get in there and just pull them off. It may be a bit tricky to pull off. Once you get the technique down, it's just like that. You kind of get in there and just twist a little bit and get them off. Get the leads off. And now we're going to do the transformer. You see, our systems is using one Honeywell LT cable, so I can just unplug the barrel connector right here, which is really convenient. And that's why we like the Honeywell LT cable. It's just really useful in that way. But if you don't have a Honeywell LT cable, and you actually have just a wired connection in here with no barrel connector, then you'll need to go and find the transformer for the system, which it looks like this. This is a Honeywell 1361-GT, Honeywell 1361-GT. So this is what it looks like. You may have this screw screwed in at the top, in which case you'll need a screwdriver to unplug it from the outlet. The screwdriver just keeps it secure and prevents it from being unplugged accidentally. But if you don't have a Honeywell LT cable then look for this, and unplug it from the wall. But in our case, we do have the Honeywell LT cables. So we can just unplug this right here, and we'll drop that for now. And so our system's completely powered down. You see, our keypad went blank. We disconnected the backup battery. We've undone the transformer, and our keypad's blank. And we're ready to begin the process of installing the communicator So today, we're using a Honeywell LTE XA This is the AT&T model. The Verizon one looks pretty much the same. Go with whichever cellular network provides better coverage in your area. So you can make that decision. Check coverage maps, if you aren't sure. So what we're going to do-- we have our module here, and we have a Phillips head screwdriver. And we're going to take it, and we're going to undo the screws. So we're going to do that now. OK, so we've got the screw removed. And now, we're going to open up the communicator just so we can take a look inside. You will want to make sure you note the Mac and the CRC codes on the communicator. You will need those when you go to activate. So it's recommended that, you either write down these codes or take a picture of this sticker. So that way, you have easy access to it. And just keep it somewhere safe where you can access it later. So that way, you won't have to reopen up the module again. It's just more convenient to have it that way. So we're going begin mounting the communicator. You do have the option of doing a wall mount. It does come with mounting equipment. We have it right here, but we're not going to be doing that today. And just to point out, you do have the mounting slots, the screw slots, on the back for mounting it. But we're actually going to be mounting ours outside the panel's metal enclosure. Or some people call it the metal can. You have it mounted outside, so that way, it gets a better cellular reception. If it were inside the panel, then the reception wouldn't be very good. It would be locked in there. The metal would be causing interference. So you actually mount it on the outside. You use this threaded clip right here that you add to the LTE XA or LTE XV. So with it open, you can take it, and you just slide it in. I'm demonstrating how it goes right now. And so we're just going to click it into place. Just slide it into place, and it'll click, just like that. And it's locked. And it's nice and secure. So that won't come loose at all. OK, so we're going to take ours, and we're basically putting it through here into the slot. And we'll be securing it a little better in a second. But first, I just want to demonstrate the wire I'm going to connect at this part first. We just take it, and we put it in right here. It clicks in, like that. Don't let your hand get hit. [LAUGHS] But we can take it, and we can just put all the wires through the hole. It is a small hole, so we do have to get them a bit organized. But they should all just run right through. We can drag those through on the other side, once we get over there. There we go. OK, so we've got that set up and everything, so that's good. Oh, I almost forgot. Before we do that, actually, we do want to do the washer, which carries it to the panel. This is the metal washer right here. We're just sliding the washer through the wires, [INAUDIBLE] down the line, until we get to here. Then we're just going to [INAUDIBLE].. And there, it's nice and secured. So now, we have our LTE XA secured. I am just going to screw this in, just to have it back in place. Remember to note the Mac and CRC before doing this. So that way, you don't have to open it up again later. And so now, we're going to begin wiring the four-wire connection from the LTE XA to the Vista Turbo panel. OK. All right. So we have our four wires here. We're starting with the red wire. This is for positive power, and it's going into terminal 6. And then we have the black wire for negative power, and this is going into terminal 7. And then we have the green wire, and that's going into terminal 8. And last, we have our yellow wire, which is going into terminal 9. This might also be a white wire, in some cases. And if you have existing wires at the keypad bus, then you can just match the colors, which is what we're doing here. But the yellow one or the white one is going into terminal 9. All right. And we'll just give it a quick tug to make sure it's all good. And it looks like the red one might be a little loose. We'll just tighten that down a little bit-- loosen it up and then tighten it down to get it in there. There we go. OK, and those look good. And so now that we have our connections made, we can power on the panel again. If you turned off power at the breaker, you can go and do that. In our case, we have our LT cable, so we'll just be plugging it back in. Or just plug your transformer back into the wall. Remember to do the set screw, if applicable. But we have our LT cable down on the floor here, and we're just going to plug it back in. And we see the Vista keypad come on, so we know that the panel's receiving power. And if you check the LED lights on the LTE XA, then you can see that it is receiving power. And you will want to check cellular signal on the LED lights when you do power it on. You can refer to the manual for more information on how to do this, but this will just give you a brief indication of signal strength. It will take some time to boot up, so we can't see it quite yet. But there is the signal LED on there. So you can check that for more information, just to make sure you're getting good cellular reception. You want to make sure you have a strong enough cell signal, or else your panel might go offline. So for most people, that's not a worry. With the LTE networks, they provide great coverage area. So just make sure to check that, though. Make sure everything's good on that. And lastly, you will need to activate the communicator for monitoring service. Your monitoring company will help you with this. If you're being monitored by Alarm Grid, then we will contact you at the activation slot that you scheduled. And we'll walk you through the rest of the process to get it up and running. Remember that you will need to provide the Mac and CRC codes from the communicator during the activation process. So that's how you install a Honeywell LTE XA or a Honeywell LTE XV to a Honeywell Vista Turbo series, those being the Vista 128 BPT and the Vista 250 BPT. If you have any questions about the LTE XA, or the LTE XV, or about the Vista Turbo panels, or about alarm monitoring service in general, send an email to support@alarmgrid.com. If you found this video helpful, make sure to give it a thumbs up below to like the video. And remember to subscribe to our channel for updates on future videos. We hope you enjoyed the video. Thank you.
- Uploaded