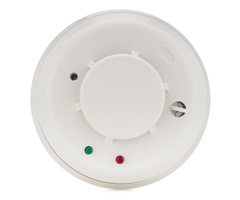
Learning the 5808W3 into a Qolsys IQ Panel 2 Plus
Related Products

Related Categories
Description
Learning the 5808W3 into a Qolsys IQ Panel 2 Plus
Transcript
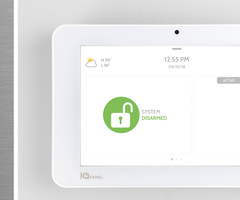
Hey DIY-ers, I'm Jorge from Alarm Grid. Today, I'm going to be showing you guys how to learn a 5808W3 wireless smoke and heat detector to a Qolsys IQ2 Plus system. So the 5808W3 is a wireless smoke and heat detector, it transmits at of 345 megahertz frequency which is Honeywell's frequency. Now, the IQ2 Plus that you have, if you're going to be using one, you need to make sure that you have the correct version. So, if you have-- there's three different versions to the IQ2 Plus, there is one version that has the 345 megahertz daughterboard card built-in. There's another one that has a 319.5 megahertz daughterboard card built-in, and then there's another one that has the DSC, all right? So you guys want to make sure that you guys are using the 345 megahertz IQ2 Plus Panel, or else this wireless Honeywell smoke and heat detector will not work with this system, all right? So once you got that confirmed, that you guys have the correct system, you guys are using the Honeywell, or I'm sorry, the 345 megahertz daughterboard card in your IQ2 Plus system, then you can go ahead and start to learn this in the system. Now, the first thing we have to do is get into programming mode, and very easy to do, you can go ahead and press the top button at the top of the screen, go to your Settings. Right now, it's telling me I have no Wi-Fi because I haven't connected it. We need to go to Advanced Settings. Enter user code. You need it enter your installer code or dealer code, all right? So that's either going to be 1, 1, 1, 1 or 2, 2, 2, 2, it may have changed if you or your company have changed around the codes, so make sure you guys use the right one. So again, I'm just going to go with my default one, 1, 1, 1, 1. I'm going to go to Installation, Devices, Security Sensors, and Auto-learn. Auto-learn is going to be the easiest way to learn in any sensors that you guys ever do, it automatically puts the sensor into a learning listening mode. So if any sensor trips or sets off the signal the system will pick up on it, and then you can go ahead and program it in. Now, this actually has a battery built-in, if you guys have a brand new 5808W3, the most consistent way to learn in multiple ones is if you remove the battery, or if it's a brand new sensor you just pull the battery tab. But if you have existing 5808W3s, you need to basically take it off the back plate, pull the battery and then reinsert it. Now, you're going to see right now since this is a listening mode, the first one that I learned in it's actually going to be learning by the tamper. Now, you can learn these in by just removing them from the back late because it will actually pick up on the tamper signal. Or you can even use a little test button in here, you're going to need like a little paperclip or something skinny to stick in there and poke and hold it down for about three seconds to send off a test signal. But again, if you're learning in multiple ones, we have realized that it's pretty inconsistent when you're doing multiples. When you're working with multiple smoke detectors, so you need to make sure that if you're going to be learning in multiple ones, that you do it by the battery method. So if it's a brand new smoke detector just pull the battery tab, if it's existing you can go ahead and twist counterclockwise, pull it away. Now, I told you the first one would learn in by setting off the tamper, and you can actually match that serial number 0333306 to the serial number on my small detector 033306. And once you confirm that they match, you can just hit OK, but I do want to show you guys real quick that you can also learn it in by powering it on. So, let's say you had a brand new smoke, you don't have any batteries in it-- by the way they use a lithium CR123 battery, so it's these stick cylindrical batteries. Again, you stick it-- you stick the battery in according negative in first, positive side last. Once you power it on, it should pick up on this signal. Give me a moment. And again, it picks up on not just tamper, it also picks up on powering the sensor up, that's going to be the most consistent way of doing it. So, make sure that you guys are doing that if you guys are working with multiple smokes. Now, if you just look at the panel here. You'll see that it says sensor 0333306 is requesting to be added to your list, do you want to continue? This is the same screen we had last time, so just hit OK. Again, if you guys want to confirm, you guys can take a look at the serial number right up the very top and match it to the serial number that's on the smoke. After you guys have matched the serial number on the smoke, you're going to go ahead and make sure that the loop is set to 1, if it's set to anything else make sure you always set it to 1. So loop, you want to make sure you leave it as 1. For the sensor type it is not a door window, you want to set it to smoke detector. The sensor name, you can do a custom description it has some options here-- hallway, upstairs, downstairs, basement smoke detector. You guys can go ahead and label it whatever you guys want. You can give it a chime, if you guys want, voice prompt. The Source, you should see here it'll say securityRF 345, that's the frequency that this is transmitting at 345 megahertz. And then the sensor group, you just going to leave it as a smoke and heat. And if you're done and you want to add a new sensor, you can go to Add new. Sensor added successfully. Or you can just hit the Home button, and back out to the main page. Now, to test it, I'm going to put the cover back on. You want to make sure you match this little port here to the little triangle port over here, it should fall right into place, twist clockwise, locks it in. After you lock in your back plate which you twist clockwise, you can now test the smoke detector to make sure that it's working. The test button, which is also a feature you could have used to learn the sensor in. So if you guys already have it installed, you don't want to take it off the back plate, and you guys just want to learn it in. Another way to learn them in is by using this little hole right here, not the one with the bridge across but the one right here. It's found right next to the green LED, you use a little paperclip-- I'm using a binder clip, you're going to put the binder clip in hold it for about three to five seconds, and this should start making the smoke detectors beep. Now, again this-- if you're learning it in and you're doing it the test button way, make sure that it's actually learning in the correct serial number. And again, the most consistent way of doing it is by removing the battery or pulling the battery tab and reinserting it. And if you have multiple smokes and you try doing the other ways where you tamper it or you do the test, you might get some inconsistency when learning in the sensors, so just a little reminder for all of you guys there. So now, I'm going to go out and test the smoke with the panel. Hold it down for about three seconds. As you can see I'm getting the alarm, I'm just going to go in and clear it. I can silenced it, if I want. Fire alarm Silenced. You can go and clear it. 1, 2, 3, 4. System is now disarmed. And again, make sure if you're being monitored by central station that you have your account on test before you test the smoke detectors, because you do not want to get the fire department dispatched on a false alarm. So, make sure that you have your account on test with the central station if you're being monitored and you're testing the smoke detectors. So, that was just a quick video on how to learn in the 5808W3 Wireless Honeywell Smoke and Heat Detector to a Qolsys IQ2 Plus Panel. You need to make sure you guys have the correct version the one with the 345 megahertz daughterboard card built-in. If you guys have any questions at all about how to get the system programmed in, or how to test it, feel free to email us that support@alarmgrid.com. If you find the video helpful, make sure you hit Like underneath, subscribe to the YouTube channel and enable notifications, so whenever we upload new content you guys get notified. I'm Jorge, and I'll see you guys next time.
- Uploaded