Location of the Enrollment Button on the DSC PG9944
Related Products
Related Categories
Description
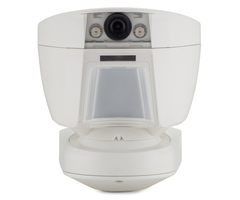
In this video, Michael from Alarm Grid shows the location of the enrollment button on the DSC PG9944 PowerG Outdoor Image Sensor. This enrollment button is in the battery compartment. You must remove two (2) device covers to access it. Accessing this enrollment button is needed to enroll the sensor.
Like most wireless sensors, the DSC PG9944 can be auto-enrolled with a security system. Auto-enrolling is recommended, as it prevents you from making a mistake if you had to manually enter the device's serial number. In order to auto-enroll the PG9944, you must first access the battery compartment. This will require a Phillips head screwdriver. You should then put your panel into its auto-enrollment mode. You will need to press and hold the enrollment button on the sensor until the LED light turns solid orange. You can then release the button, and the panel will allow you to auto-enroll it. You will then need to configure the settings for the zone. The sensor is typically programmed like any standard motion sensor.
When auto-enrolling the PG9944, you will need to have the batteries inserted so that the sensor can transmit signals. The space between the batteries and the enrollment button is very thin, so you will likely need a thin object to press and hold the button. Something like a small screwdriver or a pen can work pretty well. The device will enroll the system as a motion sensor. The only difference is that the device will take photos when it triggers and alarm on the system. The first of these images will be made viewable from Alarm.com for remote viewing. You can access Alarm.com from a web browser or from the mobile app to view that image. This is great for checking in and making sure that an alarm is legitimate.
https://www.alarmgrid.com/faq/where-is-the-enrollment-button-on-the-pg9944
http://alrm.gd/get-monitored
Transcript
H, DIYers. This is Michael from Alarm Grid, and today I'm going to show you where the Enrollment button is on the DSC PG9944 outdoor image sensor. Now, this is a PowerG sensor, so you're going to have to enroll it like a PowerG device. You can use it with any system that supports PowerG. That includes Qolsys IQ Panel 2 Plus, a DSC iotega, or a DSC power series neo system with an added PowerG transceiver. But please note that only on the IQ Panel 2 Plus will you be able to locally view any images that are taken during alarm events. If you have a different system, like one of the DSC systems that I just mentioned, you're only going to be able to view the images from alarm.com. But you need to find the Enrollment button on this device because that's needed for enrollment, and it could actually be a little bit tricky to find. So I have the DSC PG9944 outdoor image sensor right here, and I've removed the cover so that the camera showing. The camera is activated everything. The camera switch is right here, actually. And if you look here next to the battery, you can see there's a button in there, this red button, and that's actually the Enrollment button. Now, since you need to do this with the batteries in, it can be a little bit tricky to reach each, so what I like to do, just take a screwdriver and you go in, and you can just tap the button like that. Yep. Now, as you can see, we have our DSC PG9944 already opened up. If you have the tamper cover applied, you're not going to see the Enrollment button hidden in there. So actually, a couple of things you have to remove. You're going to remove this cover second. This is the one that actually covers the batteries. It goes right here like that. And on top of that, the whole thing, we have a larger covering the area right there. So you're going to have to remove both of those. They both use a Phillips head screwdriver, so make sure you have one of those on hand. You'll just be able to easily unscrew it, pull it off, and that's how you'll access the batteries and the Enrollment button. And I do also want to point out the batteries are pretty unique on this. They're actually-- let me pull one out here, if I can get one. And well, let's try this trick using the screwdriver to get it out, and there we go. We got it out. So we have our batteries here, and they're actually unique batteries. These are CR174503 volt lithium batteries. They're kind of like a AA battery, but they're not as long, and they're also longer than a CR123A battery, a camera battery. So these are pretty unique batteries, and the sensor does come with two of them, which we have already here, so you won't have to worry about getting new ones, but when it does come time to replace the batteries, make sure you get CR174503 volt lithium batteries for your PG9944 outdoor image sensor. Now, we actually have our PG9944 sensor already enrolled with the IQ Panel 2 Plus system, so I'm not going to show you that in this video, but I will show you the menu where you go and what you would do to activate to enroll the sensor. So what you do, you're at the main screen of your IQ Panel 2 Plus system. Keep in mind if you're using an iotega or you're using a power series neo system, you would just follow the steps for those respective systems to put it into Enrollment mode. But today we're using the IQ Panel 2 Plus, so we're going to click the small gray bar at the top, and we're going to Settings, Advanced Settings, and then you can enter your installer code or you can enter your dealer code. We're going to use our installer code today, and the default installer code is 1111. So we'll do that, 1111. And then we're going to choose Installation, we're going to choose Devices, we're going to choose Security Sensors, and then we're going to go to Auto Learn Sensor. And we already have ours enrolled there, so we won't be able to enroll it again. But what you would do, you would take your handy tool with the batteries plugged in and you would hold down this button until a solid orange light appears, and then you would release it once that happens. The LED light on there is here, but since we already have ours enrolled, it's not going to do that, but that's how you would do it. You would put it into this menu, on the IQ Panel 2 Plus, and you would hold it down until the orange LED appears, and you would release it once the LED steady. And then it would allow you to auto enroll the sensor, and you could adjust the device settings. We'll have a different video on enrolling the sensor, so be sure to check that out if you need to. We'll go back to Home now. But that's the Enrollment button on the PG9944 outdoor image sensor. If you found this video helpful, be sure to give it a thumbs up below to like the video and click the bell icon to get updates on future videos if you want to stay alerted to what goes on on our channel. And if you have any questions about our monitoring services or any of our products, be sure to send us an email at support@alarmgrid.com. And also check out our website, alarmgrid.com. Thanks. We hope you enjoyed this video. Have a great day.
- Uploaded