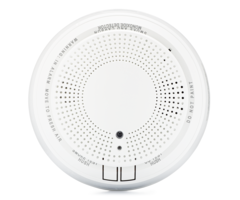
Opening the Honeywell SiXCOMBO
Related Products
Related Categories
Description
https://www.alarmgrid.com/faq/how-do-i-open-the-honeywell-sixcombo http://alrm.gd/get-monitored.
Transcript
Hi, DIYers. This is Michael from Alarm Grid. And today I'm going to be showing you how to open up the Honeywell SiXCOMBO combination smoke detector, heat detector, and carbon monoxide, CO, detector. Before I get into the reasons why you would be opening the sensor, I'm just going to quickly show you how to do it. So you have the sensor against the wall or the ceiling against its back plate. This is the back plate right there. But to simulate, my hand will represent the wall, and we're pressing it against the wall. And so it's pressed against the back plate, and we can just twist it counterclockwise, and then that separates the back cover from the sensor. And then to close it, you just have to properly align it. [BEEPING] We're going to silence that real quick. You will get a tamper cover when you open up your sensors. So we'll enter in our master code, and we'll just put that into programming so it stops. But that's how you open it. You press it against the wall or the ceiling back plate And you twist it counterclockwise. And then to close, you have to properly align it. If you're having trouble getting it, I just like to go around until we get it to lay flat against the sensor, just where we get it properly aligned, just like that. And then we have it against the back plate like so. Press it against, and we can-- well, it's not properly aligned yet. Just got to get it right on there where it's flat. [BEEPING] Yeah. We're going to get that silenced and we're going to get this aligned. Sometimes it gets caught on things. That's normal. Just keep going around until you get in the right spots. You can match up the spots, but I just do this. And then, there, it's aligned. And then put it against the back plate and we turn it clockwise, locks into place, just like that. So that's how you get it. To open, counterclockwise; close, clockwise, just like that. So the reasons you would be opening the sensor. It uses four CR123A batteries that you would need to change periodically. It has an average battery life of five years. As I said, it uses four of these batteries. It's recommended that use lithium batteries for optimal battery life. So that way you need to change the batteries less often. I guess you would be opening the sensor if you were mounting it, because you do see the screw holes on there for mounting the sensor. So that's a reason you might do it. There is the serial number inside the sensor. So if you needed to verify the sensor, then you would go in and open up the sensor to see the serial number. You can also go into the six programming mode, if you have it already enrolled, which we do. We have our sensor right there. And we can match the serial numbers on the Lyric System, if you wanted to do that. Again, you saw how we got the tamper cover when we opened up the sensor. You will get those for any zone that is programmed with the SiXCOMBO. And since it does smoke detection, heat detection, and CO detection, you'll get a tamper cover for each of the zones, assuming that you have them all enabled on the sensor. You won't need to open up the sensor to look at the LED light. This LED light, it's green. It's useful for enrolling the sensor OR when you're verifying enrollment. When it's blinking quickly, that means the sensor is not enrolled with the Lyric System. When it is blinking slowly then it is enrolled. So you can check this LED light on the front of the sensor, and you won't need to open up the sensor to get to it. There are also the test buttons down here. Again, you don't need to open up the sensor to get to the test buttons. Just press the buttons, and then perform the test as described. Now, remember to put your system on Test mode before testing the sensor, so that way you don't cause a false alarm on the system. But again, just to reiterate, you have the sensor against the back plate, whether this is the wall or a ceiling, however you have it. And you just twist the sensor counterclockwise, and you can open the sensor. You see that it's open. And align it. I'm not going to pull it off again. Holding this, so that way we don't do it. But you can see it's open, it's aligned. And then to close, twist it clockwise. Just like that, it'll lock into place and it'll stay closed. So that's how you open up the Honeywell SiXCOMBO combination smoke detector, heat detector and CO detector. You just press it against the back plate, whether it's on the wall or the ceiling, twist it counterclockwise. You can separate it from the back plate. Then when you go to close it, make sure it's properly aligned so it's flat all around the sensor, and then twist clockwise to lock into place. If you have any questions about the SiXCOMBO or the Honeywell Lyric Alarm System, or about alarm monitoring services, send an email to support@alarmgrid.com. If you found this video helpful, make sure to give it a thumbs up below to like the video. And remember to subscribe to our channel for updates on future videos. We hope you enjoyed the video. Thank you.
- Uploaded