Programming the 5800COMBO to a Vista Panel
Related Products
Related Categories
Description
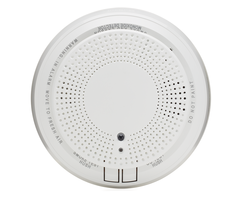
In this video, Joe from Alarm Grid teaches you how to program a Honeywell 5800COMBO to a Honeywell VISTA Alarm System. This is a combination smoke, heat, CO, and freeze detector that operates at 345 MHz. The sensor will work with a Honeywell VISTA Alarm Panel once a wireless receiver has been added.
The Honeywell 5800COMBO is a unique device in that it has two (2) different Serial Numbers. The main Serial Number is for the smoke and temperature sensing portion of the sensor. The second Serial Number is for carbon monoxide detection. The second Serial Number is one digit higher than the first Serial Number. So if the first Serial Number is 1111111, then the second will be 1111112 You will actually need to program the device to five (5) total zones for complete functionality. These zones are for smoke & heat detection, low-temperature detection, CO detection, device maintenance, and end of product life. Any function that you do not wish to use with the sensor does not have to be programmed.
As a 345 MHz sensor from the Honeywell 5800 Series, the 5800COMBO will work with any system with a 345 MHz wireless receiver. The Honeywell VISTA Series Panels are hardwired systems that do not come with a wireless receiver by default. Fortunately, you can add a wireless receiver to these systems so that they will support wireless sensors like the Honeywell 5800COMBO. Often, the easiest method is to just use a Honeywell 6160RF Keypad. This keypad includes a built-in wireless transceiver for this purpose. And since you need a system keypad anyway, this one serves dual roles. Of course, you can also add a standalone wireless receiver module, like a Honeywell 5881ENH or a Honeywell 5883H. It is recommend that you use an Alphanumeric Keypad when completing the programming process.
https://www.alarmgrid.com/videos/programming-the-5800combo-to-a-vista-panel
http://alrm.gd/get-monitored
Transcript
[MUSIC PLAYING] Hi, DIYers. Joe here from Alarm Grid. And today, we're going to show you how to program in a 5800Combo to your VISTA system. Now the 5800Combo, it's a great combination smoke and CO detector. It has a smoke detector and CO detector built right into the unit. It can also detect for low temperatures in your location. So if it drops below 41 degrees Fahrenheit, you can have it send a signal to your panel.
If you're using a VISTA system and you're looking for a combination smoke and CO device, this is a great option to use. It's highly recommended, works great, and it actually looks and matches most decors pretty well.
So on our VISTA system, before you program this in, you're just going to want to make sure that you do have wireless setup. You're going to want a wireless receiver or wireless transceiver for this to work. We do in that we have our 6160RF ready to go, on our VISTA-21iP.
Now the way that this programs into the system is it actually has two different serial numbers on it. It has one serial number for the smoke portion and one serial number for the CO portion. If I take the back plate off, you'll be able to see that. Right up here on this sticker, we see our smoke serial number right there, and we see our CO serial number right below it.
I'm going to use these both to manually enter in the serial numbers to the system today. So on our VISTA system, we're going to enter Programming, so I'm going to do Installer Code 4112800. As you can see, Installer Code 20. That means we're in Programming. To get to Zone Programming, I'm going to do Star 56. And then Set to Confirm, I'm going to hit 0, which it's already selected, and Star to confirm.
So now we're in Zone Programming. And I want to go to the first zone that supports a wireless device, which is zone number 9. So I'm going to do 09 Star. We're seeing our zone overview right here. I'm going to click Star. This is where we're going to tell the system what the device does, or the zone response type, rather.
So as we're going to program it in our smoke portion first, I'm going to do 09, which sets up fire without verification. This means as soon as the smoke detector goes off, it's going to send a signal to the panel and a fire alarm will occur. I'm going to click Star, Partition number 1. That's fine. Star.
This is our Report Code assignment. We're just going to want to make sure that we put a 1 in the first number slot to make sure that it does send a Report Code to Central Station, assuming that we do have this set up with the Central Station. So I'm going to click 1 and then Star. As you can see, our Input Type's already set up for an RF Transmitter. That's saying that we're going to use a wireless device in this zone. I'm going to click Star and then this is where we enter our serial number.
And for the smoke detection portion, it is going to be on loop number 1. As you can see, it is set for loop number 1. So my smoke serial is 0007195 Star. Our loop is correct. So I'm going to hit Star again. And that's our zone overview. Everything looks good. And we have now programmed in the smoke portion to work as a fire alarm on the system.
I'm going to go ahead and hit Star again. Program Alpha, this will program in the words of the smoke detector if you want it to show up and say smoke detector on the screen or something else when it goes off. I'm not going to do this right now. And if you do have an alarm company monitoring your system, there's a good chance that they can remotely log into your panel and help add these words for you.
It's not a problem to do it on the keypad. It's just kind of tedious and takes a little while, as you have to look up the information in the manual and enter it all in manually. So if you can get your alarm monitoring company do this for you, it's highly recommended. So I'm going to do No to confirm, or 0 to confirm. Great. Now we're back to our zone overview.
So next I'm going to program in the smoke maintenance zone. What this will do is this will send a signal to the panel if the smoke detector detects that it needs to be cleaned. It's a very useful little feature and it will notify you to go take the smoke down and just clean all the parts out and make sure that it's still up and good to go.
So we're on zone number 10. That's the next zone. I'm going to click Star to confirm. Again, we have our zone overview. Star. The Zone Type for this one is going to be Zone Type 12. This is a 24-hour monitor. What this is going to do is that if this trouble goes into effect, it won't set the system off into alarm, but it will send a notification to the system, and you will hear the keypad beep, and it will show up on the keypad.
Now if you do want that trouble condition to go to your monitoring station, you will want Trouble Reporting enabled. And, again, if you do have this monitored, or your system monitored by an alarm company, ask them to help set this up. And they will be able to either walk you through setting it up, or remote into your system to set it up.
So now that we have this set, I'm going to click Star to confirm. Partition number one is set. Again, if you do want it to report, we're going to have to put a number 1 in our Report Code field in the first slot. I'm going to click Star to confirm. We do want number 3 for the RF Transmitter selection. Star to confirm. And then, again, I'm going to use the same smoke serial number, but I'm going to select loop number 2 for this feature. So 0007195, Star to confirm that, and then loop number 2. Star to confirm. There's our zone overview. Everything looks good. Star to confirm again. And I'm not going to enter the Alpha at this time.
So now we have the last portion of the first serial number. This is going to be for low temperature. So this will be if the temperature in the location where this is mounted drops below 41 degrees Fahrenheit, it will send a signal to the system. So yes, zone 11 is what we want, Star. There's the zone overview. Hit Star to confirm. Zone Type, again, we're going to select Zone Type number 12 for 24-hour monitoring, which would do the same thing as how we had the second loop programmed.
If this trouble condition goes into effect, it will send a notification to the system. And, again, if you do want this trouble to go up to your Central Station, just talk to your alarm company and they'll be able to help you set that up. Star to confirm. Partition number 1. That's correct. I want to enable the Report Code. So in the first slot, I'm going to put a 1 there. RF Transmitter as the Input Type. That's what we want.
And then I'm going to use the same serial number again-- 0007195. Except this loop is going to be number 3. Star to confirm. There's the zone overview. It all looks good. Star to confirm again. I'm not going to program the Alpha at this time.
Now, as you can see, on the back, our CO serial number is the same serial number plus one. So it's going to be 0007196. So enter the zone number. 12 is the next open one. That's what we want. So we're going to jump into that. There's our zone overview. Hit Star. What we're to do for this one is enter a Zone Type number 14. And that enters it as a CO zone for the CO detector.
Hit Star, partition 1, correct. Just like the others, we're going to enter 1 in the first slot to enable the Report Code. Hit Star. Input Type-- it is the same as all the others-- number 3 for our transmitter. Star. And then the serial number is 0007196. Star to confirm it, and then loop number 1. Star. So the overview looks good. We're going to hit Star. And we're not going to enter the Alpha at this time.
So now we're at the next open zone. And this last zone available on the smoke detector is the carbon monoxide end-of-life monitoring. Carbon monoxide detectors have about a 10-year lifespan. And when this is enabled, this will actually send a trouble signal and notify you when the CO detector is getting near the end of its life. It's a super convenient feature and it's much easier than remembering when you actually mounted the device.
So our zone overview is right there. We're going to hit Star. For this one, just like the others, we're going to enter zone number 12 for 24-hour monitor, to get that notification. Hit Star. Partition number 1 is correct. Star. Enter 1 for the Report Code slot. Hit Star. RF Transmitter is what we want on number 3. Hit Star.
And, again, we're going to enter the CO serial number-- 7196, Star, and then loop number 2, Star. There you go. There's the zone overview. I'm going to hit Star to confirm. We're not going to program the Alpha at this time.
I'm going to pop the cover on the back of my 5800Combo. The tamper in this device automatically programs in, just so you know. With that set, I'm going to hit 00 to exit Zone Programming, and then Star 99 to back out of Programming. And there you go.
And now we're going to test the detector, just to show it looks like when we use the Test buttons on the device. I did have Alarm Grid download the descriptions into the system, too. So it will show up as Smoke and CO when we do our tests. To test the 5800Combo, really all you have to do is either click the Smoke Test button or the CO Test button.
I'm going to click the Smoke Test button now. It's going to enunciate that the test is going to occur And then we're going to see it occur on the actual keypad. So the Smoke Test is right there. Click it. If it doesn't work when you first click it, try it again.
Smoke sensor is good. Battery life is at least 12 months. The alarm now sound in five seconds. Press Test to cancel.
And we should see it appear on the keypad.
[BEEPING]
So I'm going to click the Test button to cancel it--
[BEEPING]
--which will silence the CO, or the smoke CO. And then on the keypad, as we can see, we have Fire 09 Smoke. That is the zone that we programmed the smoke portion of the Combo detector into.
To cancel this, I'm just going to enter our master code-- 1234 and 1-- which will silence it. And then 12341 to clear it. Now let's test the CO portion. So, again, just like the smoke, we're going to click the CO Test button.
CO sensor is good. Remaining sensor life is at least 12 months. Battery life is at least 12 months. The alarm will now sound in five seconds. Press Test to cancel.
And just like the smoke portion, we're going to see the CO portion show up on the keypad.
[BEEPING]
That's the device going off. And, as we can see, we have Alarm CO 12, which is where we programmed the CO into our system at. So I'm going to click the CO Test button to cancel.
CO sensor is good. Remaining sensor life--
I actually re-initiated it. [LAUGHS] As you can see, if that happens and it goes off again, all you're going to have to do is click the button to cancel it.
--will now sound in five seconds. Press Test to cancel. Test cancelled.
So the test is canceled. Again, on our keypad, let's enter the master code-- 1234-- and then 1 to silence it, and then 12341 to clear it. As you can see, the system is back to its ready state. And that's how you test the 5800Combo after you have it programmed in.
That's how to program in a 5800Combo to your VISTA-21iP system. If you have any questions about your VISTA system, the 5800Combo programming, or alarm systems in general, feel free to head over to our website-- www.alarmgrid.com, give us a call at 888-818-7728, or send us an email to support@alarmgrid.com.
If you did enjoy the video, feel free to subscribe. And if you want to be notified when we post future videos, hit the notification button below, and we'll send you an update when we do so. Thanks for watching and have a great day.
- Uploaded