Resetting an Interlogix Simon XT to Factory Defaults UPDATED
Related Products
Description
In this video, Jorge shows users how to reset an Interlogix Simon XT Panel to factory default settings. This will do a couple of things. Any user codes that are programmed with the panel will be removed. The Master, Installer and Dealer Codes will be restored to the default. All zones will be wiped.
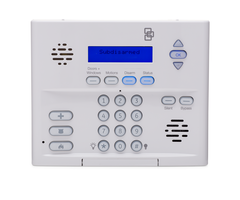
A user can default the Simon XT by pressing and holding the four buttons beneath the LCD display screen while the system is being powered on. These buttons are labeled "Doors + Windows", "Motions", "Disarm" and "Status". By pressing and holding all of these button while the system is powering on, a factory default will occur.
One of the most common reasons to factory reset an Interlogix Simon XT is to obtain the Installer Code for the system. If a user doesn't know the Installer Code, defaulting the system will restore the Installer Code to 4321 so that the user can get into programming. The Master Code will also be restored to its default of 1234. If there were any other codes programmed with the panel, they will be deleted and no longer work with the system.
But a user should avoid having to default their system unless they absolutely have to. Defaulting the system will delete any sensors that have been programmed. While this can be useful if the user is taking over the system from someone else, it will be very inconvenient to have to reprogram all of their sensors otherwise. But this can potentially be the only solution if the user has lost their Installer Code. Before resorting to a factory reset, a user may want to try the default code of 4321.
Additionally, any settings that were adjusted with the system will be reset to their default. In other words, a user will need to reprogram their system in its entirety after performing a default. This includes any communication settings that had been adjusted with the Simon XT System.
Note: There is a field in panel programming called "Phone Lock". This feature is set to "Off" by default, however, if it is enabled, a panel default will not affect the following settings: account number, dealer code, code length, call wait cancel setting, phone numbers 1 and 2, phone report modes 1 through 4, phone lock, downloader phone number, and downloader code.
http://alrm.gd/get-monitored
Transcript
Hey, DIYers. I'm Jorge from AlarmGrid and today we're going to be going over how to default a Simon XT system. So couple things, defaulting a system-- the Simon XT is going to do a couple of things. It's going to go ahead and first of all it's going to get rid of any user codes that are in the system right now. So right now, my master code I have a set of 5555. Yeah, so that's four fives. So that's my master code on the system right now. When I defaulted that code will be deleted. Any system settings that you have configured whether it's anything in the deep level program that you want to change for the monitoring station or anything like that will also be deleted. Any zones, door, windows, seals, smokes, any possible security zone that you have learned to the system also going to be deleted. It's going to go back to normal back as if it was brand new, just out of the box. As far as programming goes, right. So just to show you guys real quick that the master code is currently set to 5, 5 I'm going to go ahead and arm it. Motion, doors and windows on, motion on. If I hit disarm. Enter access code. I'm going to enter my 5555 because that's what I have is set to. Disarmed. Now the default one is 1234. If I tried 1234 it would not work. Enter access code. See it doesn't work. Disarmed. So when I default it my 1234 will work and my 5555 will no longer work. Real quick, if you're looking at the video easiest way to disarm it is while the system is powered down you hold down these four buttons 1, 2, 3, 4 as you power it back on that's going to default the system completely right away. Now to do that, to power down the system, the first thing we need to do is unplug the backup battery, remove the transformer. So to do that press these two tabs at the top down, swings the panel wide open, you'll see the backup battery right here. I'm going to go ahead and remove it completely. So I'm going to pull this tab away allowing this backup battery to slide right out. Going to remove the leads Yippa, sorry. And we can go and places off to the side for now. Yep, we can on and leave that. I'll get to this in a second here. So the next, we've unplugged the backup battery, now we have to unplug the transformers. So they're usually plugged into one of your wall outlets. I have mine plug behind here, so I'm just going to go ahead over here. Now, you'll see the blue lights on. As soon as I power down the lights will turn off. So the system's no longer powered on it doesn't react to any of my button presses whatsoever, there's no power to the system. Now at this point, if you have a cellular communicator right here, this would be the point where you want to unplug it. Yes, so you're going to remove the cellular communicator, if you have one. We need to remove it before we default it. So while the systems power down, you have backup battery unplugged, transformer unplugged, systems on, uh system is off, remove the cellular communicator. I'm going to go ahead and place it back on its back plate. All right, I didn't plug the backup battery back in because like I said you don't need it for this process. Now you may need two people for this as holding down these four buttons with one hand can be a little difficult. I'm going to go out and attempt it in this video. So, again, you want to make sure you hold down these buttons before you power it back on. So I'm going to hold down 1, 2, 3, 4. In one moment there we go. 1, 2, 3, 4. Powered on. The panel beeps. It is fully powered on now. And now if I arm it, first of all, remember, there's no zones into the system because you just defaulted it. So it's going to allow me to arm because I don't have anything. Doors and windows on, motions on. But now, if I try to use the code that I had before, which was 5555, it will not work watch. Enter access code. Everything's defaulted, so I need to use the default master code, which is 1234. Enter access code. Disarmed. The panel is defaulted. Its back to its normal codes. There's no zones learned into it and you have a brand fresh Simon XT panel. At this point in time, if you do have a cellular communicator, since the panel is defaults and now all you need to do is power down the system. So just unplug the transformer again, open it up, plug-in the cellular communicator. You can also go ahead and plug-in the backup battery as well now, and just close the system backup. And you have a defaulted Simon XT system. All right, guys now just on a side note, if you guys have done all the steps in the video to default your Simon XT and it still did not function or there's some settings that you still can access. If your dealer code wasn't defaulted there is actually a feature that is on the Simon XT is called a phone lock feature. Now by default this phone lock feature comes disabled on the system. However, there are some companies out there that will enable it. Now there's a list here of what all the certain features that the phone lock will deny you access to. Now these are very important features. Because for instance, if you are using the Simon XT and you're using it on a phone line monitoring using a plain old telephone service if the phone lock feature is enabled and even if you guys do try to default the system to edit the setting in the system where you can change the phone number that the system dials out to that phone lock feature needs to be disabled. If it is enabled you won't be able to get into that setting to switch companies so that the system can dial out to a different central station. So again, make sure you're taking a look at the list if the default doesn't work it's quite possible that the phone lock feature is on and the phone lock feature is only something that can be accessed by having the dealer code. The whole point of the video was to default the panel so you can get your code. So if the default is in working you're not going to have your codes to be able to check the setting. And if you do have your dealer codes then it's just a setting that can easily be switched by yourself in the programming. All right, so if you do have your dealer code, then you can easily access this phone line or this phone lock feature by using these top arrow keys right here, you're going to go ahead and hit the down arrow key until you see system programming. You're going to hit OK. You're going to want to enter in the dealer code. Now if your codes are defaulted, you're going to want to enter in 4321. Ops sorry it backed out it took too long. Again, system programming OK. 4321, OK. Now from here you're going to go to security. You're OK. And then you're going to scroll down until you see phone lock. Now obviously my phone lock is set to off. If yours is set to on it-- if yours is set to on make sure that you select and you set it to off. Now again, that phone lock feature is very important so you guys can actually go in there and switch the phone number that the system is dolling out to or some of the other settings, which you guys saw on the list previously. All right, so from here we're just going to back out to the main screen by hitting status all the way out and we're back out our main disarm screen. If you guys have any other questions, you can always email us at support@alarmgrid.com. Make sure that you hit Like, if you found is very helpful. Subscribe to the YouTube channel and enable notifications, that way whenever we upload new content you do get notified. Again, my name is Jorge, I'll see you guys next time. Bye.
- Uploaded