Running Power to a Honeywell L7000
Related Products
Description
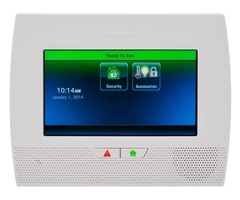
In this video, Jarrett from Alarm Grid shows you how to power on a Honeywell LYNX Touch L7000 System. Like most wireless alarm control panels, the L7000 uses a plug-in transformer for primary power and a plug-in battery for backup power. You must disconnect both the transformer and the backup battery if you want to power the system completely down. This is done when making hardware changes to avoid damage to the panel and the equipment.
When powering down, it doesn't matter whether you unplug the transformer or the backup battery first. But when powering the system back on, it is strongly recommended that you connect the backup battery first, followed by the transformer. Keep in mind that the panel will not power on from battery power alone. It needs the transformer to be connected before it will power back on. This is part of the battery saver circuitry that prevents the panel from discharging the battery too deeply.
The Honeywell L7000 uses a 9VDC, 2.5A transformer for power. This transformer is known as the Honeywell 300-04705. You connect it to the panel using 18-gauge or 22-gauge, 2-conductor wiring. The 18-gauge wire is a bit thicker to allow for longer wire runs, but some users prefer 22-gauge wire due to the fact that it is thinner and more flexible. You can find alarm wire at a hardware store. Another option is to use a Honeywell LT-Cable, which is a prepared cable that doesn't require any stripping. Just keep in mind that the Honeywell LT-Cable is a fixed-length cable, and it cannot be easily extended. As for the backup battery, it has a plug-in connector that secures to a port on the back of the panel. The backup battery will need to be replaced after about four (4) years depending upon use.
https://www.alarmgrid.com/faq/how-do-i-run-power-to-a-honeywell-l7000
http://alrm.gd/get-monitored
Transcript
Hey, DIYers, it's Jarrett here from Alarm Grid. Today we're going to be going over how you can set up power or run power to the Honeywell L7000 system. There are a couple of different ways you can go ahead and do so. That's what we're going to be covering in this video. But, essentially, there's different ways you can do it, right? Normally, you can use either custom wire to be able to supply power to the system by using standard 18-gauge cable, 20-gauge cable, or 22-gauge cable. The recommended if you're going to be using custom wire is 18 by 2 gauge cable because it is going to be able to supply enough power sufficiently. And especially if you want to do some long power runs, 18-gauge cable's normally the best one to use. You can also use 22 by 2 gauge cable or even 20 by 2 gauge cable. Some occasions we've seen 16 by 2 gauge cable but not as recommended as ones mentioned earlier. Now, for the other way of setting up the power for the system is by using an LT cable as well. It's a specific cable made by Honeywell. We're going to be covering this cable a little bit later in this video. But this is the LT cable. Essentially, it's going to be different from a custom wire, because custom wire, you're really going to see the-- You're not going to see the spade connectors unless you set that up, obviously. But you'll see just the stranded wire, positive and negative, that you just set up to the panel and then also the transformer. For this one, it's a little bit different because you have a barrel connection right here, you have the piece that plugs into the back of the panel, and then this just plugs in via a barrel connection. As I said, we're going to be covering this in a little bit. But those are really the two ways you can go ahead and set up the power. Now, really, there's different reasons as to why you would use either a custom wire or the LT cable. Essentially, if you're setting up an L7000 system, and you want to locate the transformer away from the panel-- maybe somewhere across the house or 20 or so feet away so that it's not really viewable to anybody or it's not out in the open, you want to have it hidden-- if you're going to be doing something like that, then it's much better to use custom wire, because you're able to run that wire a little bit further than you would with the LT cable, for instance. The LT cable is fixed to about 8 feet, it's an 8-foot fixed cable. If you have an outlet that's about 8 feet or 7 feet, anywhere around that range, then you can go ahead and use this cable, definitely recommended, because it is very easy to set up. But if you have anything that's going to be run any further, then we would recommend using the 18 by 2 gauge cable. That's going to let you be able to run power a little bit further. And then 22 by 2 and then 20 by 2 gauge cable. Now, for the L7000, if using 18-gauge cable, I believe the furthest you can run the power is roughly around 20, 25 feet. With 22 by 2 gauge cable-- or, I'm sorry, 20 by 2 gauge cable, you're going to be running about 13 to 15 feet or so. And then 22-gauge cable, it's going to be a little bit less actually, around 8 to 10 feet. You can find this information in the installation manual for the L7000. It'll give you a better estimate of how far those power runs can be. If you are going to be using custom wire, you want to make sure you're staying within the recommended power requirements, or the length of how far that wire can run. You want to make sure that the system is getting sufficient power. If you're going further than what's recommended, you might have some issues with the power being run to the system, there's a couple things that can follow. So just want to keep that in mind when you're setting up the power to the systems. Now, for the LT cable, very simple, as I said, 8-foot cable, very straightforward to set it up. You don't have to worry about the length or anything because it's already a pre-cut wire. It's already a fixed length. So, essentially, if you want to go ahead and set up power to the L7000, first thing you want to do is obviously make sure it's powered down. There's going to be no power to it, because there's no power running to it anyway. So, basically, the first thing you want to make sure though is that the battery backup is actually unplugged. You normally never want to run power to it if the battery backup is plugged in because normally the sequence to either power down the system or power it up, you always want to have the battery backup unplugged. So first thing you want to make sure of when you're setting up the power is that the battery backup's unplugged. You never want the battery backup to be plugged in while you're running power to the system, to avoid any power issues. So, first, what you want to do is pop open the L7000 so you can have access to the power terminals anyway, so you can run that power. So if want to do that, it's much better if you have a flat-head screwdriver or a pair of keys, something that's going to be able to help you pry open the two tabs to open up the system. There's going to be two tabs located right at the top of the panel, literally right here, and then right here. They're a little bit geared towards the back of it, so you can't see it. But you're just going to pop those open, or you're going to push those down, and then pop open the system. So as you can see, you have the two tabs sitting right here. You just want to push those down, and then you'll be able to pop open the system. Now, if you look at the inside of the L7000, you see a power strip right here, right? This is normally where you would run-- If you're using custom wire, you're going to be running the positive and negative to this terminal. You have, if you look very closely, 9-volt DC and then a GND, basically ground. Positive is going to run to this, negative is going to run to this. We're going to cover that in a bit. If you have the LT cable, then you're going to plug the barrel connection right into there. Now, as I said, first thing you want to check is the battery backup. Make sure that it's unplugged before you run any power. As of right now, we do have it unplugged. But your battery backup's normally going to be located right on the back plate, attached to the wall, and then you'll have the cable running down. Normally, it would be plugged in right here. So it pops in place a little like that. But for this demonstration, we want to make sure it's unplugged. So, first things first, we're going to be using custom wire. So we actually have 18-gauge cable that I'm going to be using for this video. And just looks like a standard cable. It has the-- if you look at it, we have the positive right here, and then we have the negative. I've already stripped the sheath that's on here. Before, when you're prepping a wire, normally, what you would have to do if it's a brand new cable is take off this plastic covering that's literally right here. You have to remove it, and then you have the wires on the inside. In this instance, this is actually an 18 by 4 gauge cable, not an 18 by 2, so that's why you're seeing a green and yellow cable right here. I just wrapped it around because we're not using it. We're just going to be using the positive and negative. Now, normally, an 18 by 2 gauge cable, you would just have the positive and negative. You don't have this extra wire. So when you've removed that plastic covering, you're going to have the wire exposed. And then these cables are also going to be covered, they're also going to be covered as well, yeah. So you're going to have to strip the plastic off of those so you can get the bare metal to be able to set up the power. Now, as I said, on the L7000 itself, you have the terminal right here at the bottom, or at the top. And what you would do is take your red positive, and you're going to wire into the 9-volt or the plus 9-volt DC terminal screw. So before you do that, you want to make sure that the screw here is taken out enough or lifted enough so that you can fit the cable in there. And you would take your positive and stick it into the little terminal that is right above it. There's a little slot, you can't exactly see it here, there's a little slot right up here that the cable can fit into. And once you pop that in, you would just screw it in place. Want to make sure it's not coming out at all, make sure it's nice and snug. And then you have your negative cable, so the black wire. And then what you're going to do is wire that into the GND terminal right here. As I said, you want to make sure the screw is lifted up so you have some room to fit the cable in there, just wire that in. And now you have the positive negative wired into the back of the L7000. Now, on the other side of the cable, this is where the transformer is going to come into play. So normally when you get like a brand new L7000 system or even a Honeywell system in general, you're going to get a transformer, a power transformer, to be able to set it up. Now, it doesn't come with any wire, so this is where you would use either the 18-gauge cable or the LT cable. So as you can see on this transformer here, we have terminal screws at the bottom. And this is where the wire is going to be screwed into. And there's a positive, there's a negative. So what you would do is take your positive, wire it right underneath the positive, and you're going to need-- You can actually use either a Phillips or a flat-head screwdriver because the screw allows you to be able to do that. Now, for these actually, this a very good thing. If you just try to screw it in the way I just did, normally the cable is just going to pop out sometimes from the side. What you want to do is kind of just angle it. Make like a little hook. And then you would just hook it into the terminal screw, so that when you screw it in, it's in place. See, it's not popping up from the side again. So, same thing with the negative, you want to make sure it's lined up with the negative screw. Just do a little hook as well. Cable's going to be a little bit stiff because it's brand new, but you want to go ahead and just screw that in too. Now you have a positive and negative set up on your transformer. So and then what you would do at this point is once you have that set up, normally, in most instances, you would have the cable fed through the wall. I just did this as a demonstration, but whenever you have that power cable set up, you're just going to plug in the transformer-- Or, first, take that back, you're going to plug in the battery backup, and then you're going to plug in the transformer, and then that'll supply power to your L7000 with a custom wire. All right, so now that you know how to set up or run wire or run power to the L7000 by using custom wire, we're going to go on and move over to the LT cable. I've already removed our custom wire from the previous bit because we're no longer going to be using that. But for this part, this is going to be LT cable. So as I said, this is going to be a type of barrel connection. You have the female-- I mean, you have the male barrel connection right here, and then you have the female connection right here. This is going to be the piece that wires into the L7000, actually. You could technically plug the barrel connection right here as well, technically do that. But it's much better if you just use the male and female end, because if you ever need to just unplug it or anything like that, it's just much simpler. Now, when you're setting this up, as we already went over, you have the positive and negative. So you want to make sure that the positive negative are being run to the correct terminals on the L7000. So we're going to take our red positive, and we're going to wire it into the plus 9-volt DC terminal. And then we're going to be taking the negative and wiring it to the GND, which is ground. So just going to make sure. So you're just going to make sure your screw is lifted high enough so you can fit the cable in there. Right now, mine is not, actually. I wasn't able to stick or put it in there correctly. So now going to screw that in. And then we're going to take the negative, wire it into the ground terminal. So now you have your female end of the LT cable wired into the L7000. And then if you have the other end of it fed through the wall or fished through the wall, then you're going to be able to just plug it in from there. Now, we'll get to that part in a second as well. Now, for the other end of the LT cable, this is where you would wire this end to the transformer. As you can see, at the top of it, we have two spade lugs right here. We have a positive and then a negative. The spade lugs are going to make it a lot easier to be able to wire it to the screws instead of having to sit there and make the little hook with the custom wire to have it nice and snug and not slip out from underneath the screw. These are just going to be able to catch it much easier. So when you're doing that or when you're setting up the cable to your transformer, you want to place your positive on the positive screw terminal. You're just going to stick that spade lug underneath the screw, and then just screw that in. See, it's much easier. It's not slipping or anything like that. It just catches immediately. And then you're going to take your negative and make sure that it is lining up with the negative screw. You don't want to switch things around because you can cause some power issues if you have positive and negative wrong on the panel compared to how you have it set up on the transformer. So you want to make sure that these are not slipping at all. You want to make sure these are nice and tight, tightly secured. I'm pulling on it just gently, but nothing's coming out. But as you can see, you have the positive run to the positive and the negative run over to the negative. All right, so now I have the LT cable actually fed through the wall, fished over. This is what I should have done with the custom wire as well. But, basically, this is what it would look like if you have the cable fished through the wall. You have your female connection here set up on the back of the L7000. And then you have your male connection fed through the hole. Now, first, before plugging in the power, want to make sure your battery backup is plugged in. So just plug in that battery backup real quick into the terminal up here. And then you have your LT cable. So at this point, you plug that in, and then at the other end of it, you have your transformer that you just plug into a normal wall outlet. Then if you were to close it up. The panel's currently in its boot up process, but that's how you would set up the LT cable with the L7000, just as simple as that. And that is how you run power to the Honeywell L7000 system. If you have any further questions about the Honeywell L7000 or alarm systems in general, please reach us at support@alarmgrid.com or go to our website alarmgrid.com. If you found this video helpful, please like and subscribe. If you want notifications of future videos, please click the bell icon. This is Jarrett with Alarm Grid. Have a great day.
- Uploaded