Setting Up a Cellular Communicator for a 2GIG GC3e
Related Products
Related Categories
Description
Setting Up a Cellular Communicator for a 2GIG GC3e
Transcript
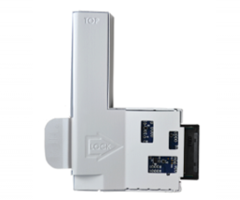
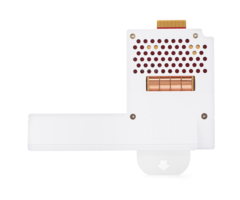
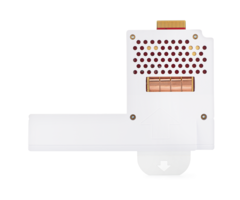
hi diy-ers this is michael from alarm grid and today i'm going to be showing you how to properly install a cellular communicator inside of a 2gig gc3e security system now the gc3e it has built-in wi-fi but per alarm.com requirements you have to add a cellular communicator if you want to get the system monitored cellular communication is extremely reliable it's a great um secondary path in case the wi-fi goes down and like i said alarm.com requires it so you're going to be adding a cellular communicator to your gc3e if you plan on getting it monitored the only reason you wouldn't do this is if you're just using it as a local noisemaker an unmonitored gc3e but most people will want to get it monitored and a benefit of doing this it will connect with the alarm.com servers you'll be able to control the system remotely provided that the alarm.com features are included in your monitoring plan you'll be able to do both security controlling and automation controlling through alarm.com just pull out an app on your phone or open up a web browser it's super convenient really good if you're on the go and you want to check your system or if you want to make sure that maybe your lights are off or you want to adjust your thermostat you have lots of great options here all from adding a cellular communicator and the gc3e uses lte cellular communicators which is great because lte the lte networks they're not going anywhere anytime soon you have options for both att and verizon this has nothing to do with your personal phone it's just what your system's using and your monitoring costs are going to stay the same regardless whether you choose 18 t or verizon so just go with whichever network provides better coverage in your area if you're not sure you can check coverage maps and if you don't if you live in more of a rural area where you can't get any coverage can't get adequate coverage consider adding a cellular antenna or an amplifier so those are options as well but we're just going to go through the basic process of installing a cellular communicator on the gc3e today the first thing we want to do is uh remove it from the the wall the wall mount so that way we can open it up power it down always make sure you power it down before installing and then i'll show you how to install the communicator so the first thing that we want to do when removing the the cell cover we have to check and make sure that the cell cover screw is uh in the unlocked position so we have to remove the front cover for the panel and to do that we can just kind of put our fingernails in and just pop it right off um into the crevice to access this area so ours is already in the unlocked position so we can go ahead and uh take off the the cell cover when we get to that the cell cover slot um but if you find that yours is in the locked position this screw right here if you find that it's in in the one on the left the locked position then you'll want to take it out and remove it and put it into the unlocked position position just so you don't lose it but we're fine here so we can just go and snap this back on that's just something you want to check because otherwise you won't be able to access the cover slot so now what we need to do before installing the communicator we need to power down the panel so we're going to have to open up the panel because that's where the backup battery is now i do want to point out um when you're opening up the panel we're going to show you how you would remove it if it's wall mounted first um actually that's the only way we're going to show you it here um but we have a set screw at the bottom and whether you're opening it flat mounted or on the wall you need to loosen up this set screw so that way you can pull it off otherwise you're not going to be able to get it off so we just have a phillips head screwdriver and it's kind of tricky to see with the position that i'm in but we got it and we're just going to screw it until it's it kind of tightens up so we're just going to do that okay we've got it to where it's it's it's not going anymore so we have our set screw loosened you don't want to remove it all the way just loosen it up so then we can take our panel and we can just pull it off the wall like just kind of push upwards and you can get it off the wall just like that now we have the back of our panel here the first thing we want to do is we want to disconnect the we want to disconnect the backup battery which is right here uh the blue and yellow battery it has its plug-in port right here so we're just going to unplug that and then you need to disconnect ac power um okay um so we have ours i'm using a honeywell lt cable so in our case we can just unplug it from the barrel connector now if you don't have a honeywell lt cable and you are instead getting power from the power terminals um which the power terminal blocks over here and you you have it um you know plugged into the wall you'll just remove the transformer from the wall so we have a transform right here so this is what you want to look for you just want to have that uh room just take that out from the wall so do the backup battery first and then the transformer so we have our gc3e uh removed from the wall plate uh the back the back plate so to speak um if you have yours uh mounted on a desk or a table or just lying flat then you will just pry open the cover on on the the back here um that ours is on the wall right now so that's why you don't see it here ours is already fully opened um you can just take a screwdriver and poke it off and it'll come right off so um we have ours fully exposed here just to show you where the the communicator goes if you have the panel uh lying flat or you have it you're facing the panel right here uh you can see this part right here that's the cover um for the the communicator uh so we're gonna show you it uh with it flat um i like it just uh have it face down like this and you can just uh take your fingernail and just take this right off um that's the cover right there here so we're going to put that aside for now now we have our communicator and um with uh the arrow facing upwards yeah the arrow is facing up you just insert it in into the slot and then it kind of clicks into place you can see um uh right there the little portwork connects um that'll just do a nice little click so that way you know it's secure and then you can just put the the cover back on which i'm doing this the wrong way there um and there we go so there we've installed the communicator on the 2gig gc3e always make sure your system's powered down before you do this uh so now that we have our 2gig gc3e communicator installed uh we can power our system back on uh first we're going to uh plug in the transformer here just into the barrel connector if we can get in there there we go all right and we'll reconnect the backup battery just into the same port as before and now we can put the system back on the wall plate there we go our gc3e is back on the wall plate the cellular communicator installed um and then we do want to show you uh the cell test uh which is what you're gonna do after the system is activated you're gonna need to contact your monitoring company and schedule an activation slot or you'll set one up online and they'll contact you that's the case for alarm grid so another note i want to point out is that you will need to provide the imei number for the communicator this is needed when activating it with your monitoring company and alarm.com so you have the imei number on a sticker a white sticker on the side of the communicator when you open up the cell cover you can see it even when even when it's installed inside the panel it's just right there so yeah you will want to make a note of this we recommend either writing it down and keeping it somewhere safe or taking a picture of it and you might also be able to find it on the product packaging if the sticker's removed for whatever reason but you will need this number when you go to activate so keep that in mind and as part of the the activation you will perform a cell test which we'll show you that now so the last thing i want to show you is how you perform a cell test or also called a radio status test on the 2gig gc3e uh this is something that you'll do during the activation process at the end after the alarm.com account has been built um you need to have the account built and you need to have the communicator installed inside of the system for the test to work properly it's just something you need to do at the end as part of registering with alarm.com you may also be able to have the the test pushed down to your panel uh by your monitoring company uh but this is where we're gonna show you how to do it manually today um we have the communicator installed as you saw earlier and we went ahead and build an account for alarm.com so now i'm going to show you how you do the test manually at the panel so um we're at the main screen of our 2gig gc3e system here and we're going to click the 2gig logo in the upper right corner and then we're going to enter in our installer code which ours is at the default of one five six one and then you see radio status in in the upper right corner here and um you see we get some information here uh the signal strength the serial number um just some useful information here you can scroll through it to see a little bit more there's a little bit at the bottom there and so we're just going to press this start radio test button the green button in the bottom right corner and you see it came through successfully we got successful on all the steps so we're just going to click done and then we can just go back out to the main screen and and that concludes the radio status test also known as the cell test it's just something you need to do at the end to get everything set up properly so that's how you set up a cellular communicator for a 2gig gc3e security system if you have any questions about the 2gig gc3e about any of its cellular communicators or about alarm monitoring service send an email to support alarmgrid.com if you found this video helpful make sure to give it a thumbs up below to like the video and remember to subscribe to our channel for updates on future videos we hope you enjoyed the video thank you
- Uploaded