Upgrading the 2GIG GC3 to an LTE Communicator
Related Products

Related Categories
Description
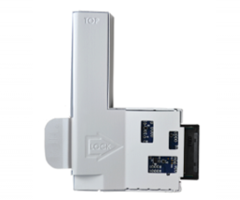
In this video, Jorge upgrades the cellular communicator inside the 2GIG GC3 Security System. This is done by powering the panel down, opening up the panel, taking out the old communicator, inserting the new one. Adding a new communicator will improve communication speeds and extend the panel's life.
As cellular technology continues to grow and evolve, older cellular networks get shutdown. When this happens, a user may need to replace the communicator on their security system. Each communicator is specifically designed to work with a certain cellular network. If the cellular network is shutdown, then the communicator will no longer function.
That is why it is very important to always get a communicator that connects with the most advanced cellular network available. A newer and more advanced cellular network will have a longer remaining support life than an older and less advanced network. But if you do have a communicator that connects with an older network, you can usually replace it.
In addition to extending the life of your security system, a new communicator will also increase its communication speeds. This can come in handy whenever you send commands through Alarm.com. This includes and system commands like arming and disarming, as well as automation commands like turning off the lights or adjusting the thermostat. Users may notice that commands go through faster and that overall performance is improved.
If you plan on upgrading your system's communicator, make sure you arrange the swap with your alarm monitoring provider before you do so. They will need to update the information with Alarm.com so that your communicator works properly. Only complete the swap once you have received permission from your monitoring company. Remember, you should power down your system before completing the swap. Failing to power down the system could result in damage.
Please Note: When swapping the cell module in the 2GIG GC3, you must coordinate the physical swap of the module with the programming swap, which occurs on the Alarm.com server. Be sure to coordinate with your alarm dealer, and only physically swap the module once they have told you to do so.
http://alrm.gd/get-monitored
Transcript
Hey DLYer's. I'm George from Alarm Grid. Today, we're going to be going over how to upgrade your cellular communicator in your 2GIG GC3. So today, we're actually going to be upgrading our CDMA communicator that we have in the GC3 right now to an LTE communicator. First thing you do want to make sure before you upgrade this communicator is to let your monitoring company know that you're going to be doing so. Why? Because they're going to need the new serial number or, in your case, they'll need information off of that cell radio. And the reason they need it is so that they can input it into alarm.com to get it activated for you. So whoever you're being monitored by, just make sure that you let them know beforehand that you are upgrading the cellular communicator. Also, if you're going to be upgrading the cellular communicator to an LTE, make sure your panels on the correct firmware. The firmware needs to be 3.0.2. Now we have that step on our page. We actually have a video and an a FAQ on how to upgrade your GC3 firmware. So if you guys need help doing that as well, make sure you look up that FAQ and that video, and you'll be able to get your GC3 on the latest firmware. Now just to go ahead and start off, if you guys have never replaced the firmware on the GC3, it's actually pretty easy. And I'm going to show you guys how to do that right now. First thing we want to do is make sure we go into the System Settings in the bottom right-hand corner. We're going to enter in our master code or our installer code. Right now, it doesn't matter which one you use. For instance, I can use my master code, which is defaulted at 1, 1, 1, 1. Obviously, yours may be different if you or your monitoring company has changed it. You could have also used the default installer code. If you guys haven't changed it as well, it's 1, 5, 6, 1. Again, if all of those codes have been changed, you want to make sure you use one of the ones that you know or one of the ones that is tied into your system-- so master code or the installer code. Now that I'm on this screen, I'm going to scroll all the way down. And you should see the option to do Cell Radio Swap. Once I hit on that Cell Radio Swap, it's going to ask me to begin. Now once I hit this Begin, I'm going to need to basically open up this little side compartment here, take out the old cell radio, and put the new one in. Now it's telling me to remove the cell module. Now some of you guys, when you go to open up this little side cover here-- if you're looking at it directly, it's actually on the left-hand side-- you'll notice that it may be locked. It doesn't come out. If you push out on that little tab, it could be because the cell radio cover is actually locked. And I'm going to show you guys how to unlock it right now. So first thing you're going to need is a flat-head. We're going to need-- around the silver trim, right here, there's actually a small little gap. So you're going to put your flat-head right into that little gap, and you're going to twist it to the side to pop the cover. Try holding that side open so that you can actually pop multiple sides. And the cover should come right off. Now, there's this little screw right here. If you guys have yours set to L for locked, that means that this little side cover is not going to open up. Now usually, we leave it as unlocked. The side cover doesn't come off on its own either. It's just so that if you want to prevent someone from manually opening it. It's not like the side cover is going to fall out. It's just going to prevent anyone from actually manually releasing the side cover. So, I mean, you can leave it as locked after you install the new one. But for right now, you do have to unlock it. So give me just one moment. So now that I finally got the little screw taken out. Again, if you guys want, you can actually just put this little screw in the unlock spot right here, in that slot. Again, you really don't need to have this in the locked phase unless you're really worried about your kids or someone pulling this little slot out. So after you have the little screw taken out-- I'm just going to leave it off to the side. If you want, you can actually just screw into the unlock slot there, and you should be fine. I'm going to put my cover back on. So this just snaps into place. Snap all four corners. Good. Good. Snapped into place. So, again, if you place your let left thumb after you unlocked the little side cover, this side cover now should come out pretty easily. Now it wants us to remove the cell module and insert the new one. So we're going to remove the cell module. It has a little plastic tab. Give me one second. Whoops. Let me go back into that screen, so Radio Swap, remove the cell module. I'm just going to pull it out. If you see how this little kind of tab right here, that allows you to pull it out by. So all you do when you just grab the little tab, you pull it out. It comes directly out the system. Now, we need the LTE communicator. So let me just go ahead and grab that for you. And then if you see, the panel notices we took out the cell module. So after we take out the cell module, now it's saying that to insert the cell radio module and select done. So now it's waiting for us to input the new LTE GC3 cellular communicator, which comes in this little packaging right here. So let me go ahead and open it up for you. It comes in a little bubble wrap. Take it out. And again, if you guys need to get the serial number, remember it's actually found on the sticker on the cell radio. Yeah? Obviously, you don't need a zoom in. But every cell radio is going to come with a little sticker, which you can actually get the cellular information for. And you're monitoring company is going to need the serial number, which is abbreviated as SN, and that's Sierra November. And then, it will probably also need the IMEI. So make sure you get one of those two numbers, and the monitoring company should be fine with either or. So now it's saying to insert the new cell radio module. It only fits in one way. So you just put it into a little side cover, and it fits directly in. Once you have that in there, go ahead and put your little side cover back on as well. Put in the back first. Give me one moment. After you put the back in, go ahead and close it up. Insert the cell radio module and select Done. After we select Done, it's going to start registering, so it might take a little bit on the system. As you see now, it says working. So what it's doing right now is it's registering the cellular communicator. It's recognizing that it took out the old one. And it's basically setting all the settings to the LTE. So once it's done, I believe, it'll say done on the screen, and then we just back out to the Home screen. And it's always best after you input a new cell module to send a cell radio test to your monitoring company so that they can verify that it's working. They can check the signal strength and make sure that everything is still the same as before. You just upgraded to an LTE. Now one of the reasons you also may be upgrading to an LTE communicator is if you're CDMA is going into a sunset. So for those of you who have CDMA right now, you actually are good for a couple more years. I don't know exactly when the exact sunset date is for CDMA, but I know you have a good two to three years left on that. I believe it's sometime in 2022. But, again, that's just for the CDMA radios on the actual alarm system. So if the CDMA sunsets or if the CDMA just stops working, obviously, contact the monitoring company first to see what the issue is. And if it does turn out to be that the CDMA radio's no longer working or it's obsolete, then that's just when you may need to upgrade to an LTE communicator, which is going to give you longer longevity for the lifetime of the cellular communicator. Again, this usually takes a couple of minutes. So, as soon as it's done, I'll show you guys how to do the cell radio test. So it looks like the registration finished. However, as you see, we're getting an error here. Well, there was an error saying that the cell radio was not detected. But then I gave it a couple of seconds here, and now it says that the cell radio module swap was complete. So, as you see, it takes a little bit for the system to recognize that there's a new cellular module in there. So if you see that error, don't get alarmed. Just give it a couple of more seconds, and it'll come up on here. And before I said that it was going to give you a done option. It actually even better gives you the radio test button right there. So, as you see on the screen, it's actually asking if you want to do the radio test from right there. So you guys can either choose to do the radio test with your monitoring company on the line, or you guys can just back out to the home screen. So just hit the little greenhouse button here to bring you back to the home screen. And again, this was just a quick video on how to upgrade your cellular communicator in your GC3 to an LTE communicator. You want to make sure use that cell radio swap. Obviously, make sure you work with your monitoring company, and you let them know. That way, they can make sure everything is ready and set for you to go. But if you guys do have any questions, feel free to email us at support@alarmgrid.com. If you guys found the video helpful, make sure you hit like underneath. Subscribe to the YouTube channel and enable the notifications, so whenever we upload new content, you guys do get notified. I'm George. I'll see you guys next time.
- Uploaded