2GIG CDMAV-A-GC3: Installation in 2GIG GC3
Related Products

Related Categories
Description
The 2GIG GC3 wireless security system relies on its cellular radio to effectively wirelessly communicate with central station and other dispatchers.
It’s important to select the right cellular radio for the area you live. These cellular communicators use cellular networks to communicate wirelessly.
If you live in an area with poor AT&T coverage, then there’s little to no reason to select a cellular radio that uses the AT&T network.
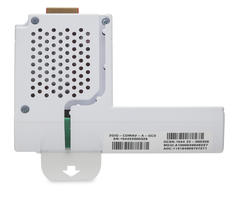
That’s where the 2GIG CDMAV-A-GC3 cellular radio enters the picture. It’s a cellular radio that broadcasts on the Verizon network. It’s a good choice for those that live in an area with strong Verizon coverage.
Our video shows you how to install this 2GIG CDMAV-A-GC3 cellular communicator into your 2GIG GC3 wireless security system.
The video also touches on how to properly program it to the 2GIG GC3. We have an additional video discussing programming more in-depth.
It’s also important to note that this video focuses on installing the cellular radio into a new security system. If you’ve already set your 2GIG GC3 up, then you should seek out our video on swapping out the old cellular radio with the CMADV-A-GC3.
Our video explains the primary reason to use the CMDAV-A-GC3 is for increased reliability. It’s the best cellular radio for Verizon networks. A strong and reliable connection is also to protect the safety and security of your home.
Though the process is mostly the same, we offer additional videos on how to install cellular radios to the 2GIG GC3 that broadcast over other networks such as AT&T and Rogers.
Our CMDAV-A-GC3 videos tells you everything you need to know about powering down your security system, making sure its offline, installing the new cellular radio, and powering everything back up.
Our video tutorial also explains in detail how to test to make sure that a reliable connection has been formed between the two devices. You must make sure that your 2GIG GC3 is functioning properly before relying on it for the security of your home and family.
Note that this cellular communicator does come with a written manual. However, the instructions aren’t always very clear. Our comprehensive video much more clearly shows you how to install the 2GIG CMDAV-A-GC3 into your wireless security system.
The video also explains the various settings available on the GC3. These include silent or audible alarms, transmission delay, and much more.
Another popular feature are text/email alerts. Enable this setting and your GC3 will send alerts to your phone or computer whenever the alarm is tripped. Doing this helps prevent false alarms and also increases the overall security of your home.
That’s the value of using the 2GIG CDMAV-A-GC3 cellular radio with the 2GIG GC3 wireless security system – it improves the reliability and effectiveness of your security system in areas with strong Verizon coverage.
Transcript
Hi, DIYers. This is Frank at Alarm Grid. We're back in the Alarm Grid lab, working on the two gig GC3 Self-contained Wireless Alarm System.
This is the newest of the Go Control series keypads. Two gig also had the Go Control 2 which you can see down here below-- much smaller screen with a larger speaker here. We now have the much larger touchscreen, the programming-- everything about this system is just night and day better. We've been very impressed with it so far.
Today, we'll be working on installing the two [? gig-CDMAV-A-GC3. ?] So this is the Verizon CDMA radio that works with Alarm.com and is specifically designed for this new GC3 panel. There's another 3GA-A-GC3, which is the AT&T version. We already have a video on that, so you can check that out on the channel.
Today, we'll be showing you how to install this for the first time. So we also have a video on doing a cellular swap-- if you had a radio in here already and were swapping to another one, there is a nice hot-swap feature which allows you to keep the panel powered on and go into that cellular swap mode in the master programming menu. What we discussed in our other videos is that you cannot do that hot-swap on your initial install. So this may change with new firmware, not really sure.
In the guide that comes with it, it's a little confusing because it says you can do it when it's powered on. But what I've noticed in testings-- when I go to that menu without a cellular radio installed-- you'll notice that it basically does not offer a place to hit Begin or start that process to cut power to the cellular module. So we'll stick with the regular traditional install of a radio where we would kill power to the panel, make sure everything's offline, install, power back up, and then just make sure things are working by doing a cell test.
So we will start by powering everything down. So I'll put that radio down for a moment. There's a few different ways we can do this. Generally, we recommend disconnecting the transformer from the wall power.
If you have an LT cable-- LT dash cable from our website, AlarmGrid.com-- or the AC2 plug, which is basically the transformer-- not the transformer that comes with the panel but a separately purchased transformer that has the barrel connector on it-- either one of those would give you the ability to disconnect AC power from the back of the keypad. I happen to be using one today. But just in case, if you did custom cable it, we'll disconnect the transformer just to cover all of our bases here.
So I'll start by disconnecting AC power. So I just removed our transformer from the wall outlet beneath here. You'll notice it said Power Lost on the keypad. I missed hitting OK there, but that's fine. The screen will kind of gray out a little bit or just kind of dim down.
So what we'll do next is pop open the keypad. So we'll take our hands on top, grab our thumbs underneath, and give it a firm snug and that'll pop it off, and then you can lift up. And we have our AC power here. Again, this is our LT. So if this was either the LT cable or the AC2, you can just disconnect that from the port-- and this is just a DC barrel connector. So if you, again, if you do have this, you don't necessarily have to disconnect your transformer because this offers an easy way to do it. If you custom cabled it, rather than working with live power and having the transformer powered in and disconnecting here, we would recommend the transformer disconnection first.
So since we already have our transformer disconnected below, I can plug that LT cable back in. You'll see, just to the right of that port-- that DC port-- we have our white battery clip. So we'll slide this little plastic ring there off and we'll disconnect the battery lead. We'll keep everything powered off. Again, we have our transformer disconnected, battery out. If we turn over the keypad, we can hit the keys, and this panel is completely powered down.
So on the left side of the board, there's a small little tab here where you can grab and swing open the door. So that comes right off. It removes completely from the panel. We can now put down the door. We'll take our CDMAV-A-GC3 for the GC3 panel and we'll actually slide that in. The antenna sticks straight up. The golden connector, here will slide right into the board.
So you can see, on the backside here, this golden connector sits right into the black plastic piece on the back of the board. It sits in nice and snug. There's this little tab here to grab it and remove it later. We can kind of just push that down.
We can flip over again. We'll put in our low voltage DC backup battery there. We can slide that little plastic piece up in there to get it out of the way from the back plate. And then, we can just put this right back in. If you have the LT cable and you didn't unplug the transformer, you could plug that LT back in-- just right in that female port. I'm gonna feed the wire back in the wall.
You can line up the hooks from the top of the panel so it's nice and snug. And then you give a firm press down. And then, since we disconnected our AC earlier, we can go ahead and plug that transformer back in. I can first put the door back. Snap that shut.
We now have AC power back on. It'll take a couple moments for that to come back up. Once it does, we'll do a cellular radio test just to make sure we have some signals there. At this point, you'd want to take your documented ADC serial number there and send that over to your alarm company. At that point, they should be able to remotely activate service over the phone or on site. And if you have any questions on the Alarm.com interface and the app and what that entails, you can ask your alarm company.
So now that everything's powered back up, we'll go into System Settings. We can enter 1 1 1 1 for the default master code. If you've changed your master-- which we always recommend doing-- you can use that, as well. Or you can use your installer code for this-- the default being 1 5 6 1.
We'll do the Cellular Radio Swap and then hit Radio Test-- the blue button on the left. And at this point, you can see that we now have signal strength of four out of six bars. When you first come into this, you may notice that it may not show. Give it about three to five minutes after you've installed it to acquire a signal. I noticed that when I first powered up on my last install, it showed one out of six on this exact same radio in the exact same spot. So just keep that in mind.
Give it about five minutes after the install, then do your tests. You can even do another one here, where it will do a test in progress and show you the accurate signal as of right now. So we'll let that run through. It usually does take a couple minutes.
So as that's wrapping up there-- once you have the cellular unit installed, you can send over the serial number information to your Alarm.com dealer. The dealer can take that and remotely activate service. You will need to send a cell radio test after they've already created your account in order to register the panel on the Alarm.com server. Once you've done that, they should be able to pull in your information, offer you remote programming assistance, and set up the app for you. If you have any questions on Alarm.com monitoring services, you can email us at support@alarmgrid.com.
And we can see here that it came through successful. So looks like the test did come through. It's showing four out of six bars. So it looks like we have great signal here. So usually anything over three bars is plenty.
When you do the activation with your Alarm.com dealer, you can verify the signal with them, make sure that things are OK. But this looks good for now. So we'll just back all the way out to the home screen. Now we have our two [? gig-CDMAV-A-GC3 ?] installed in our two gig GC3 Go Control 3 Panel. At this point, you can enroll in your Alarm.com service. And if you have any other questions on this, shoot us an email at support@alarmgrid.com. And don't forget to subscribe to our channel.
- Uploaded