2GIG GC2: Working with Onscreen Trouble Alerts
Related Products
Related Categories
Description
In a perfect world, your 2GIG GC2 system will never have to signal an alarm for trouble. In the event that it does detect trouble, it’s important to know what to expect, both when it initially senses and issue and in the immediate aftermath of the detection. Our video will walk you through what these expectations look like.
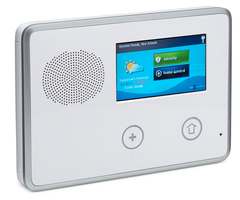
If your 2GIG GC2 system detects trouble, the “trouble alert” icon will flash on the security screen. The icon is easy to spot and is in the shape of a triangle with an exclamation point embedded in its center. The device will also sound six alert beeps every minute. You will also see a scrolling text along the top of the display. This text will describe the trouble condition that exists.
Scrolling text along the top of the display also describes the trouble condition that exists. Some of the trouble conditions you might see include AC power to the control panel, communication to the Central Station, low sensor battery, and external sounder connection.
When the trouble condition exists, you’ll see that the “trouble alert” icon will also display a number in the upper right corner. This is the number of current trouble alerts that the system detects.
As the video shows, the “trouble alert” icon will continue to flash until all of the trouble alerts are acknowledged by the user. Once this occurs, the icon will constantly be lit until all the troubles are corrected. Once the troubles are corrected by the user, the icon will disappear from the screen.
To begin correcting the trouble alert, begin by pressing the “trouble alert” icon on the screen. This will bring up a list of all current trouble areas. If there are more than three trouble events detected, you can access them by pressing the up and down arrows to scroll through the list.
Once the events have been viewed, press OK to acknowledge the alerts has been read. The alert beeps will become silent once you press the button.
While the beeps are an important component to alert you that something is wrong, you do have the option to control when the device beeps. The system does give you the ability to suppress the trouble alert sounder from 10:00 PM to 9:00 AM, so they don’t awake you as you sleep.
This doesn’t mean the system will stop working. Any trouble alerts will still be displayed. The only difference is they will function without the sounder beeping.
It should be noted that some of the trouble conditions that you encounter may clear by themselves, as the video demonstrates. However, other trouble conditions that may display might require additional service to correct. You should consult your manual to verify which conditions may require additional service assistance.
If the trouble in question does require service, it’s important that you arrange to have the system serviced as soon as possible. Doing so will safeguard from you not having a lapse in service or protection.
Transcript
Welcome to the installation training video for the GCTBZ48 Go!Control battery-powered z-wave thermostat.
Before removing the existing thermostat, first make sure that the existing heating ventilation and air conditioning system or HVAC works correctly, and using your user guide, verify that your thermostat will be compatible with your current HVAC system. Next, disconnect the power from the HVAC system and label each of the wires, and feel free to use the labels provided with the thermostat.
When mounting the thermostat, first push down on the thumb tab to remove the back panel, and mount the back panel to the wall. Ensure that the thermostat panel is secure by using the provided anchors and Phillips screws. Once mounted, find the appropriate wiring set up in the TBZ48 installation guide. Once the wiring is complete, attach the front panel to the back panel. Insert the batteries by first prying off the front of the front panel with your fingernails at the bottom of the case cover. Put in four AA batteries, and replace the front panel case. Lastly, test the heating and cooling to make sure that all of the functions of the HVAC system are working correctly.
For further system configuration please refer to your GCTBZ48 installation and operation guide. Congratulations. You have successfully installed the Go!Control GCTBZ48 z-wave thermostat.
This video is intended for use by a fully qualified and licensed electrician, and in accordance with the national electric code and local regulations. Thank you for watching. For more information, please visit our website at NORTEKCONTROL.COM.
- Uploaded