Adding & Changing User Codes On a 2GIG GC2e
Related Products
Related Categories
- Wireless Touchscreen Alarm Panels
- Small Business Security Systems
- Monitored Home Security Systems
- DIY Wireless Security Systems
- Apartment Security Systems
Description
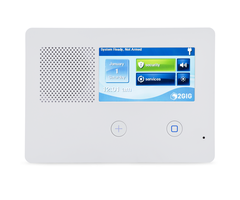
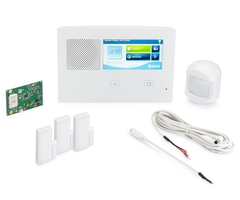
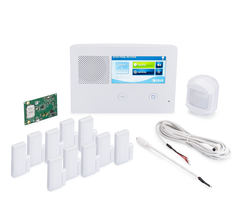
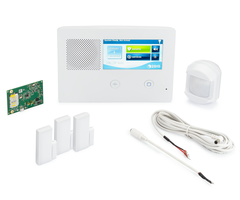
In this video, Michael from Alarm Grid shows you how to add change user codes on a 2GIG GC2e Security System. The panel provides support for up to 64 different user codes. Many users prefer to give everyone who uses the system regularly their own code so that they can see who controls the system at what time. It is very important that codes are not shared with anyone who shouldn't be accessing the security system. It is a major security risk to give a valid code to an unauthorized individual.
When setting up a user code on a 2GIG GC2e, you have the option of setting a schedule for the code so that it only works during certain times of the day. This can be useful if you give a code to a user who should only be able to use your system during designated times. This might be the case for someone like a maintenance person or a house sitter. User codes on the GC2e are 4-digits in length by default. You can also set 6-digit codes for the system if it is running Firmware Version 1.23 or higher.
There are a few special codes on the 2GIG GC2e Security System. The Master Code is hard-coded to Slot 01, and it cannot be deleted. There is also a duress code that is hard-coded to Slot 08. It is optional to set up the duress code. If you do decide to set up the duress code, then make sure to only use it during emergency situations. The system also has an Installer Code that is not assigned to any user slot. Unlike the other codes, the Installer Code isn't changed in the User Management Menu. That code is changed by accessing the corresponding section within System Configuration. The Installer Code is changed using Q43. However, we recommend keeping the Installer Code at its default of 1561. But the Master Code should be changed from its default of 1111.
https://www.alarmgrid.com/faq/how-do-i-add-or-change-user-codes-on-a-2gig-gc2e
http://alrm.gd/get-monitored
Transcript
Hi, DIY-ers. This is Michael from AlarmGrid, and today, I'm going to be showing you how to add or change user code from a 2GIG GC2e security system. The GC2e, like pretty much any security system, it uses codes to confirm that person who was using the system is authorized. So they know a secret code that allows them to disarm the system and verify that they are who they're supposed to be and that no one who is not supposed be using the system is using the system. Because an intruder won't know a code and they won't be able to disarm the system, an alarm will occur, and then if you have central station monitoring, then dispatch can occur, emergency dispatch. But anyway, so we'll get into the programming of these codes here. You can have up to 64 on a GC2e security system. It's a great idea to have everyone have their own code. If you have an office, then have everyone have their own personal codes, so that way you can see who controlled the system and when because you'll be able to tell which system, which user, I'm sorry, disarm the system whenever they go to do that, so that can be a good security tool. But anyway, we're at the main screen here. If we want to get into the user code section, we'll choose Security. And then we're going to choose Menu here, and we're going to use Toolbox. And then we can enter in our installer code or the master code. Our master code is at the default, we'll use that, 1111. And then we go to User Management. And this is the screen where we can scroll through the different user slots here. The master code is always program to slot 1. It's hard-coded into slot 1. You're not going to see the installer code here. That's actually changed in programming, and you need the installer code to access programming to change that code. And we recommend keeping our installer code at the default of 1561 just for reference. The master code, you will want to change, but we'll leave that all on here. In our case, we're just going to play with other user slots. But I do want to show you, if you go down, you see that user slot 8 is the duress user. If you program a duress code and then you enter that duress code, it's going to look like your system's disarmed. It's going to look normal. But in actuality, it's going to send a secret signal to the central station assuming that your system is monitored and they'll notice, send help right away in that case. But you really want be careful of that code because once you enter the duress code, there's not really much canceling it. You really only use that in emergency situations if you're being held hostage, you're in danger, then you would press that. But you can see all the way, if we go all the way down, we have 64 slots. And there, it does circle back. So you see the end of our slots there. But we'll focus on-- we'll do keep up slot 2 and 3 today for-- well, actually, we'll just do two because I'll show you it working and I'll show you what happens if we change it. But we'll start by programming a new user here. And we enter in our code-- by the way, if you upgrade the system firmware to 1.23, then you can get six-digit codes. But in our case, we have it set to four-digit codes. You would need to change the setting within in programming to get the six-digit codes. But we're fine with the four-digit codes today. So we'll do 8888 just for an example. That will be our code for the first test, and we'll press OK. And we have to confirm it. So 8888, OK. And then it says that it's been successfully created. Now, we can set some settings here. You can choose to have this done by a schedule if you want and you have to end the schedules. You can add the schedule, you do it by date, reoccurring date range, that's something if you only want the code to be able to disarm at certain times, maybe have a maintenance person or a house sitter that comes through during the day. But you don't necessarily want them coming in at the middle of the night. That could be a great option there. So we'll first cancel here, we're not going to set a schedule. We're going to keep our ours at Always. You can also said it to Never. If you want the user code to essentially be useless, then that is an option, but we'll keep ours at Never. We'll press Back. And we see, we have our user 2 programmed here. So now, we'll test it out a little bit. Let's try arming the system here and we'll do an Arm Away. And we didn't have to press the code to-- we didn't have to press the code to Arm Away, but we can disarm and it is going to ask us for code, and we'll try our 8888. System disarmed. Ready to arm. And you see that it successfully disarmed the system. So now, I'm going to go back into programming and I'm going to show you what happens if we change the code. I'm going to show that 8888 will no longer work and we'll do a new code instead. So we'll go into Toolbox, enter our master code, go too User Management, and then we'll go to our key fob slot. We'll change the pin, and this time, we'll do 9999, and we'll confirm that. And it has been successfully changed. Now, when I go back to try to do the disarm again, we'll arm way again and-- Arming away. Exit now. I'm going to show you if we enter in 8888, it's an incorrect code. We changed it, so that's not going to work. So we have to do our new code 9999. System disarmed. Ready to arm. And that does successfully disarmed the system. So that's how you can go about changing codes. And earlier, we showed you how to add codes. You get 64 codes on your system, there's a duress code and master codes hardwired into our codes in programming, but you can change those as needed. You can set schedules if you need to, but that's how you do codes on the 2GIG GC2e security system. If you have any other questions about the 2GIG GC2e Alarm System or you have questions about alarm monitoring, send an email to support@alarmgrid.com and our team would love to help you out. If you found this video helpful, make sure to give it a thumbs up below to like the video, and remember to subscribe to our channel for updates on future videos. We hope you enjoyed the video. Thank you.
- Uploaded