Honeweywell 5820L: Program to Lyric
Related Products

Related Categories
Description
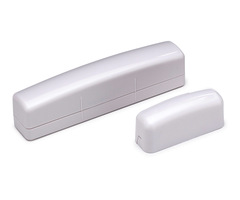
The Honeywell 5820L is a wireless door and window sensor. It is one of the most common used door sensor from Honeywell and has some great advantages over other models. Because it is not a SIX series sensor, there is no encryption or bidirectional communication to the control panel.
In this video we will program the Honeywell 5820L to the Lyric control panel. The Honeywell Lyric is designed to be used with the SIX series sensors. However, Honeywell included backwards compatibility for all 5800 wireless sensors, so the 5820L will work just fine in the Lyric system.
If you have existing sensors in the 5800 series and upgrade your panel to the Lyric system, you will still be able to use your sensors. This is great news for the budget conscious because you don’t need to replace all of your sensors.
This video will show you step by step how to enroll the sensor into the Lyric control panel. Follow along to ensure you have a properly working system.
To add a sensor, access the programming section of the Lyric panel with the use of the installer code. If you use the master code you will not have the options to enroll sensors. Make sure you use the correct code.
The video will take you through the menu options to begin setting up the sensor. From the program menu you will enter zones to program a zone. There will be default zones already set up in the system. You can edit an existing zone, or create a new one.
Our video will walk you through the editing of the existing zone 3, which is a template set up for front door sensors. Click the zone and then choose edit to be taken to the zone edit screen.
Here you will need to enter the serial number of the motion sensor. As with most other wireless sensors you can enter the serial number two different ways: either manually entering the serial number or by tripping the sensor three times.
Our video will show you how to enroll the sensor with the activation method and discuss how to manually enroll using the serial number. Once the sensor is enrolled with the serial number you will need to edit the other zone parameters.
Follow along with the video to define the other parameters of the zone edit screen. Such options as the name, chime and supervision can all be set to your personal needs. The video will cover each option and the optimal settings for these zone parameters.
Once you have the zone set, press save to lock in all the information and return to the program screen. Return to the home screen and test the sensor. Testing is important to ensure everything reports and responds as you want it.
You can view our other videos to learn how to install the sensor or find more information about the Lyric control panel.
Transcript
Hi, DIYers. Sterling with Alarm Grid here. And today we're going to show you how to program a 5820L Wireless Door or Window sensor to our Honeywell Lyric Security System. So if you've seen our introduction video to the Lyric you know that this system uses the six series sensors which are new two-way bi-directional encrypted sensors, brand new wireless technology that Honeywell has developed, and we do suggest that on any new Lyric system you go with the 6 series sensors. However, because Honeywell knows that wireless sensors have been very popular with their Honeywell Vista Security Systems that use wireless receivers and/or the Honeywell LYNX Plus or LYNX touch Security Systems which are also all-in-one wireless systems, they've made this Lyric panel to be backwards compatible so that if you have existing 5800 series sensors, or if you, for any reason, want to use 5800 series sensors with the panel you certainly can still do that.
So we're going to show you how to program this sensor. And the 5820L is popular. You can see it has a very a skinny profile, so if you have a window that has a very thin frame, or a door for some reason that had a very thin frame that a wider footprint sensor wouldn't really work on, the 5820L gives you a really nice thin footprint so it installs on the wall or the frame on a spot where otherwise a fatter sensor wouldn't work as well. So 5820L slim line sensor, a very popular sensor, and we're going to show you how to program one to the system.
First thing we need to do to prep is to install our battery. So the sensor comes with the contact, all right, the magnet with the magnet installed in this plastic, and then a battery. And this is a lithium AAA Energizer battery that's included, and we simply have to install it in the sensor. So on the sensor, it's rectangular, you have two long edges. One of the sides that have the long edges has hash marks right here. These hash marks indicate the side that you must install the magnet and they must be as close as possible and parallel like this. If you put it on this side it's not going to work. If you put it up top it's not going to work. So these little indicators are where the magnet goes. And then on one of the short edges you have this little snap-in tab, and using a flathead screwdriver, if you push that tab down then this cover pops away from the back plate and in the cover you have your circuit board, you have your two battery connectors, and you have a little tamper switch which lets you know if the device is opened.
Inside here, we have our serial number sticker which is the same serial number that's on the backside. We're going to use that when we do our programming. But before we do our programming we have to have power to the system, or power to the unit rather. So we go ahead and fit our battery in, there's a nice big positive indicator right on the circuit board so you're not confused about which way the battery goes, and you just insert it with the positive side towards the positive connector, and you close up the sensor. There's a little latch or a hinge at the bottom, and then you just snap it shut and click that tab into place. And now our 5820L has power and is ready to be programmed.
So just like any sensor that we program to the Lyric we have to access the installer level programming. If we do Tools and hit 4112, we're on this screen where it's trying to associate the system with an account. That's because we have not yet activated this system for monitoring. All right? We can ignore this prompt because we're just doing local programming for this purpose. When we hit Program and then Zones, you can see that we're displayed with the template or default configuration for this system. Zone number one and two are hardwired zones, that's why they say New. Unless you're hard wiring a zone to the panel, do not use those sensors or those zone parameters. If you try to edit these and look for a serial number box you'll see there is no serial number box, and you'll be reminded, "Oh, yeah, you told me not to use those unless it's wired."
However, if you go to Zone 3, which is the first wireless available slot, and you hit Edit, you can see there is a serial number box. And when learning in a sensor, the first thing you have to do is choose that box and type in the serial number, or auto-enroll the sensor. You can see right at the top it gives you that description. Enter serial number, so you could type it, 0489769 and you can save it. Or if you clear that out, it says Activate Sensor. So to activate a door contact that just means move the magnet away, and then put it back. Simulate the door opening and closing. Door opens, door closes, panel beeps once to confirm. Do that a second time after pausing a couple seconds, open the door, close the door, panel beeps twice, learns in the serial number. We can confirm. I've never seen the serial number pop up different than what's on this sticker but just go ahead and confirm that it did. And then, finally, one more activation. Open the door, close the door, beeps three times and the serial number is locked in, the loop number.
5820Ls are a single-loop zone only or a single-loop transmitter only, there are no alternative loops to use. It's always loop number one. So 5820L has the serial number, has the loop number, and this is going to go on our Front Door so we can leave the Zone Descriptor One Front, with Device Type Door. If we had more than one front door we could call it Front Left Door, so if we type, we're choosing from a library, but we could call it Front Left Door so we could program also a Front Right Door and then we would know which is which. You don't have to use all of the descriptors, so if you only have one front door go ahead and just leave it Front Door. If you're going to put on the back door, change Front, clear it out, put in a "B", hit the down arrow once, and you've got a Back Door descriptor in there. So you're using the Zone Descriptor one and two just to name the sensor where it is in the house for the best information.
Device Type, in this case it is going on a door, but if you were going to use it on a window call it the Back Window, very easy. You just select where it's being installed. And then, finally, we want to choose the Response Type, and on a door in a window sensor the Response Type to use is one of these two: Entry Exit 1 or Perimeter. There are other options, and for a very custom or unique situations there's certainly reasons to use these other response types, but for the majority of the people and for the majority of the time you're going to choose Entry Exit One or Perimeter. Entry Exit One, a zone that's opened with that setting will go into a delay period so that you can have time to disarm the system before the alarm goes off. So if this is on a door that you use when the system is armed for the family to come home, you need make it Entry Exit One, so that when you arm it, you have time to open and close that door.
As long as the door is closed by the time the exit delays times out, the system is armed and no false alarm occurred. When you come home at the end of the day, and the system is armed, you can open that door, and instead of having the alarm go off right away, you have a 30-second time to get to the keypad and disarm the system. So if this is a door that you use when it's armed, Entry Exit One. If this is a door that would never be used when it's armed, select Perimeter. So our back door, we're not going to open our back door to come into the house, all right? If an intruder opens that back door, we don't want them to have a 30-second delay, we want the alarm to go off right away. So in our purposes we're going to use Back Door with Response Type Perimeter, and now we know if we open this door during the countdown to leave we've set off a false alarm, so we're not going to do that. If we come home at the end of the day and it's armed, we cannot open this door first, otherwise the alarm will go off. We'll have to disarm it first. But then it will be more secure for an intrusion.
Alarm Report is a question whether or not you want this sensor to report to the central station. All right? So if it's a protected zone, most of the time you're going to want it to report. If, for some reason, you were having issues with this zone, having false alarms, and until you sorted out the issue, if you want it to say, "Don't send any alarms for this sensor to the central," you could toggle it to No. But most of the time you're going to set that Yes.
Chime is a way to have the panel beep and/or give an audible enunciation of the words that have been programmed, Back Door, whenever this sensor is faulted or opened in the disarm state. So it's a nice way to know that someone opened your door and you're in the house and you're not armed, whether that's letting you know that the kids are leaving or the kids are exiting the house, or if they're coming in, that's just an easy way that if you're in the living room you can know, "Okay, someone just opened my front door, or my back door."
And then Supervision. You want that always to be supervised for a protected zone. What it means is this sensor will send periodic check-in messages to the system. If a 12-hour period goes by with no check-in messages received, no alarms, troubles, or faults received, then you have a supervision trouble and it lets you know that this sensor may have been damaged or it may be in a bad spot where it's no longer in range back to the panel. If you didn't have it set supervised you would never know that it wasn't checking in, and if it ever had a low battery you wouldn't know either. So we always recommend supervised. And to make sure we locked in all our settings and we haven't wasted all of this good work, we have to hit Save at the end.
And now we have another Back Door, we haven't manipulated this one yet, obviously you would change that. But we have it in as Back Door, and if we exit to the home screen, we can show you...it's beeping on a system trouble message, that's because we don't have this panel associated with monitoring yet. But we can show you it says Ready to Arm at the top, and if we simulate the door opening, the magnet pulls away, it says Not Ready to Arm, it shows the open Back Door right on the screen. You can see you can't arm it yet, and I was talking over it, but if you listen close again without me talking you'll hear the panel speak Back Door with the beep, that's the chime mode in use. When you're disarmed and you fault the panel will tell you what's going on. As soon as you close the door again, it switches back to Ready to Arm and you're ready to arm the system because you know all your doors and your windows are closed up.
So that's how to program a 5820L Slim Line Wireless Door or Window sensor to a Honeywell Lyric All-in-One Wireless Security System. We hope you've enjoyed this video. If you have any questions on programming your 5820L, please let us know, email us support@alarmgrid.com and make sure to subscribe to our channel. As we release more videos about the Honeywell Lyric, you'll be up-to-date on all the great new features that this panel offers.
- Uploaded