Honeywell 5800CO: Program to L7000
Related Products
Related Categories
Description
With carbon monoxide, a common threat in today’s homes, the Honeywell 5800CO carbon monoxide detector is perfect for alerting you to the dangers of this colorless, odorless gas. Our tutorial video will walk you through the steps required to program the sensor to your L7000 control panel.
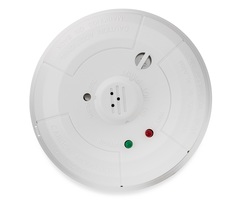
Out of the box, the carbon monoxide detector has 2 major parts: the mounting plate and the head. It is important to note that unlike a smoke or heat detector a carbon monoxide detector has an end of life. As explained in the video, the gas detection chamber will wear out over time.
It is important that you note the dates of manufacture and expiration as shown in the video guide. You should make a note of the expiry date so that you can adequately replace them when the time comes.
To enroll the device, you need to activate the battery by removing the plastic tab and make a note of the serial number. The video will show you how to accomplish this and where the serial number is located.
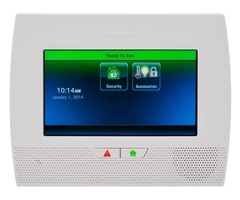
Programming on the L7000 control panel is relatively straight forward. You need to access the “Tools” menu from the home screen by using the touch screen on the panel. The walk through will show you exactly how this is done.
You should follow along with the video to enter the programming mode and use the visual clues on the panel to make sure you are in the correct spot. You will need to define the zone for the detector with the first available zone.
Like most other programmable devices you have two options for entering the serial number: manually or self-enroll. The guide discusses the manual entry method. To self-enroll, you can utilize the test button on the 5800CO detector.
The install guide will tell you all the needed information to program the device yourself. In the tutorial, you will learn that you need to program the carbon monoxide detector to loop 1. This will ensure proper alerts in the event the alarm rings.
You should be aware of the reporting and supervision selections, and the video will cover these in detail. The settings should allow the device to report and be supervised so that you are always covered. In the event of an alarm, the L7000 panel will alarm locally as well as sent a report to the central station so that action can be taken if necessary.
Once the programming is complete, you should return to the home screen on the L7000 panel and you can then test the detector. Following along with the video will show you how to accomplish the test to ensure everything is working properly.
Be sure to disarm the alarm from the testing and your 5800CO detector is ready to mount in the desired space. Once mounted you will complete the installation and programming of your carbon monoxide detector.
Transcript
All right. Now, to finalize and round out the Honeywell Life Safety Detectors, this is a Honeywell 5800CO Wireless Carbon Monoxide Detector.
We've shown you the smoke and heat detection options that you have with this panel, which is the 5808W3 Smoke and Heat Detector, the 5806W3 Smoke Detection Only, and the 5809 Heat Detection Only. The other type of life safety is carbon monoxide, a silent and odorless deadly gas. Very, very important. In fact, a lot of local jurisdictions are requiring smoke detectors in homes now, just because of the life safety issue that exists around devices in the home that can cause carbon monoxide and the life safety situation that that would put you in.
So we've talked about how this panel, while not only allowing you to detect intrusion, can also add extra value in terms of life safety detection-- a smoke detector, heat detector. Or more importantly perhaps even, a carbon monoxide detector is a great way to get more value out of your LYNX Touch system. So we're going to show you how to program this device to the panel and talk about the device and how it works.
It looks very similar to the smoke and heats. You have a base that mounts to the ceiling or to the wall. So you have your base, and then you have your head. And very similar style. Of course, on the top it talks about being a carbon versus a smoke detector. You have your Test button. Your Hush button. You've got your LED showing alarm condition, normal state. And you've got your tamper contact to alert you when the device has been tampered with.
While smoke and heats do not have an end of life, carbon monoxides do. So these devices typically last so many years. And they have right on here a replace by. You actually have a manufacture date, and then a replace by date. So be very careful that you do not leave these out in the field or in use in your home or business beyond that time. The carbon monoxide detection chamber after time loses its sensitivity. And therefore, will not accurately detect carbon monoxide. So it's extremely important to document your replace by date and set yourself a reminder so that you replace this device in so many years.
This device to program is very simple. Just like we've done on the other ones, we've got our battery. While it's in the shipping to prevent the contact, you've got this little plastic tab that we just simply pull out.
Now, we're ready to enroll. We have our serial number listed a few times. We have it here, alpha 086-3221. We also have it here, alpha 086-3221. I don't know if they also include it over here. I don't believe so. But we have our two spots here.
So to program this device, we jump into Programming by going to Security. More gives us the option for Tools. Tools gives us the option to enter our installer code. 4112 is the default code. And then, we're jumping into our Programming option.
From Program, you can see the top switches over to yellow, System Programming. And we're able to enter the Zone section of Programming.
We use the Down Arrow to select the available zones. And we can see that it's starting to populate with all the sensors that we've been programming. So we hit the Down Arrow one more time. And we get the next available new zone.
We highlight 15. So it's highlighted to blue. And we click Edit. From there, we're in the Zone 15 Programming page, and we can program our 5800 Carbon Monoxide.
So first thing we want to do, click into our serial number. And like we've shown on a couple of them, we can activate the test button three times to learn it in. Or, we can manually enter the serial number. So we have alpha 086-3221. And we do done.
We want to make sure-- it's very important-- that the serial number matches. It does, so we're good.
Loop number 1 is what we want to be using with this sensor. It is documented in the install guide. We also have information about that on our website about which loop to use. But in this case, loop 1 is what we want.
And the next thing we want to do is device type. The Honeywell Lynx Touch is great because it allows you to select the device you're using-- a door contact, or a window contact, a motion. In this case, they have one specifically for a carbon monoxide detector.
By choosing that device type, it auto selects the only available response type you should ever use for a carbon monoxide. Again, with life safety it's very important that we're using this device type. So we've got it set that way. Alarm report is Yes. If this was selected to No this would sound the local alarm. This would sound the local alarm. This panel would not send out the alarm to the central station. And therefore, if someone wasn't hearing it or had already passed out because of the carbon monoxide gas in the home, you'd be in a life safety situation.
We want this set to report so that our central station can call the home. And if no one is answering the phone, we send out the fire trucks. And hopefully, we get there in time. So that's how the carbon monoxide works. We absolutely want this supervised.
If that was set to Unsupervised, if this detector went out of range, or went bad, or had any issues, we would not know necessarily that it's not going to be ready to alert us when there's a real alarm. By selecting it to Supervised, this L7000 panel will look and see that this is there out in the house. Every 12 hours it's going to do that check.
During that 12-hour check if this device is not being seen, it gives us a trouble on Zone 15 for an RF supervision trouble. And then we know, OK, this might be in a bad location. Maybe it's too far from the panel and we need a repeater. Or maybe we just need to relocate.
Of course, the most important thing when you're mounting this is that you're putting it near whatever source of carbon monoxide gas you have in your home. And if you have multiple sources, you want to use multiple carbon monoxides.
There's a very good picture and information here in the install guide where it shows you typical spots to use your carbon monoxides. So it's important to read through that so you understand what can cause carbon monoxide gas, and how to best protect for that kind of alert.
Now that we have all this keyed in, what we can do is name it. We're going to put this one in our garage, so we're going to use the keypad here--
Garage.
--to type the word "garage" until we get to garage. And then, we do Done. And we're fully programmed for our Zone 15 carbon monoxide detector now.
We're going to save it. And on this device, we have a test button right on the top. So to make sure it's working, before we exit out of Programming-- we don't want a tamper problem. So we simply line this up so it fits. If you notice, it won't fit anywhere until it finally gets to here. And then you give it one more slight turn, snaps into place. We're mounted to our ceiling or to our wall. And we're ready to go.
It indicates very clearly here that this is our test button. And we can use our skinny screwdriver to press down on that button to test it. Before we do that, we want to be on the Home screen. All right.
So we're going to make sure that this device works and that we programmed it properly. We stick the screwdriver or the long skinny tool that we're using down into this hole. There is a little plastic or a little metal disk at the bottom. And you simply press and hold it.
There we go.
[BEEPING]
You can see we have our carbon monoxide alarm detector. You can hear the noise is slightly different than a smoke or a heat alarm. And you have your deadly carbon monoxide symbol.
Disarmed. Ready to arm.
Disarming won't--
Check zone.
Disarming once stops that alarm. And again, that different noise just tells the people in the home what kind of emergency has occurred. So the burglary alarms make one sound. The smoke and the heat detectors make another sound. And then the carbon monoxides make a third kind of sound.
So if you're not by the panel, you have some indication, OK, am I worried about an intrusion? Or should I be looking for fire? Or should I be rushing out of the house because there could be deadly carbon monoxide gas in the room? And I want to get outside where it's nice, fresh air before I get into any kind of bad situation.
This alarm, after we've disarmed once, is still showing. So that if we got home and we heard it beeping at us, disarming once so we can collect our thoughts and understand why it was triggered. Now we can say, OK. We know the carbon monoxide gas has been cleared. The fire trucks have shown up. They've swept the house. Everything's good.
We disarm one more time.
Disarmed. Ready to arm.
Our LYNX Touch 7000 is back to the ready-to-arm state. We know our carbon monoxide is good to install. And we know we're protected until that end of life date when we're going to go ahead and purchase a new carbon and replace that one. So that is our 5800CO carbon monoxide programming video to the LYNX Touch L7000. Make sure to subscribe to our YouTube channel to be kept alert on any new future videos that we have on new products, programming, et cetera.
- Uploaded