Honeywell 5808W3: Program to L7000
Related Products
Related Categories
Description
With the Honeywell 5808W3 you will be able to detect both smoke and heat. Our tutorial video will walk you through the steps required to program the sensor to your L7000 control panel.
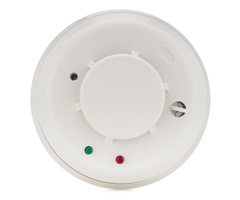
Out of the box, the smoke detector has 2 major parts: the mounting plate and the head. It is important to note that unlike a carbon monoxide detector, a smoke detector does not have an end of life. As explained in the video, the only thing that will wear down is the battery.
It is important that you note the dates of install and expiration as shown in the video guide. You should make a note of the expiry date so that you can adequately replace the batteries when the time comes. A good rule of thumb is to replace the batteries every 6 months.
To enroll the device, you need to activate the battery by removing the plastic tab and make a note of the serial number. The video will show you how to accomplish this and where the serial number is located.
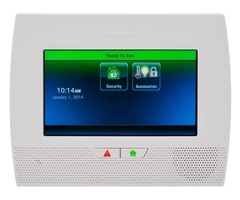
Programming on the L7000 control panel is relatively straight forward. You need to access the “Tools” menu from the home screen by using the touch screen on the panel. The walk through will show you exactly how this is done.
You should follow along with the video to enter the programming mode and use the visual clues on the panel to make sure you are in the correct spot. You will need to define the zone for the detector with the first available zone.
Like most other programmable devices you have two options for entering the serial number: manually or self-enroll. The guide discusses the manual entry method. To self-enroll, you can utilize the test button on the Honeywell 5808W3 detector.
The install guide will tell you all the needed information to program the device yourself. In the tutorial, you will learn that you need to program the smoke and heat detector to loop 1. This will ensure proper alerts in the event the alarm rings.
You should be aware of the reporting and supervision selections, and the video will cover these in detail. The settings should allow the device to report and be supervised so that you are always covered. In the event of an alarm, the L7000 panel will alarm locally as well as sent a report to the central station so that action can be taken if necessary.
Once the programming is complete, you should return to the home screen on the L7000 panel and you can then test the detector. Following along with the video will show you how to accomplish the test to ensure everything is working properly.
Be sure to disarm the alarm from the testing and your 5808W3 detector is ready to mount in the desired space. Once mounted you will complete the installation and programming of your smoke and heat detector.
Transcript
So now that we've shown you a lot of the most popular intrusion types of sensors, sensors that are designed to detect burglary alarms, we're going to show you that the Lynx Touch System, not only is it a good security system, but it can be also protecting for environmental situations, life safety, smoke and heat, heat only, carbon monoxide, low temperature, things like that.
So if you're going to purchase a monitoring service from a company, which we of course offer that, but a lot of other companies do as well, you pay one fixed rate per month for service. While some companies will charge you extra to protect for fire, we, of course, any zone or programed censor that you have attached to your system we'll send the proper authorities. So adding monitored smoke detection, or CO detection, or flood sensors, allows you to get extra value out of your monitoring plan.
So we're going to show you the most common sensors used for environmental protection. We have our 50-- this here is a Honeywell 5808W3. Is a wireless smoke and heat detector. It will trigger if it detects smoke. It will also trigger on a fixed temperature if it gets above 135 degrees in the room.
We also have a very similar-- this is a 5806W3. This is a wireless smoke only. So in a situation where a room could get above 135 when there's not a real alarm and you only want to pick up smoke, you would use the 5806W3. However, in 90% of the applications the 5808W3 will give you better protection because it's monitoring for both smoke detection and for fixed heat detection.
We're going to show you how to program both of these sensors to your L7000 Lynx Touch Panel. We open our box and we have our detector. This orange plastic cover is simply a protector so that this photoelectric smoke chamber on the inside of the smoke head doesn't get dirty with dust. If it's pre-construction and you want to mount your sensors but you know that there's going to be work going on in the home, no dust or debris would be able to get up into this chamber which would throw the sensor off and hurt the sensitivity of the sensor.
So this unit-- if you're in your installation phase you should keep the cover on. Make sure-- it even says it right on here-- remove before operation. Once you have it installed and you're ready to go, you pop the cover off so you can see your LED indications and you have your chamber ready to detect smoke.
If you pop the base from the head you can see that this is a melting base to mount to the wall or the ceiling, and then this is your actual smoke detector. You have a pull to connect tab, which if you slide out you can see is holding and keeping the battery from touching the contact. So to operate and make the sensor live you have to pull this tab.
Now we have a live sensor. We have our serial number to program our sensor, 0988402, it's directly under the bar code. It's also-- that same number is displayed-- it's stapled to the install guide, but it's on this bar code as well.
All right. And we have our smoke base and our head. So to program a 5808W3 our Lynx Touch L7000 we have to go into the security section of the system. We hit more. Tools. 4112 is the default installer code. Program takes us to the system programming screen. And we select the zones to key in, or program, our next zone. We're going to do the down arrow to go to our next available zone. Zone 11 is set for new, that means it's an available zone. As you scroll through, you can see all of these are new because they're not programed yet.
So we go into zone 11 and select it. And we highlight and click edit. So the program we're on our zone 11 smoke detector programing page. We click into the serial number. And for this device, while we normally would just activate the sensor three times to learn it in, without smoke in a can to actually activate the smoke detector what we should do is just simply key in the serial number.
So again, we have our bar code. It is a small number there but you can read it. Zero. Oops, clear. 09888402. It's always a seven digit number. You have the alpha on the sticker to show you that is the right number. And then you do done. So you just make sure, since we did auto enroll this one because there's no real way to fault this sensor to auto enroll it, you have to be careful and make sure that what you keyed in matches that number. And again you have that number in a couple spots. You have it on the paperwork here, and you have it on the device itself. So make sure we're keying in the proper number for this device.
Loop number one is what you want to use. Loop number one is the loop that shows detection on the smoke detector and on the fixed heat detector if it gets over 135. So we key it in loop number one, which is default.
Next thing we choose is device type. And you can see we have smoke, heat, and carbon. We also have temperature and environmental. So a couple of these could be good, but we are going to choose smoke detector. Smoke detector tells the panel when it goes off it'll say smoke detector. And the response type defaults to fire no verification.
This is a common question we get, what is the difference between fire no verification, versus fire with verification. Very simple. Has nothing to do with the central station calling you to verify the alarm. That's a whole different question for when you're setting up your alarm about how should we respond when it goes off. This no verification versus verification is the panel verifying the alarm. And the way it verifies it if you did with verification, the very first time that this sensor detects smoke it would sounded the alarm but then cut it off right away. So basically it sees the trip, but it restores itself automatically. And then if it triggers again then it would cause the alarm. So if it was a slight false alarm, smoke got in there because you're cooking, or something in the house, someone smoking, something where it's not a true fire situation, the verification would ignore the first trip and it would only send the alarm to the central if it was triggered again after ignoring the first trip.
Because we use verification phone calls with the central station to find out should we send the fire trucks or not, we normally recommend that you do no verification. That's a more secure way of doing it with a life safety detector like a smoke and heat detector. We much prefer that we get the signal as soon as it triggers, and then we use the phone calls to avoid the false alarms.
So there may be cases where verification is the right option. And it's certainly your system, you can set it up the way you want as long as you understand the way these work. That's your discretion. But we normally recommend fire no verification for this device.
Once you've got that the, next thing you want to do is name what smoke detector it is. Maybe we have a downstairs smoke and an upstairs smoke. So we would do D and then O down. So we used D, O, W to get to down, and we used the down arrow from there to go to downstairs. When we hit none we have it locked in with downstairs smoke detector. Alarm report says yes. We of course would want to know that-- the central station would want to know when this device is detected which is alarm report.
Supervised just like we've discussed on all of these sensor programming videos. We'll tell you, or rather the panel will check for this device every 12 hours. And if it doesn't see this device, if it looks for the serial number it's not getting the check back message from the device it throws up a zone 11 smoke detector trouble alerting you to an RF supervision problem. That could be that we put the wrong serial number in, it could be a range issue, maybe this is too far from the panel, or perhaps there's some interference preventing this panel from seeing the detector, which would indicate a problem meaning that the detector may not be able to transmit the alarm to the panel. Or worse, if this unit was tampered with or broken then of course the system wouldn't see it. So this 12 hour supervision check is important. And we always want to have its supervised.
We save that selection to lock it in. We have our downstairs smoke detector. And now we close it up. You twist it until it kind of latches here. And then, finally, you snap it shut. This little indication is your mark that it's installed properly, the tamper is happy. And you would mount to your ceiling.
If we come out to the home screen from there. The way to activate and make sure this works there's two things you can do. One is to pop it.
[BEEPING]
Ready to arm zone trouble. I just hit the button to silence that trouble beep, but you can see tamper 11 downstairs smoke detector. You have the house on fire icon. Not that it's a real alarm, just that it's a tamper issue. And as soon as you close this back up and you do a disarm.
Always clearing our troubles with a double disarm. The tamper trouble goes away, and we now know that we learned it improperly because popping the cover indicated the proper zone was in tamper.
The other way to test this device, and this is a bigger test because this is going to set off the full alarm. But on the smoke head you have a couple things to look at. You've got your LEDs, which if it's triggered would show you when the alarm is active. You have this little hole with a plastic bridge. And then on the opposite side you have this hole. And if you look down on the base of that hole, it's going to be hard to see how the video, but there is a small silver button that you can press. And sticking our screwdriver down in there and pressing that button we're going to hear the alarm trigger at the panel. And then we can disarm once we've verified it works.
You'll see this yellow flashing-- or this green flashing LED which just indicates that it's in proper functionality.
So to test again we stick it down in.
[BEEPING]
Causes the fire alarm.
Cutting it off twice like that with a double disarm clears this trouble away-- or clears the alarm away. And we know that our 5808W3 smoke and heat detector was learned improperly.
- Uploaded