Honeywell 5808W3: Program to Lyric
Related Products

Related Categories
Transcript
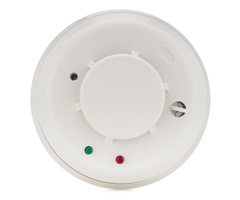
Hi, DIY'ers. Sterling with Alarm Grid here. And today we're going to show you how to program a Honeywell wireless 5808W3 smoke and heat detector.
This is by far the most popular wireless smoke and heat detector used with Honeywell wireless systems. If you have a VISTA Honeywell wireless security system-- a VISTA panel with a wireless receiver attached, or you have a Honeywell LYNX Plus or LYNX Touch system-- you may already have 5808W3 throughout your house.
And now that you've upgraded to your Honeywell Lyric system, instead of replacing this with a new 6 Series smoke detector, you can still use your existing 5808W3. The Lyric is backwards compatible and supports all of the 5800 Series sensors that are already out there in the field. So just keep that in mind. You certainly can use this device with this system.
The first thing we want to do is remove this cover. This is just a dust cover. So if you're installing this pre-construction or if you're painting a room and you might get fumes up into the smoke chamber, snapping this on there will just protect the chamber from getting dirty. So it always comes with the cover on. Before you are ready to go live with the sensor, you want to make sure you remove this. Otherwise, it'll never detect any smoke.
But once the cover's removed, we can see on the cover we have our photoelectric chamber. This is a photoelectric smoke detector. Photoelectric is a better technology than ionization, which is the more traditional method of smoke detection on smoke detectors like Life Safety [? smokes ?] you might get at Home Depot or ones that are already in the house that are either tied into your house power or battery-operated.
These photoelectric ones are much better at detecting slow-burning fires. So even if you have those existing [? smokes ?] in the house, for life safety purposes we always recommend considering adding some monitored photoelectric wireless smoke detectors.
So we're going to show you how to program this into our Lyric. The first thing we want to do is open up the unit. So there's a base plate on the top here. It's got screw-mounting holes. And then this is the head and this is the chamber. So the head and the chamber remove just by twisting counterclockwise. You can hear it snap. And then the back plate removes fully from the head.
And on the head, you can see right here-- pull to connect batteries. So these come installed with a battery. And they just have a little plastic insert that's preventing the battery from making full contact. So they just want you to pull that tab before you use the sensor.
So with the tab removed, now we have power to our unit and we can program it to our Lyric. So to program any sensor to the Lyric system, whether it's a 6 Series sensor or a 5800 Series RF sensor, you have to do Security, followed by Tools, followed by your installer code. In our case, we've used the default 4112 code because we have yet to change that code. Obviously, if you've changed your installer, you'll be typing your four-digit code.
This screen here is only seen if your system is not yet set up for monitoring with an AlarmNet provider. AlarmNet is Honeywell servers that process the signals from an internet or cellular equipped system. So this screen about associating to the AlarmNet account.
Unless you're working with your alarm provider, never say yes. Just say no. You'll get past that. If you're using this as a local system, just get used to ignoring those messages.
When you hit Program, you can go to Zones. And now you can toggle down and you can see these are all the zones available for the Lyric system. It goes up to 130 zones of protection.
Some of those zones are unique. The first two zones are hardwired zones. And the last four zones-- 127 through 130-- would be Garage Door zones. The smoke detector can be programmed on any zone in between there.
So you'll see there's template zones out of the box-- front door, back door, window, motion sensor. If we're going to use those devices, we can go ahead and skip those because we know we're going to edit those when we're actually programming our front door sensor, our back door sensor, our window sensor, our motion sensor.
For this case, because we're doing a smoke detector, we want to go ahead and go to the next available zone and click Edit. That's not to say we can't change this and make it a smoke detector. But just to keep convention, we leave our doors, then our windows, then our motions. Then we can go into the next peripheral devices we have.
So the first thing we want to do to enroll our 5808W3-- just like we do with any sensor-- is to learn in the serial number. And you may have seen on our sensor programming videos, when we're enrolling a door contact or a motion sensor, that we tell you to auto-enroll the device. And auto enrolling just means at this point, fault the sensor, wave your hand in front of the motion, whatever it is.
On a smoke detector, there's not really a way to activate the device. In fact, if you hit the test switch--
[BEEPING]
--the sensor will sound. But you don't really get the serial number faulting like you do with another sensor. If you do a tamper, you can get it to beep.
[BEEPING]
You can get it to learn the serial number, but it will put in loop number four because that's the tamper loop. So that's kind of like the hidden loop on all sensors. If the device is tampered, it will report. And it uses loop number four.
You never have to program loop number four. But by auto-enrolling-- by activating this tamper, you're going to make the mistake of putting it as loop number four. And if you don't forget and change that back to loop number one, then the sensor would never work. So if you were to hit Done, and you did that auto-enrolling, you'd have to remember to change this back to loop number one.
So what I prefer on the 5808W3 is to just go ahead and type in the serial number. It's a lot easier. You don't have to remember manipulating the loops and all that. So if you do 0555791-- that number I'm getting right from this barcode sticker-- has the A for alpha convention that all Honeywell wireless sensors do-- and you hit Done, you can see it says RF type 5800, which is what we want.
And now we're in there with the right serial number. Oh, wait. I missed a digit. I put a double zero in the beginning. So 0555791. When you come on this screen, you always want to make sure these match if you're going to type it in yourself. You want to be careful about digit entry errors there.
And the loop number one, again, is for the protection zone. That's for the smoke and the heat. So this will detect on smoke detection. It will also detect on high heat-- 135 degree fixed heat. If it ever gets that hot in the room and it sees that, it'll go off. And also, it's got a rate of rise. So if it gets too hot too quickly in the room, it will set off as well. And all of that's handled under loop number one.
So now that we have that programmed, we can close this up and we can name it. So the first we want to do-- because it's a device type new-- is tell it what device type this is. And smoke detector. Pretty easy, right? You use the name of what it is, and it chooses the response type of fire no verification.
And we select this. We have two options-- fire with verification, fire with no verification. This has nothing to do with verification at the central station. So the phone calls the central station can make to say, hey, did you have a smoke event? Is this a real alarm? Should we send the fire trucks or not? That's not what this selection's all about.
This selection is, how does this device talk to this panel? If you have it with verification, the first time there's an alarm from this sensor, it ignores it. It says, OK, I see you, but I'm going to say that could be a false alarm and I'm going to ignore the first one.
If a new subsequent alarm is triggered right away, which in the case of a real alarm, there would still be smoke in here, so it would go instantly right back into alarm-- if that second alarm goes off, then the panel will actually make the loud noise for the siren. So if this was in a spot where you had frequent false alarms because you're cooking or things like that, you could do fire with verification to avoid some false alarms.
Because this is life safety and we never want to really mess around with life safety and we're more concerned about detection than we are about false alarms typically with a sensor like this, we like to suggest going to fire no verification, meaning the very first activation of this device will set off the alarm for the Lyric panel.
If this is our only smoke detector in the house, we may not need to put its own descriptor in. But for our case, we're going to have one on every floor. So if we jump into zone descriptor one, and we put it with a U-- you can do up. You could say up smoke, or a little better word probably would be upstairs.
So this is a custom library. You hit the letter, and then you use arrows to scroll through all the available words in that library. And when you save it, we now will have it saying upstairs smoke detector.
We install this upstairs. When this goes off, we know it was this device versus the downstairs smoke detector. So the zone descriptor allows you to further clarify where the sensor is in the house, which helps other people that may see the alarms in the house know where they're occurring. And it also, more importantly, helps the central station tell the police officers or the fire trucks what's going on.
Once this is all set, the last questions are whether or not you want it to report. So do you want this just to make a loud noise in the house and alert everyone to get out? Or is your system monitored and you want to send these fire alarm activations to the central station? With it set to yes, it will report to a central station. With it set to no, it'll only sound the local alarm. For our purposes, we're going to be monitored, so we certainly want that set to yes.
There's no chime. It's grayed out. You can't chime a smoke because there's really no faulting of a smoke. It's either in alarm or it's not in alarm. There's no arming a smoke. It's armed in all modes. It's a 24-hour device. So it's disarmed. It'll still work. If you're armed away or stay, it'll still work.
Finally, supervision. Just like we've described on our video about RF supervision and in our other programming videos, this selection is telling the system to look for low battery issues from this sensor and also tell us if this sensor is not checking in.
This sensor will check in every 70 to 90 minutes with that set to supervise. And if a 12-hour period goes by and we've seen no alarms, no troubles, and no check-in messages from this device with it set to supervise, the panel can alert us that, hey, zone number seven is having a supervision loss issue. And then we know we may have a range issue. We may have an installation location issue. For some reason, these devices are not talking to each other. So we definitely want that supervised.
When we save it, we've locked in our parameters. And we can see that upstairs smoke detector is now our zone seven. If we exit to the home screen, our sensor--
[BEEPING]
We have a [? comm ?] trouble from earlier. That's just because we're not yet monitored. But aside from that, our zone is good. We have our upstairs smoke detector zone showing now.
And we can test it. If we stick something long and skinny into the hole opposite the hole with the plastic bridge-- this is actually a test switch. At the base of this hole is a little silver push button.
So if we press and hold this, we'll hear a siren come out of here. And if we've done our programming correctly, the alarm will go into alarm mode. So we're going to try to simulate that now. So press and hold.
[ALARM RINGING]
The device--
[ALARM RINGING]
The device was in alarm mode until I let go.
[ALARM RINGING]
And the panel's in alarm mode until we disarm. So when we're holding the switch down, that's basically like saying the smoke is in the chamber. And the device will make that loud noise locally at this device, in this device only. But as long as it's been programmed to the panel, that alarm at that sensor will set off the alarm at the panel as well.
So you noticed as soon as we let go of the tamper-- or rather, the test swtich-- the local sounder in the smoke stopped going off. It basically said the smoke cleared out of the chamber. But the panel's still in alarm mode until either the fire timeout period kicks in-- four minutes after we set it off, it would have timed out on its own-- or disarming the system turned it off as well.
And now we've verified that we've properly programmed our 5808W3 to our Lyric security system. And we are now protected for smoke and heat from our 5808W3.
So we hope you've enjoyed that video. If you have any questions on programming your Honeywell wireless smoke and heat detector, please let us know. We have support at alarmgrid.com-- if you want to email us. And make sure to subscribe to our channel so you're kept up to date with all of the new videos we'll be releasing about the new Honeywell Lyric system.
- Uploaded