Honeywell 5809: Program to L7000
Related Products
Related Categories
Description
With the Honeywell 5809 you will be able to detect heat. The rise in temperature of more than 15 degrees in a certain time will activate the detector. Our tutorial video will walk you through the steps required to program the sensor to your L7000 control panel.
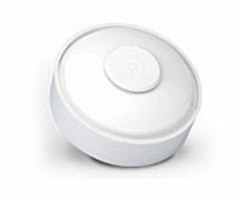
Out of the box, the heat detector has 2 major parts: the mounting plate and the head. It is important to note that unlike a smoke detector, this heat only smoke detector is a one time activation device. Once it alarms you will need to replace it. This is outlined in detail in our video.
As with every other smoke and carbon monoxide detector, you should replace the batteries every 6 months. The instruction sheet and video will explain how this is done.
To enroll the device, you need to activate the battery by removing the plastic tab and make a note of the serial number. The video will show you how to accomplish this and where the serial number is located.
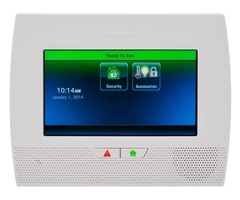
Programming on the L7000 control panel is relatively straight forward. You need to access the “Tools” menu from the home screen by using the touch screen on the panel. The walk through will show you exactly how this is done.
You should follow along with the video to enter the programming mode and use the visual clues on the panel to make sure you are in the correct spot. You will need to define the zone for the detector with the first available zone.
Like most other programmable devices you have two options for entering the serial number: manually or self-enroll. The guide discusses the manual entry method. To self-enroll, you can utilize the test button on the Honeywell 5809 detector.
The install guide will tell you all the needed information to program the device yourself. In the tutorial, you will learn that you need to program the smoke and heat detector to loop 1. This will ensure proper alerts in the event the alarm rings.
You should be aware of the reporting and supervision selections, and the video will cover these in detail. The settings should allow the device to report and be supervised so that you are always covered. In the event of an alarm, the L7000 panel will alarm locally as well as sent a report to the central station so that action can be taken if necessary.
Once the programming is complete, you should return to the home screen on the L7000 panel and you can then test the detector. Following along with the video will show you how to accomplish the test to ensure everything is working properly.
Be sure to disarm the alarm from the testing and your 5809 detector is ready to mount in the desired space. Once mounted you will complete the installation and programming of your heat detector.
Transcript
So as we move along, in terms of our Life Safety devices, we started with our Intrusion devices, and we went through most of the common ones there. We're now showing you how you can get added value out of your security system by not only protecting against intrusion, but also against environmental or life-safety types of emergencies.
We've done our 5808W3 Smoke and Heat Detector. We've done our 5806W3 Smoke Detector Only. And this is a Honeywell 5809 Wireless Heat Detector. This device will not detect from smoke, but will detect from both fixed heat-- if it gets above a 135 degrees-- and beyond doing that, which the 5808W3 also does, it will also detect if the temperature in the room rises more than 15 degrees per minute. That's called rate-of-rise.
So you have your fixed heat detector and your rate-of-rise heat detector. So this heat detector is better than the heat detector in the 5808W3, but it's a single heat detector only. So it would be used in areas which could be dusty and would then set off the smoke detector portion of the 5808W3. So garages, workshops, places like that, the 5809 is a good option-- heat detector only.
This is a mechanical heat detector on the fixed heat. And I'd like to point out that a 5809 mechanical heat detector, if activated, this top piece-- be very careful with this disk. If ever activated, this pops out and is a one-time use only. So if it ever did get above 135 in your room, this device would activate the alarm. Its done its job. And you'd have to then replace the device.
The rate-of-rise is not something that would activate the mechanical portion here. And, therefore, you could use-- if it was a rate-of-rise heat alarm, it could continue to work. You've got all over it showing you 135 is the degrees and that it does rate-of-rise. But, again, keep in mind, if 135 degree fixed heat detector is triggered, you need to get a new 5809. This is a one-time use on the fixed heat activation.
This device consists of the heat detector head. You've got your wireless transmitter antenna. You've got your battery holster. You've got your Test button. And you've got your tamper test. And then you've got your mounting. This slides in and twists shut so that, when it's mounted, your tamper's held down and it's happy and ready to detect.
So we're going to show you how to program this 5809 detector to your L7000 LYNX touch panel. You've got your Panasonic CR123A, which is the most common battery used with most of the Honeywell sensors. You've seen this battery used in our 5816 and the 5800PIR-RES motion detector. Same style battery for the 5809.
So before we can program it, we have to have power to the unit. The battery-- you have a plus indicator here, a minus indicator here. It's faint, but it's into the plastic there. I don't know if it's picking up on the video, but you'll see it when you're doing it. And you simply slide in the battery. Now we have power. Now ready to enroll.
We're going to use the serial number, which is showing in two spots. You have your barcode sticker, alpha number with seven digit number. And you have, without the barcode, alpha seven digit number there, as well. Both are the same number and always should match. And that's the number you use to program the device.
To program, we go into Security. We hit More to access the Tools menu. And when we hit Tools, we're prompted for our code. We're looking for the installer code. 4, 1, 1, 2 is the default installer code. And we are now able to select Program, Zones. And we're going to keep our types of sensors together. So we have our Downstairs Smoke, Downstairs Cold Temp. Our 5808W3 allowed us to set up two different zones, one for the smoke and heat and one for the low temperature. We have our upstairs smoke detector for our 5806W3.
And we're going to go ahead and choose New, Edit. And we're going to use Zone 14, at the top here, for our 5809 heat detector, which we're going to put in our garage. We've got a wood shop in there. It gets dusty. That would trigger a smoke detector. And therefore, we want to use the heat only for times where there's a real fire in that area, and the temperature, either rate-of-rise gets 15 degrees or more in a minute or gets above 135.
So we click into Serial Number first. There should be two ways we can key this in. We can hit the Test button three times. Or we can key in the serial number on the sticker. So Test button once. Test button twice. Or three times. Activating the smoke and heats with the test button, as you've seen in our other videos, that can be a little temperamental. It's supposed to be three, but you're using the Test button. It did the job. You can verify 0, 2, 4, 9, 9, 1, 8 is the serial number for this device. It is Loop number 1, which is the proper loop. If you look in the install guide, it references that loop. And we're ready to finish our programing.
While on the 5808W3 and the 5806W3, we chose smoke detector, because this is a heat only. We want to select heat sensor. You'll notice on the heat, you don't get the option for No Verification verses With Verification. That's just because on a heat detector, there really should be no false alarms. If it gets above 135, unless something crazy is going on in the room, it should be a fire. Smoke detectors, because there can be smoke when it's not a real fire, or at least not a real fire emergency, that's why the smoke gives you the option for both. Heat, you want it, every time it's activated, you want that sending that alarm out.
So we're going to do the Fire No Verification, which is the only option we have. The last thing we want to do, even though this is going to be the only heat that we have in our house, we want to give anybody that might be getting the alarms the indication of where it is. We hit they the G to our G-words. And we either hit the down arrow till we get to "garage," or we just type out the word "garage."
As soon as we hit G-A-R, this is the first alphabetical word that starts with G-A-R. So we're good. Done. And we have our serial number with our Loop number 1, Garage, Heat Sensor. Fire No Verification. Alarm Report, Yes. We want this alarm from this sensor to send to our central station. Chime is disabled.
You don't even have the option to choose a chime, because, again, there's no faulting of this device. It's a 24-hour device. If it goes into alarm mode, it's an alarm. There's no faulting. Supervision, Supervised. If this device is not being seen by the panel or if the serial number was entered in wrong or there was interference from this device to the panel, every 12 hours this panel will check for this device, as well as all devices that are programmed. And it would throw up a Supervision Fault on Zone 14, letting you know, hey, there's something wrong with the way this is installed or where it's mounted or something with the device is bad. So you could save it.
You can see we have our Garage Heat Sensor learned then. And if we exit out, before we fully exit-- so we can put our head on here. But if we do that, we lose the ability to hit the Test button. So before we do that, we want to make sure this thing's working. So we're going to exit to the Home screen. And we're going to hit our RF Test button.
[ALARM BEEPING]
We've got our fire alarm.
[ALARM BEEPING]
Disarmed. Ready to arm. Check. Disarmed. Ready to arm. Check zone. Chime.
The first disarm cut off the siren. The second disarm cleared out the fire alarm. The only reason it's still indicating a problem is because the cover or the head is not set on the base. So we now have a tamper. So the RF Test button indicated, yes, we programed it properly. Activating this device triggers our L7000 panel.
Because we did the double disarm to clear out the alarm, it's the only indicating now that there's a problem, being that the tamper. So the tamper's important. You want to make sure it's closed up properly. So now that we've tested it, if we put the head on properly and we twist it shot, that snaps the tamper and holds it down. And disarming the panel--
Disarmed. Ready to arm.
Just expected. Ready to arm. Chime. The tamper trouble's gone. Our 5809 is properly programmed to our LYNX Touch L7000 panel. So that is the programming of the 5809 to our LYNX Touch L7000 for heat detection. Make sure to subscribe to our YouTube channel to be kept up to date with all of our programming, product release, and website update videos. And keep an eye on the channel as we continue to produce more of these videos, showing you how to properly use your Honeywell security system.
- Uploaded