Honeywell 5816OD: Program to 2GIG GC3
Related Products

Related Categories
Description
It takes just minute to configure the Honeywell 5816OD wireless outdoor sensor to work alongside the 2GIG GC3 wireless security system by following the instructions laid out in our video.
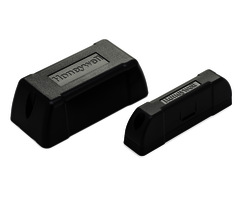
The Honeywell 6816OD is the first wireless outdoor sensor for home security systems. Not only is it waterproof, but it can also withstand temperatures from as low as -40° F all the way up to 150° F.
Because the wireless outdoor sensor is specifically designed for use outdoors, it has a much greater wireless range than indoor sensors. This Honeywell model works well up to 200 feet from your 2GIG GC3 security system.
Our video shows you exactly how to program the Honeywell 5816OD to work with the 2GIG GC3 security system. The video tackles everything from putting batteries into the outdoor sensors to enrolling them with the security system.
The video is extremely in-depth. It goes to great measures to ensure you properly set up your outdoor sensor. It even explains how to program in an additional sensor as a backup if desired.
Enrolling the device on the 2GIG GC3 is another step our video explains step by step. It shows you how to go to the “Installer Tool Box” to start the steps of enrolling.
The video also shows clearly how to set your voice descriptor settings. This is handy if you want your GC3 to ever enunciate the name and location of the outdoor sensors.
Yet another aspect that our video clearly details is the difference between your installer code and your master code. It’s important to know the difference between these two to properly set the two devices up together.
Of particular importance is selecting the right “sensor loop.” Our video tutorial explains which loop is best for which needs and preferences. It even explains the difference between “loop one” and “loop two”.
Finally, the video dives deep into additional settings of the Honeywell 6816OD. One of these is setting up text and email alerts.
In addition to sending a signal to central station, enabling text and email alerts means that your security system will send a text or email to your preferred phone number or location every time the outdoor sensor is opened.
The Honeywell 6816OD is best for barn doors, shed doors, pool gates, and fence gates. The video also highlights the right way to mount the device on these surfaces.
Our video even talks about the transmission delay built into the 2GIG GC3. It tells you the reason this feature is included.
That’s the value of pairing the Honeywell 5816OD wireless outdoor sensor with the 2GIG GC3 wireless security system – it sends you alert and/or triggers an alarm whenever an outdoor door or gate is opened.
Transcript
[LOCK SOUND] Hey, DIYers. This is Frank at Alarm Grid. We're back in the Alarm Grid Lab working on the two gig GC3 self-contained wireless alarm system. You'll see below here, we have our old Go Control panel. And this is the newest of two gig systems. We're going to show you today how to program the 5816OD.
This is an outdoor wireless door contact. It's the only fully outdoor rated, weather proof door and window contact that we're confident will work great with the GC3. You can see it is a little bit bigger than most contacts. But generally these are designed to be put on gates or sheds, anything outdoors that you want to protect. Either you want to set as a burglary zone and have it trip an alarm when it's opened, when the system is armed. Or just as a general monitor zone-- maybe like a gate-- so that when that's open and you can get a text or e-mail through Alarm.com. So we'll show you how to pop this open, get the batteries in, and then program it in the system.
All right. So first we'll take a regular number two Phillips head screwdriver. There's a small-- or there's a regular sized stainless steel Philips head on here. We'll go ahead and turn that counterclockwise. Loosen that up. And get it completely out of the back plate. OK. Once you have that out, we can take our little back plate and put that down along with the screw. We can take a smaller flat head. And there's a board in here that we can just leverage into the backside of the board and get the board out. And then we have our battery compartment.
So you'll see that there are plus symbols on the bottom here and the little tamper unit so that once this cover is open, it'll throw a tamper trouble on it. So we'll go ahead and throw our batteries in. We have the plus symbol on the bottom. So we'll put our larger ends down on each of these. Once you get your batteries nice and snug in there, this unit will be powered up. So there are a couple things and here I just want to mention before we close up. So there's actually three small screw terminals inside of this unit. Just like a regular 5816, this can be used as a multi-purpose device. You can set it with a normally open wired contact or a normally closed wired contact. And as long as you have that programmed to loop one, you can actually see in here we have-- the center terminal is for your C or common. On the left is this second wire, a normally closed sensor or contact. The right one is for normally open.
So if you did want to wire out to a secondary sensor, something like-- we don't actually have one right here. But any wired contacting, a normally closed or normally open contact. So again normally open, the right two terminals. And the normally closed, the left two terminals. And you would program that zone to loop one. Today we're going to be using this as a fully wireless unit with the included magnet. And we have the sensor and the magnet as just a fully wireless sensor. So that will go to loop two. And I'll show you how to do that in programming. So if you were also wiring this out to something else, you could do that now before closing up.
For right now, we'll actually just go ahead and push this all back in. So we have the arrow here facing towards the bottom away from the screw terminal. You'll notice that there's a little screw hole. You want to line that up there first, push that in nice and snug. Put our magnet down. And you'll want to put this back plate back into the back side here. Flip it around. And then we can put our screw back in. So we want to take the screw. We can line this back up. We'll tighten this back in.
Once that's nice and tight, we can then start our programming. So we'll go ahead and put this down with our magnet. And we can pop into programming. So to get into programming on the GC3 with the top right two gig symbol, enter our installer code. Not to be confused with our master. The default installer is 1561. If you've already changed the installer code, you can just use that new code. We'll go to System Configuration and Wireless Zones. So we don't have any zones in the system right now. So we'll hit Edit Zone on Zone One. If we go back here, you can also just click into any of these fields and it will bring that over to here as well.
So we'll start with the sensor type. So depending on how you want this set, if you want it to trigger an actual alarm and report to the central station and basically trigger an alarm during Armed Away and Armed Stay, we can set it as one of these first few zone types-- entry exit one, entry exit two, or perimeter. If this is on, let's say it's on a shed. And when your system is armed and if this is open, you want it to be an instant alarm. We would set that to perimeter. There's also another zone type. And today let's say we're setting it up on a gate. We can actually set this as a No Response Type if you want. And then you can create different rules on Alarm.com for it to send you text alerts when it's faulted. That way every time it's open-- even when the system is armed-- it won't necessarily trigger an alarm. But it will basically just let you know sensor activity. And you can do that through the Alarm.com app.
So again, you can do No Response Type here or whichever response type you need. Perimeter would be an instant alarm. Entry exit would give you a delay period on the way in and out. Since we're going to use this as a gate, we don't want it to really do anything except send us alerts so we can configure those from Alarm.com later. So we'll keep this. We'll do Sensor Equipment Type as Contact. And move down to Equipment Code. When we're in Equipment Code, we can move down. This is the 5816OD. So it will actually show you-- we can use the same equipment code as the regular 5816. There's no other programming differences here. So we can just use that. And that's 0637 for the equipment ID. It says HWDW 5816. So that's Honeywell Door Window Contact. 5816 is the model number. So we can bump down to serial number.
Here's what we'll want to learn that in. So we can take our contact. And what we'll do is you'll see the serial number listed on the side. So you can either manually enter that in. Or we can auto enroll. We'll auto enroll and then just verify that it came in properly. So we'll hit Learn. And that will be listening. We want to take the contact--
[BEEPING]
And move it away. And you'll see that it automatically enrolled it in. 0141480. So we can confirm that that's actually the zone or that's the serial number that's listed here on the side. There's also a serial on the inside of this unit if this ever peels off. So you can just open this back up again and view it in there. We'll accept that and move on with our programming. So we have equipment age is always new if it's a new sensor. Sensor Loop. This is pretty important. So again going back to the wired terminals inside here. If you are wiring a normally open or normally closed contact to those terminals, then you want to wire to loop one. Because we're using this with the magnet and the built in read switch, we actually want this to be loop two.
So we'll go back down here. We'll hit this on loop two. That way when this moves away from the contact, it will trip and throw a fault on the system. If you put it on loop one, again that'd be if you have a wired contact normally open, it won't normally close to the internal terminals here. You can set that up as a secondary zone and use both this on loop two and the wired contact on loop one as two separate zones. And we won't get into that right now. But for today's purposes, we'll just be using this for the fully wireless contact.
So we'll we move down to Transmission Delay. As discussed in other videos, a little bit different than Honeywell panels. But the two gig GC3 and its predecessor the GC2 has a transmission delay where by default the system will hold an alarm signal before it's sent out. It's a false alarm prevention tactic. We have other ways of preventing false alarms by verifying on multiple phone numbers as well as you could set this to a delay zone. And the extended delay-- in this case, it's a No Response Type zone. So we don't have to worry about any of this. It's not something that will actually trip an alarm ever. So we don't really have to be too concerned. It's just good to know about it. So we'll set that to Disable to make sure we get that signal immediately.
We'll go to Voice Descriptor. And we're just going to label this as our back gate. So we'll put in Back. And then Gate. You'll notice that, as I type that in, you'll see it in the white bar and select it. You want to use that library in the system in order for it to voice enunciate. If you use a custom word, that's fine. It will work on Alarm.com and on the keypad. It will not voice enunciate during a fault though. So we'll hit Done.
Censor reports. Again, this is a No Response Type zone. If it was an alarm, if it was a shed or something that you did want to protect some lawn equipment or anything in there, we could just keep this enabled. And we will also keep it supervised. If this is in an area where it's far from the home, maybe on the verge of the limit, this should work up to 200 feet from the panel. It may vary depending on walls in between and other interference. But it's about 150 to 200 feet. So usually if you're within that distance, it should be fine. You obviously want to do some testing after installing it. But you generally want to keep this enabled that way if this ever falls off the network and basically the system is not able to ping it during the supervisory interval, then it will throw a supervision trouble and we'll know about it as both an alarm owner at the keypad. And your alarm company will be able to reach out and assist you by getting that report. So we'll keep that supervised.
If you're getting tons of supervision errors and it's coming in and out, you can add a 5800 RP, which is a repeater, in between the panel and the 5816OD. But if you were getting it and it was getting annoying, you could disable it if you wanted to. Again I'd recommend keeping supervision enabled always. So Sensor Chime. This is where we want to set up an alert for every time it faults. So we'll set it up on Ding Dong Two with Voice so that we get the Ding Dong Two Chime and the voice enunciation of the back gate. So let's return to System Config. Back out. We have our summary screen here. We'll save it.
And then from the home screen once this resets--
System disarmed.
We can trip this and make sure that it's faulting.
[CHIME]
We'll get the chime tone.
Back gate.
And the voice enunciation. We'll put this back. You'll notice that didn't show it on the keypad and take the system out of Ready to Arm mode. That's because this is set to No Response Type. If this was set as a regular Entry-Exit or Perimeter, then it would remove that from Ready to Arm and set it back to actually show the zone open here. When it's set as the gate, it'll just simply do the chime and voice enunciation. So that's how you program the Honeywell 5816OD to your two gig GC3 panel. If you have any other questions regarding programming this unit or any others for that matter with the GC3, you can email us at support@alarmgrid.com. And don't forget to subscribe to our channel.
- Uploaded