Honeywell 5820L: Inserting AAA Battery
Related Products
Related Categories
Description
The door and window sensors are an important aspect of your home security system. After all, the control panel and monitoring services need working sensors in order to detect breakage, smoke and other environmental changes.
While replacing a battery in an alarm sensor isn’t terribly complicated, there are some details you’ll want to be aware of. This video shows you everything you need to know to keep your sensors fully powered and working properly.
Most alarm systems are powered by standard lithium batteries. Sometimes the best solutions are the simplest. Standard lithium batteries have no external power supply which can be tampered with. Plus, replacement batteries are affordable and easy to find.
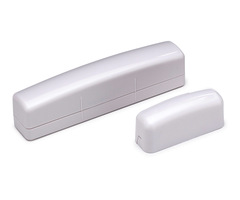
The sensors for the Honeywell 5820L system use AAA lithium batteries. You’ll want to ensure each sensor always has working batteries.
As the video shows, the sensors aren’t very big. They’re rectangular in shape and about the length of an index finger. The plastic outer shell is durable but lightweight.
The video shows you how to open the sensor to reach the battery. Along one of the short ends you’ll find a little tab. Using a screwdriver, press down on the tab to open the sensor. When opened the sensor basically splits into two long, thin halves.
The bottom plate has the unit’s serial number on the back. This will be one letter followed by seven digits. The serial number is prominently displayed because it’s often useful info to have when setting up various features (although auto-enrollment through the alarm services is also an option).
The video shows an in-depth view of the top part of the sensor. Inside you’ll see the serial number, model number circuitry and a tamper switch.
When the cover is on, a small piece of plastic acts as a tamper switch. If the sensor is pried open, the switch is released and the tamper alarm activated. The control panel will then display a Zone Tamper Alarm.
The video will help you make sure you put the battery in correctly. This can be a bit trickier than you might think. Sensors are easy to get turned around, so you want to make sure you match up the positive and negative terminals correctly.
After inserting the battery, you’re ready to close the sensor back up. There’s a hinge which connects the two halves. The video presents a clear visual of sensor reassembly.
Once the sensor is assembled and powered up, you’ll use the included magnet to attach the sensor to doors, windows and other potential entry points. When placing sensors, you want to cover any potential threshold crossing. But you also want to keep convenience in mind, too. You’ll have to replace batteries from time to time, so make sure the sensors are relatively easy for you to reach.
Fresh batteries are an important part of your alarm system. Fortunately, replacing the batteries and keeping your sensors in proper working order is easy for any do-it-yourselfer.
Transcript
This one, just like the 5818MNL that we just showed you, uses the AAA lithium battery. On the sensor, we have a little tab along one of the short edges only on one edge, and we simply use our screwdriver to pop it. Pops the cover off. We can see inside the cover is where the circuitry is. We have our back plate, and we have our serial number on the back. Alpha number followed by seven digits.
We also have a sticker on the inside, alpha number with seven digits. We also have a model number, rather, 5820L right on this sticker. And you can see this white push button is our tamper switch. When this cover is on, this little piece of plastic holds down that switch.
So just like most door and window sensors with the Honeywell 5800 series devices, it will indicate a tamper trouble. If someone's ever trying to pop the cover on your device to mess with your sensors, the panel would indicate that as a zone tamper alarm.
Before we can program it, we need to have power to the device. So we have our battery, we have a positive and a negative on our battery, and we have a positive indication printed on the circuit board, which shows you that this side of the sensor is the positive terminal. We simply slide in the device, or slide in the battery to the device, and we close it up.
There's a little hinge here, which catches on to the inside latch there. And you snap it shut. And I caught my serial number sticker there a little bit, so I'm just going to try that again. That sticker is important in case you ever have to change your system out and reprogram things. It's very important that you have that sticker available to program the sensor. While you can always do the auto enrollment, there are some cases where you would want to know the actual serial number sticker, or the serial number from the sticker.
So we're just going to close that back up so it didn't pinch onto that sticker. And we also have that sticker on the back. So now, we have our sensor installed and powered, and we have our magnet.
- Uploaded