Honeywell IPCAM-PT: Review
Related Products
Related Categories
Description
In this video, we walk you through the out-of-the-box set up for the Honeywell IPCAM-PT. This great camera works with Honeywell’s Total Connect software, and as the video shows, it is easy to set up and connect.
With the Total Connect software and the PT camera, you can control the pan and tilt of the camera, live, from your computer or cell phone. The video discusses the control and its methods using the software.
Once you have everything out of the box, the video will walk you through the instructions. Each camera comes with an instruction sheet and it is highly recommended that you read through it while watching the video. Once you are finished with the setup, you should keep the instruction sheet in a safe place for future reference.
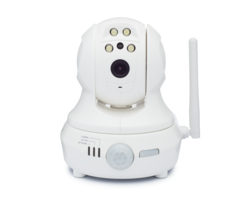
The camera comes boxed with the instructions and the power transformer for the wall outlet. As the video shows, the camera itself is larger and bulkier than the other Honeywell cameras. Due to the ability to pan and tilt, as well as mount on a wall (with the included wall plate) or sit on a shelf or desk, the camera requires a larger housing.
The PT camera has low light capabilities and uses its built-in infrared lights. The video discusses these lights in detail and shows you where they are located. Unlike the WI2 model, the PT will detect motion and record in near darkness.
The front panel of the camera base has Led lights that tell you about power, connectivity and network activity. As the tutorial shows, these will allow you to easily see that the camera is operational and connected to the network. This will help you with troubleshooting should there ever be an issue with the camera.
The camera comes with future-use upgrades in a speaker out and a 4 prong Phoenix connector. As we discuss in the video, there is no current use for these features. However, Honeywell may come out with upgrade abilities that will utilize the speaker or the port.
Connecting to the network is done with either the ethernet port that will plug directly into your router or the wireless option using the WPS mode of your wireless router connection. One WPS is enabled, as the video shows, you just have to press the WPS button on the back of the camera and it will be instantly connected to the network.
The wireless antenna comes attached to the camera already. The only thing you have to do to set up this camera is to take it out of the box and plug it into a wall socket. After the power is on you can connect it to your network.
Once set up is complete the camera is ready for operation. You can watch our other videos where we show the camera in action, as well as setting up the WPS mode on the router and connecting the camera to the network.
Transcript
This is the pan tilt camera. Now, camera is a little bit boxier and bigger than the other units. But it does have a unique feature in that it supports panning and tilting, so you actually have control from Total Connect to control the camera using your computer or the app on your phone. You the ability to turn the camera on its axis horizontally and also vertically up and down. So that's a nice feature to have, especially maybe in an apartment or living room where you want to be able to have access to view 360 video coverage.
So there's a few parts in here similar to the other cameras. There's a transformer that's going to plug into your AC power outlet. We have, in this case, we have a little wall plate. Again, we have our instructions that are always important to keep at hand on here.
And as you can see because it's pan tilt, this one is more of a dome shape. It has a little built-in desk mount on it so that you can sit on top of a cabinet or a table anywhere, maybe even on the shelf somewhere. There's some low light IRs on here. So this is going to give you the ability to see at night like the other low-light camera and the outdoor camera. The WI2 does not have that feature. And again, there's a motion detector on the front side of it just like the other cameras. And then we have some LEDs that are going to show you network activity on video transmissions and the power.
So after you power up, you're actually going to wait for that green LED on the power to fully light up green, and then you can start enrolling. So on this camera, again, we have the ethernet connection. So we have the ability to just hard wire this if we like. If you have the ability to, we recommend that.
So we also have this little phoenix connector, which is just a four-pin little plastic block that would plug into the back of the camera. There's actually no use for this currently, but there may be future uses using dry contacts or relays as triggers. So no current use for this. You can bag it and maybe keep it somewhere safe in the event that Honeywell does offer the ability to use that in future.
There's also a little speaker out-- again, future use-- is not used. And you can't pull any audio from this device currently. So it's just video only right now And that goes for all the IPCAMs by the way.
So yeah, basically, this is IPCAM-PT. This is the unit that we're going to demonstrate later. We can show you how it pans and tilts. But the button on this-- again, it's a third style, not the push button. Well, it is a push button, but you can't actually see the physical protrusion, just a little WPS button here. You would just press and hold this after your in the WPS enrollment mode on your router. And that would enroll this camera. Give it a few minutes and that you should be able to see it on your Total Connect account, assuming that you've already sent the MAC addresses of the cameras to your dealer. So we're going to move on to the last camera here.
- Uploaded