Honeywell IPCAM-WI2: Review
Related Products
Related Categories
Description
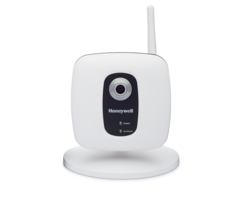
This video review of the WI2 indoor camera from Honeywell walks you through each feature from box opening to operation. The WI2 was the first Honeywell camera designed for the AlarmNet system.
The camera is not outdoor ready, so it does not have the outdoor casing like the similar WO model. As the video will show you, the mount can be placed directly on the table for easy setup.
Once you have everything out of the box, the video will walk you through the instructions. Each camera comes with an instruction sheet, and it is highly recommended that you read through it while watching the video. Once you finish with set up, you should keep the instruction sheet in a safe place for future reference.
The WI2 indoor camera is straightforward to piece together. You will learn from the video all the essential parts used for connecting and mounting. As shown in the tutorial, the mount screws directly into the threaded receptacle in the back of the camera. Once it is securely fitted to the bolt, you can adjust the vertical positioning and lock it in with the lock screw.
Each Honeywell camera uses either your wireless network or ethernet cable to connect. It is recommended to use the ethernet cable when applicable to ensure the best reception. However, the WPS enables WiFi has excellent quality. The antenna is screwed into the port and can be positioned in multiple directions to ensure you have the best connection possible.
As seen in the tutorial video, The only thing left to do is plug in the power supply and connect to the network. The power supply ships with an extension connector that allows you to mount the camera virtually anywhere.
The WPS button on the back of the camera is used to connect to the router with the help of the WPS connection. As the video discusses all you have to do is press the WPS button on the top of your router and then the connection button on the back of the camera.
Once the green LED on the camera illuminates, you will know the camera is connected tot he WiFi network. The camera is ready to use out of the box. Using any household outlet you just need to plug in the DC transformer and connect the camera to the Honeywell WAP Plus network.
You can watch the WAP Plus video to learn how to set up and use the WAP Plus system with your AlarmNet ready camera. The instructions will also show you how to pair your camera to the network and offers trouble shooting any issues you may have. The video covers these instructions as well.
The video will show the mounting template which allows for easy wall mounting by using the template to position the screws in their correct place and orientation.
Transcript
So the next camera we'll move over to was the first IP cam WI-2, which is the first indoor camera that Honeywell came out with that was AlarmNet ready. We're going to unbox this and discuss how this camera works. So it's a similar frame to the IP Cam WO, but it's going to be obviously not outdoor ready, so it doesn't have the weatherproof rugged casing. The indoor mount is a little cleaner. It offers kind of a desk mount option, so you can sit this directly on the table. And we're going to just quickly unbox all the materials here.
All right. So all the cameras come with a guide. We recommend reading instructions. So we're going to help you with the videos here, but it's always good to just take a quick look here at the instructions. And this is going to give you the rundown on how to pair the camera and install it. So always keep these handy. Don't throw them out. Keep them as a reference in case you have any issues. You can run through that and use the information in there to reset the camera and get it connected. So we're going to lay out all the pieces of the camera here.
Now, again, all these cameras have this extender. So there's the transformer that's going to bring your power down from AC to DC. And also, there'll be this extender that basically offers a longer connection to the camera if you need a little bit longer of a run between your AC outlet and the camera itself. So this one we have the transformer here. We're going to plug-in the female to male DC plug. And then this is going to plug right into the back of the camera here. We're going to open this up.
All right, so a little bit different than the back of the IP cam WO. We have the power and the land connection right next to each other, no rubber booties on there to prevent from water damage or anything like that, since this is indoors. And we're just going to plug-in the five volt, one amp transformer here. And on this one, instead of the recessed WPS button, this one actually has just a surface mount push button here. So it's a little easier. You don't need any tools to press that down. Again, any of these cameras will support a land internet connection. If you had the ability to run it back to the router, we would recommend it if you have the ability to do that. Otherwise, you can just pair it via WiFi using the WPS button. Again, we're going to show you a video on how to do that with our Honeywell WAP plus, which is a wireless access point with that WPS button on it in the event that your router does not have it.
So we have a couple other connections here to discuss. We have the bracket that we connect to the back side of the camera. You simply would just kind of screw and disconnect the power there. Simply screw on the camera to the bracket just by spinning it on like so. Once you get a tight connection there, you can use the turn dial on the back of the mount to tighten it in the vertical position that you want it. Let's say you just want it on a right angle, you can give it tightened down. And then you have this set up. So we can then plug in the power.
And you have the antenna here. You can use this if you're using WiFi, to give you some better signal on the unit. Now, once this is set up, we're going to power up, give it a couple of minutes to acquire green LED, and be fully powered out of the boot cycle. And we would then enroll it with the network, which we're going to show you shortly when we have our WAP plus set up. So that's the IP cam WI-2. We're going to move on to the other two indoor cameras, including the pan tilt and the new low light camera. So we're going to put this one aside.
- Uploaded