Honeywell Lyric SiXPIR: Program to Lyric Alarm System
Related Products

Transcript
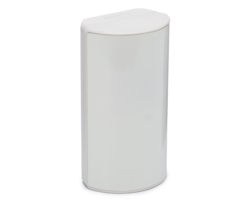
hey DIY this is George at alarm grid today we're gonna be going over how to learn in a six PIR into the lyric controller now this is gonna be our 6 PR that we're working with today and the lyric controller is at the home screen right now what we're gonna go ahead and do is first we're gonna go into programming to get this learned in now the six PIR does not come with the battery installed it's gonna be using a regular cio cr123 lithium battery just one and let's go ahead and get started yeah so first thing we're gonna want to do is just get everything prepped there's a button at the top of the six PIR all you need to do is press and hold as you put your thumb at the bottom you push up and the back snaps right off right now there's one thing that I will want you to pay attention to when you're inserting the battery is going to be this little light right here next to the plus sign it's going to be a green LED that will actually let you know the status of the of the six PIR while you're learning it in so before we put the battery in what I want to do first is go over how to batch enroll the six PIR this is going to be the easiest way to get any six series device learned into your lyric controller so first thing we want to do is go to the lyric programming screen to do that we start off at the primary screen where you see security automation video and all the other options you're gonna want to hit security after that you're going to go to tools now the default installer code is for one one two from Honeywell but if you have changed it or if a previous company has changed it you want to make sure that you have that so first thing we're gonna do is enter in again go to the tools hit for 1 1 2 which is the default Honeywell installer code then we're gonna hit program once you're in program you're gonna want to go to zones now once you're in zones the batch enroll is going to be off to the right-hand side on the blue the blue taskbar right here it's gonna say 6 batch start once you hit start that places your lera controller into an inclusion mode so any 6-series device that they usually come with battery times once you pull that battery tab it'll automatically put the device into a pairing mode so right now we have the lyric in a pairing mode now we're gonna go ahead and put the device in the pairing mode so like I said this green light on the six PIR which is what I wanted you guys to pay close attention to will let you know the status once you put in the battery the green LED will fast blink it'll come to a slow blink and then a steady green light what's gonna happen once it's a steady green light you're gonna see on the lyric controller that it has learned into the next available zone now the lyric controller the first two zones are hard-wired zones so the next available zone that usually is available if this is your first sensor learning in is three if you already have sensor to learn if you already have sensors learned in then the six PIR will learn into the next available zone all right so what we're gonna do now we're gonna put the go ahead and put the cr123 battery into the six P R which remember if you look at the green light it should start fast blinking and as soon as it's learning to lyric it will come to a steady green light so you're gonna go ahead and place the battery n Pepa all right starts the fast blinking and it'll come to a steady green light once it's learned in so it didn't come to a steady greenlight instead it just gave us a confirming greenlight but if you look at zone 3 the next available zone it learned in AZ motion sensor now if you click on that sensor you can go ahead and hit edit once you hit edit you can double check the serial number on the six PIR to the serial number that populated in the field to confirm that that's the correct one that learned in in case there was any errors now first thing you want to go ahead and do is give your sensor of zone description so let's say I'm going to be placing this in my living room you go ahead and start typing out living it auto fills it for you you can go ahead and hit save and then if you want to put the second one the description for room save it so now we have the zone description living room you'll see on the device type it says motion sensor it automatically learns then as it and the response type right now that automatically sets to interior follower that means that it follows any entry delay or exit early so if you're arming the system to a weight and you're coming back home if you open up that front door this motion sensor will follow the front doors entry delay if you have it set up for an entry delay if you do not set off any entry delay before walking in front of this motion and it is set to an interior follower there is no entry delay that it's following so it automatically gets stripped and it acts as a perimeter sensor causing the alarm to go off right away giving you know thirty to sixty seconds to enter in disarms the system so make sure if you have a motion program to interior follower that you do program it to and that you do have it set up to where you walk through an entry door first now let's say a lot of people what they do they'll set it to an interior follower but they'll also place it facing the front door now the issue that this can cause is if you walk in through that front and you set off that motion right away there have been times where we've seen where the front door contact the actual door sensor does not get the signal to the panel fast enough or faster than the motion therefore the panel sees the motion signal first and if it's such an interior follower you automatically set off the delay a lot of people are confused because they're saying hey I walked in through the front door there should be an entry delay however the motion signal got to lyric faster than the door signal so if you do have the motion facing the front door what you want to do is under the response type just go ahead and switch it to interior with delay that's gonna give you that delay if it's facing the front door that way you actually have time to open the front door and not have to worry about setting off an alarm another thing I want to go ahead and go into show you is gonna be the chime if you wanna if you want time enable on the motion you can go ahead and do that you can actually change the sound of the chime they have different ones just by tapping on it you'll scroll through all of them we're just go ahead and put it as evolve for now supervision you always want to make sure is on armed nights armed night is a different feature that most Honeywell systems offer you so what this is if whenever you armed stay it all your door and window sensors are activated but your motions are not activated they're running on during an armed stay the reason for that is because then the system knows you're home you don't want to set off the alarm if you're at the house now what armed night allows you to do is if you enable this motion for armed night this is going to bring up a separate arming feature when you go to arm your system it'll be arm away arm stay or arm night it's virtually gonna be the same thing as an arm stay except now it'll be an arm stay with with certain motions activated so let's say you have two floors in the house and you want let's say the garage motion-activated but every other motion deactivated you would put the garage motion to an armed night and all of the other motions just leaving messes don't worry about the armed night feature the only one you would have armed night enabled on would be the garage and that way the garage takes product protected with that motion whenever you do an armed stay now a lot of people miss this step as well if you hit the down arrow key one time it'll bring you to a pet immunity on this page we're not gonna worry about the supervision time the pet immunity this is if you have pets under 80 pounds or up to 80 pounds right so what this does is it gets the passive infrared motion and there's two zones in the motion there's gonna be a top zone and a bottom zone if you enable pet immune if you know yeah if you enable pet immunity what it does is that the two zones are going to go ahead and have to be tripped in order for the motion to send an alarm signal to the panel so that means that a small dog and that's under 80 pounds would probably usually only set off the bottom half not the top half a human sending up right they're gonna set off both zones now this motion you want to make sure when you're mounting it you mount it seven to nine feet is a recommended mounting height by Honeywell you obviously also when mounting it you don't want to mount it across the vents or an air duct somewhere that releases a sudden change of temperature because that will cause or trip some false alarms let's see what else with the motion hmm it has a range of 40 to 56 feet we're actually going to show you how to go into walk test so you can actually check to see you can walk around the house and make sure that it's detecting all of the zones that you want protected right or every area in the house that you want protected so after you've actually gone through every setting everything you need to adjust make sure you hit save once you hit save it saves all your work it save and you have your motion right there next thing you're gonna want to do is hit the back arrow key all the way back out to the home screen so that's gonna be about three or four times so the motion to put it in to walk test we're gonna go to do the same thing if you're already at the home if you've backed out to the home screen go ahead and hit security you're going to go to tools enter in the default installer code which is four one one two it may be different if you've changed it the walk test mode is in the test now once you do hit test you'll see here walk test is the first option this is going to put all your motions into a walk test mode where you can walk around the house wave your hand check to see if the motion is detecting your body right once you do walk tests it puts the system into a walk test and it says home to quit up at the very top so usually it'll go to this screen and what you can do is if you have them on the motion mounted already you can go ahead and walk around and as you're doing this the motion should be picking up should be picking you up and it'll actually make the panel beep yeah to exit out of walk home test after you've done testing all your motions all you need to do is press the home button now it's gonna ask you for the code the code that is asking for this time is going to be the master code the default master code for Honeywell panels is one two three four so you're gonna turn one two three four puts it back to the home screen ready to arm the status has changed and you're out of walk test mode so remember today we went over how to program in a six PIR to the lyric controller if you found this video helpful go ahead and hit the like button underneath make sure to subscribe to our Channel and enable notifications that way whenever we upload new content you guys get notified if you guys have any other questions feel free to email us at support at alarm grid comm I'm George thinking you guys very much have a great day
- Uploaded