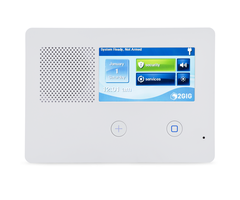
Powering On the 2GIG GC2e
Related Products
Related Categories
- Wireless Touchscreen Alarm Panels
- Small Business Security Systems
- Monitored Home Security Systems
- DIY Wireless Security Systems
- Apartment Security Systems
Description
https://www.alarmgrid.com/faq/how-do-i-power-on-the-2gig-gc2e http://alrm.gd/get-monitored.
Transcript
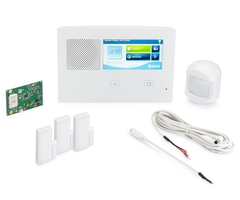
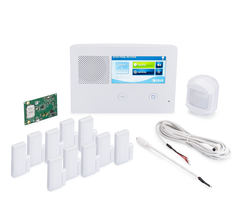
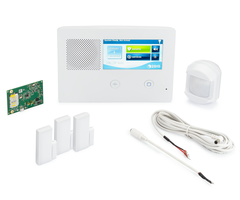
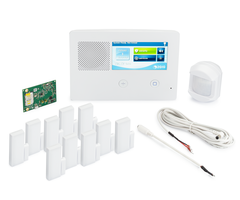
hi GI wires this is Michael from alarm grid and today I'm going to tell you how to power on 2gig gc3 security system now if you can see our GC 2e is already powered on but I'll still be able to go through the powering process I'm gonna open up the panel and show you what you would do you can actually access the back terminal without opening up the panel but since we already have ours mounted it's just easier for us to open it up but that aside so first I want to show you the transformer here it's actually the same transformer that's used with a 2gig go control GC 2 or a GC 3 or a G C 3 e they all use a 14 volt DC 1.7 amp power supply for the transformer and since this is a DC power it's going to have positive and negative terminals and so you're going to want to connect polarity properly traditionally black is negative and red is positive so keep that in mind when setting up the connections really you can use any color you want as long as it matches on the back but if you're using a barrel connector that will be important and you know if you just want to follow polarity black to negative red to positive so anyway we have our G c2e system here and I'm gonna start by trying to open it up first you can take off this front plate here and just kind of get your fingernails under there and it pops right off and then you can take your flat-head screwdriver and you can just release these two connections and that's for this unlock before opening we didn't have to do anything with ours but if you have to loosen it I you can do that that's recommended so you just kind of get in there and go we got the first one and the second one and then we're just gonna pull it down neatly and now we have it opened up so just to show you the back of it real quick we actually have two different ways we can connect a power to the system what we did we had a Honeywell LT cable and we just used the longer portion of the cable and we just did this barrel connector right there now to get to this you actually will have to open it up you might be able to reach in through the back plate which you can see through here but it's gonna be very tough to reach through there especially if you have larger hands so we recommend opening up if you're doing that and that this is the easier way to connect you just connect the barrel connector into the port and you're good to go and the other way to do it I'm gonna show you the other end of the LT cable that we didn't use you see it has the red for positive and the black for negative the two wires on there so what you would do is there's the terminal block right here next to the speaker and it's got the v+ that's for positive and the V - that's for negative so you would connect the black one to the V - and the red one to the V positive and then you can connect the rest of your LT cable or whatever cable you're using if you're using traditional wiring that you stripped and prepared yourself you can use that but what you do you would take your Phillips head screwdriver which we have here and you would just loosen up the terminals and insert the wires tighten them down you don't have to make them overly tight just nice and snug and then you would connect them to there and that's how you would provide power that way but like I said we use the barrel connector that's what's easiest for us and remember when you're setting the system up before you make the connection make sure to run the wire through the backplate because if you do that before you put on the backplate then you won't be able to close the system you'll have to undo your connections and that would be inconvenient so make sure to run the wires through the backplate before making your connections we ran ours through our back plate as you can see so I'm just gonna go ahead and close this up we're not gonna trigger alarm there and we're just gonna close it it kinda just snaps into place like that and then we can put our front cover back on and actually one thing I do want to show you before I I'm gonna open this back up again but one thing I do want to show you real quick just because this is important to Gig recommends always connecting the backup battery before you do the AC power and we have the backup battery it's the green pack right there it's port is right there above the barrel connector you can see let's see if I can get this all the way here and you can see the backup battery port right there yeah 2 gig recommends connecting the backup battery before plugging in AC power so connect the backup battery first then either do the barrel connector or the terminal block just wanted to show you that real quick glad I remembered and that's good enough so we'll just go ahead and snap this back on here I said it kind of snaps into place and there that's adequate so we're gonna take this and put this back on cover and that's that's how you power on your 2gig gc3 security system one last thing to keep in mind be sure to check the maximum wire runs that you can use depending on the gauge of wire that you're using thicker wire will allow for a longer wire run thinner wire will only allow for a shorter wire run just because as current travels through electrical current travels through the the wire it loses a little bit along the way and if you make the wire run too long then not enough power will be supplied to the panel and you might get an AC loss condition even though it's powered on I believe you have to provide at least 11 volts DC power to the system to make sure it gets enough power so just make sure to check that that'll be in the FAQ listed below so that's how you power on a 2gig GT 2e security system if you found this video helpful make sure to give it a thumbs up below to like the video and remember to subscribe to our channel to get updates on future videos and if you have any questions about the GC 2e or alarm monitoring send us an email at support at alarm grid comm we're always happy to help hope you enjoy the video thank you
- Uploaded