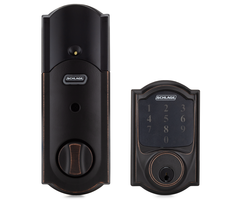
Including a Schlage Z-Wave Lock
Related Products
Related Categories
Description
In this video, Joe shows users how to include a Schlage Z-Wave Lock into a Z-Wave network. Including the lock into a Z-Wave network is necessary for getting the most out of the device. It must be paired with a network for remote operation and for use with smart scenes. Pairing a lock is very simple.
Most Schlage Z-Wave Locks are paired using a programming code. This programming code can be located on a white sticker found underneath the device's main cover. The user should make sure to write down this programming code, as they will need it whenever they want to enroll the device or exclude it from a Z-Wave network. They should also write down the two default user codes that are unique to the lock. These codes will be used if the user ever performs a factory reset for the lock. They are also used during initial setup. The user can always change these default codes later if needed. Furthermore, the sticker should never be removed, as doing so may make it impossible to determine the programming codes and the default user codes later.
Before trying to pair a Schlage Z-Wave Lock, the user should make sure to exclude it from the network first. Many locks are paired with Z-Wave networks before leaving factories for testing purposes. Clearing the lock will ensure that it can be successfully paired with your local Z-Wave network. The exclusion process is actually very similar to initial enrollment. All you need to do is activate the exclusion model for your Z-Wave controller. Then activate the learning function on the Schlage Lock. The lock should be cleared from the network. You can then pair the lock by putting the Z-Wave hub into its inclusion mode and then activating the same learning function for the Schlage Lock. The lock should pair with the network.
http://alrm.gd/get-monitored
Transcript
Hi DIYers, Joe here, from Alarm Grid. And today, we're going to show you how to include a Schlage lock to a system that has a Z-Wave controller on it. Today, we're going to use the Qolsys IQ2, as we have it set up and ready to go. But many systems out there do have Z-Wave controllers inside of them. There are some compatibility requirements that you'll find with different ones, as in, certain products aren't compatible with certain systems. Schlage is pretty good. I would go online or check the documentation for your system before purchasing a Schlage lock, just to make sure that it does work with your system and has a Z-Wave controller in it. But there's a good chance that it does. Now, with any Z-Wave device, before you do include it, you will want to exclude it first. What this does is it actually clears out all the programming that's in the Z-Wave device before including it, and will save you some frustration. Because if there is programming inside of the device when you go to include it, it may not work as expected. And it could be a little frustrating. This lock today, though, is fully ready to go and ready to be included into our system. So the first note we have to do on our Qolsys panel is put it into Learn Mode. So on the system, I'm going to slide down from the top. I'm going to click on Settings. I'm going to do Advanced Settings, enter the default code, 2222. Go to Installation, Devices, Z-Wave devices. And then we're going to Add Device. I'm going to click on Include. And now the system is in Learn Mode, waiting for me to initiate the learn function on a lock. Before you go to include your Z-Wave lock to the system, just check the documentation out to see the process. It's all similar from one manufacturer to another, with some slight differences. But if you don't know exactly how to do it, it could give you some trouble. So what we need to do on the lock is we have to click the Schlage button. We have to enter the six digit programming code, which you'll actually find on the back of the manual included with the lock. And you can see, it times out. So I'm going to do Schlage again. Ours is 925979. And then I'm going to click on 0. You can see a little light is flashing. And we got a green check mark that tells us that the lock was included in the system. So as you can see, the system did catch the lock. We have our ID, the type, and the name. I'm just going to change the name to side door. Click on Add. (DIGITAL VOICE) Side door is added to network successfully. And now, we've programmed it to the system. So if we do go back to the main menu, I should be able to unlock the lock with our panel. So as you can see, the latch is extended on our lock. And it's ready to be unlocked. So on our Qolsys system, I'm going to slide to the right. And as you can see, we have our different locks right here. I'm going to slide down to our side door. And if to click this, it should unlock our lock. [WHIRRING] (DIGITAL VOICE) Side door unlocked. And it did. We successfully programmed the Schlage into the Qolsys system. If you have any questions on this process, on the IQ2, or Schlage locks in general, feel free to give us a call at 888-818-7728. Head over to our website, www.alarmgrid.com, or send us an email to support@alarmgrid.com. Did you enjoy the video? Feel free to subscribe. (DIGITAL VOICE) Side door locked. And if you want to be notified when we post future videos, hit the notification button below, and we'll send you an update when we do so. Have a great day. Take care.
- Uploaded