Including A Yale Z-Wave Lock
Related Products


Related Categories
Description
In this video, Joe demonstrates how to include a Yale Z-Wave Lock into a Z-Wave network. All Z-Wave devices must be paired with a network for regular operation. This is necessary for controlling Z-Wave devices remotely and for using them with smart scenes. Pairing a Yale Lock with a network is easy.
One of the first things a user will need to do when setting up a new Yale Z-Wave Lock is to pair it with a Z-Wave network. This may be done before or after the actual installation process. A user might want to pair the lock before installation so that they can easily bring the lock close to their Z-Wave controller or hub. Having the lock in close proximity to the Z-Wave hub can help ensure that the process is completed successfully.
Before attempting to pair the lock, the user should first clear the device from the Z-Wave network. Even brand-new locks sometimes arrive with previous Z-Wave settings from factory testing. Clearing the lock first should eliminate this concern and allow the lock to be paired successfully. To clear the lock, first put the Z-Wave hub or controller into its exclusion mode. Then activate the enrollment function for the lock. You should receive notification that a device has been cleared.
You can then complete the process for adding the lock to the network. To do this, put your Z-Wave controller or hub into its inclusion mode. You can then activate the lock's enrollment function in the same way that you did when clearing the clock. The Z-Wave controller or hub should recognize the lock and pair it with the associated Z-Wave network. The user will then be able to control the lock from the hub or from an associated mobile app on their Android or iOS device.
Many alarm system owners will pair their Yale Z-Wave Locks with their security panels. This way, they can control their Yale Lock through an interactive service platform like Total Connect 2.0 and Alarm.com. Both TC2 and ADC have respective mobile apps that allow users to access their services from anywhere in the world. This is great if you ever need to let someone else inside your home while you are away. You can then conveniently lock the door after they leave.
http://alrm.gd/get-monitored
Transcript
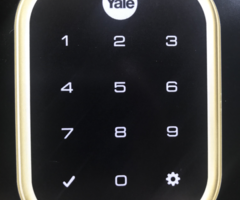
Hi. Joe here from Alarm Grid. And today we're going to show you how to include a Yale Z-Wave Lock to an IQ2 panel. Now the Yale Z-Wave Lock works with Z-Wave, so if you do have an alarm panel that has a Z-Wave module inside of it, such as a Honeywell or another model, there's a good chance that this will be able to be used with your panel. I would check with your alarm company just to make sure that it is compatible. But Z-Wave is pretty interoperable with most things out there. This particular lock will work with the Honeywell Lyric, the LYNX model panels, most of the alarm.com compatible panels out there. It's a great lock to use, super versatile, and it looks great. As far as including Z-Wave on the Yale lock goes, there's one thing that you're going to want to know about before you do include it. If you did have user codes programmed in to your lock, when you include it to the panel it's actually going to get the panel user codes that are currently programmed pushed over into the lock. The best thing to do before you actually integrate this into a panel is do a factory default on the lock to get it fully cleared out. And then when you actually integrate it through Z-Wave, it's going to get all of that user information, including the codes, into the lock itself. If you do have any questions about this though, feel free to reach out to us. We'll be happy to help you out. Now, before you do any inclusion, usually-- or always-- with Z-Wave devices, you're going to want to exclude them first. What this will do is clear all of the programming out on the lock to make sure that it's able to be included without any issues. Today though, as this lock is 100% defaulted and ready to go, we're going to just do the inclusion mode on our system. So the first thing that you're going to want to do is on your panel you're going to want to go into inclusion mode for Z-Wave. So I'm going to slide down from the top, settings, advanced settings. Enter user code. I'll enter the default code, 2-2-2-2. I'll go to installation, devices, Z-Wave devices, and then add a device. So now the system, after clicking include, it's in listening mode for the lock. So on the lock, what I'm going to do is I have to get it into learn mode or inclusion mode. I'm going to activate the touchpad. The master code is 1-2-3-4 right now. So I'm going to do 1-2-3-4-Gear. Menu mode. Enter number. And now we're in our menu. Press the gear key to continue. We'll have to reinitiate the Z-Wave inclusion mode on the system just because it timed out, which is no problem. So we're going to click number 7 on the lock to go into our Z-Wave. Wireless module setting mode. Module mode. Press the gear key to continue. As you can hear. So I'll click the gear. Join the wireless network. So then on our panel I'm going to click include. And I'm going to click 1 on the lock. Join the wireless-- And then the gear. And as you can see, it did discover the lock. It's learning in right now. Completed. It may take a little time for the lock to actually learn in, so just be patient with it. And a good practice to do is to actually bring the lock close to the panel, within 5 feet, before you include it. We have found that sometimes when the lock is too far away some of the inclusions can get screwed up. So if possible, getting the panel as close as possible to the lock may help this operation go smoother. But as you can see, our lock did add in. We have some information that we can adjust right here. I'm just going to leave it all as default and click Add. And as you can see, it says device name is already registered. So I'm just going to change this to backdoor. Backdoor is added to network successfully. There you go. So now we have our lock included to our system and it's ready to go. If you do have any questions about including a Z-Wave lock to your alarm panel, Yale Locks or alarm systems in general, feel free to give us a call. 888-818-7728. Send us an email to support@alarmgrid.com or head over to a website, www.alarmgrid.com. Do enjoy the video, feel free to subscribe. And if you want to be notified when we post future videos, hit the notification button below, and we'll send you an update when we do so. Thanks for watching and have a great day.
- Uploaded