LTEM-PA/LTEM-PV: Install PROWIFI or PROWIFIZW
Related Products

Description
In this video, Julia from Alarm Grid shows users how to install the PROWFI or PROWIFIZW into an LTEM-PA or LTEM-PV ...
Transcript
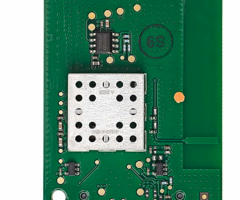
[AUDIO LOGO] Hey, DIYers. This is Julia with Alarm Grid. And today I'm going to show you how to install the PROWIFIZW in the LTEMP series communicator. Let's get to it. So the first step in changing or installing hardware in any piece of electronic equipment is powering down the equipment. So you want to be sure that your LTEMPA or PV is powered completely down. Ours is powered down, but just so you know, this is what the transformer for it looks like, or technically, it's a DC power adapter. So find this and unplug it, if yours has been plugged in. And then you'll have to open the system up in order to get to the battery to unplug it. To open it, you're going to press it on the tabs at the bottom, and then lift the front, which is hard to do when it's on the desk. There we go. So it comes loose at the bottom. And then it just kind of raises up at the top. There's two little catch tabs at the top as well. So we're going to go in and set that aside for now. We don't have a battery on our unit, but if we did, I would go ahead and unplug it. It would be connected right here. This is positive. This is negative. And the battery sits in this little tray right here. So once the unit is powered completely down, you should see no LED lights lit up on it. You're ready to install the actual module. This is the PROWIFIZW module. The PROWIFI module looks very similar. It just doesn't have the z-wave chip in it. And it's going to install right here. Now some early units that came out of this actually had foam tape right around in here in this area. And if that foam tape is there, you want to remove it. Because the module itself has the foam tape on the back. If you don't have any foam tape here, you don't want to worry about that step that's listed in the FAQ because you want to leave this foam tape in place. So you're going to line this up. This is called the finger stuck clip. I'm going to line up here where this little connector is going to slide onto this edge connector. It's going to line up pretty snug. It's going to slip under this little clip on the edge. And then just slide forward into place. This is the place where the set screw is inserted. So when you have it properly installed, the hole in the module will line up with the seeding spot for the set screw. Now the first thing that happens in tech support is that all the screws get taken out and then lost. So we don't have our set screw. But if you have it, I recommend that you use it. Once the module has been completely seated, then you can power your unit back up. When you power up, you want to power up with the DC adapter first. So plug in the power to the wall outlet first, and then go ahead and hook your battery back up. And then you'll be ready to reinstall your cover. So to reinstall the cover, you're just going to line it up at the top first, then at the bottom. Press into place, and that's it. And that is how you install the PROWIFIZW or PROWIFI into the LTEMP series communicators. If you like this video, please like and subscribe. Hit the Bell icon, so you'll be notified when we post future videos. You can contact us through our email at support@alarmgrid.com. And you can also visit our website, alarmgrid.com. My name is Julia, and have a great day.
- Uploaded