Honeywell LYRIC-3G: Installation into Lyric Security System
Related Products

Description
The Honeywell Lyric control panel comes equipped with WiFi and Z-Wave built in. There is no need for installation of separate modules for these functions as there were in previous versions. With both of these features you will have communications with the central monitoring station as well as the ability to use the Total Connect service.
However, there are times when the wireless can go down. If the modem ever loses power, or your internet provider has an error or the internet goes out due to a storm, you will lose the wireless functionality in your panel.
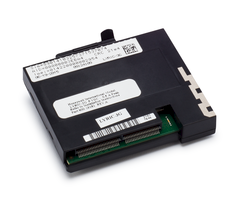
The Lyric 3G cellular device will allow for a back up communication method should something happen. This device will allow cellular communications without the need for wireless connectivity. This video will show you how to install the Lyric 3G device into the Lyric control panel.
In previous control panel models you would have to completely power down the control panel and remove the battery back up before installing a module. With the Lyric control panel you can power down only the communications port to allow for an easy install.
Following the video guide, through the Tools menu enter your master code. You will not need the installer code for this installation. Unlike a lot of other installations and sensor enrolling, you can install the Lyric 3G using only the master code.
Once you have entered the master code, choose “Advanced” from the sub menu selections and you will see the option for “Install Cellular Module”. Pressing this button will give you the ability to install the module without cutting power and battery back up to the control panel.
If you have already entered the installer code for another install or enrollment, you do not need to return to the home screen and start again. Like many of the features, Honeywell has included the cellular install option for the installer level as well. The video will explain this in detail.
You will be prompted by a pop up message asking you to confirm you wish to install the cellular module. Press yes and the screen will display step by step instructions on how to install the Lyric 3G.
The video will walk you through all of the required steps one by one. First, you remove the side panel cover to expose the 3g card slot.
As you will see in the video, you must position the 3G card properly with the pins facing the panel and the stickers facing out. Press firmly to seat the card in place. You should also use the tamper screw to lock the card in to position to prevent any accidental removal.
Once you replace the expansion slot cover you can press okay on the screen to let the system know the card has been installed. The screen will tell you that the install was successful. Press okay again and return to the home screen.
Transcript
Hi DIYers, Sterling with Alarm Grid here. Today we're going to show you how to install the Lyric-3G Cellular Communicator inside of our Honeywell Lyric wireless all in one security system. So as we've reviewed in our first impressions video about the Lyric, Honeywell has equipped this panel with Wi-Fi communications built right into it, no separate module if you're used to the links touch panels where you had to get the L5100-WIFI module as an add-on. This Lyric panel has the Wi-Fi communication optin built right into the panel. Z-Wave is also built right in, no separate module, no L5100-ZWAVE. It's all right in the panel.
So Wi-Fi and Z-Wave are in there. That's all you would need for Total Connect service and/or Central Station monitoring service. However, there are various reasons that if you're communicating via Wi-Fi only, there are various reasons that the communications can go offline. If you lose power to your modem or your router, then obviously the panel will still be live, the panel will make its alarm, but when it tries to communicate with the router via Wi-Fi, because the router's unavailable there's no communications, you're going to get a communication error, eventually the panel will throw up with communication failure status warning, central station will be calling you letting you know that the Wi-Fi is down.
Same idea, if someone cuts, an intruder cuts the Internet line exposed on the outside of your house before they break in, then they've cut the communications to the only path of communications you have available when you're Wi-Fi only. And then finally, if you ever have issues with your Internet service provider, some of the ISPs are better than others, some have outages pretty frequently, some have outages pretty rarely. You should have a good sense of how reliable your network is and then from there, as long as you understand the reasons that Wi-Fi can fail, there're certainly ways to address each of these concerns: bury lines into the house if you're for instance Verizon Fios, or putting the battery back-up on your modem and your router so that during a power outages you're still available. So there're certainly ways to address the Wi-Fi communication potential issues, but the best way to do it is to add a cellular communicator.
Now what we're doing is we're basically adding a cellphone. This is a unit with a SIM card that fits right inside the panel, and with this installed in a service plan equipped with cellular, your system, your Lyric Communications, if the Wi-Fi go down, can go out over the cellular network, the wireless cellular network. This works just like your cellphone but it has nothing to do with your personal cellphone. You don't have to get a separate SIM card or a separate line with your AT&T or Verizon bill. It's all handled through your alarm provider. They pay Honeywell, okay? And Honeywell's paying the providers, AT&T or Verizon on the back end. And all of it's taken care of. All you need to do is get the communication module installed in your panel and have the right service plan that covers cellular communications.
This video is on the Lyric-3G, which is an AT&T version. It uses the AT&T cellular network and there is a Verizon version. But this installation video's on the Lyric-3G. And we're going to show you how easy it is to add this unit to your Lyric system. So if you didn't get cellular when you first bought your system, it's a great addition. If you've ever had issues with your Wi-Fi communications, this is a great addition to add security to the communication path between your system and Total Connect servers and your Central Station if you have that kind of service.
So to install it, Honeywell has actually built right into the panel an option to turn off the internal communicator. So basically, turn off power to the port that this plugs into. So on the Link's Touch, if you are used to having the power of the system down fully, remove the battery and unplug the transformer to get the system ready to install a cellular module, you'll be pleasantly surprised to see that on the Lyric, it's as easy as going to tools, typing your master code, one, two, three, four, and then hit 'Advanced.' And when you hit 'Advanced,' you have some options in here. And one of them is 'Install Cellular Module.' By hitting that, you're actually again, cutting power to the internal connector board or the internal connector port for this communications. It just slots right in, you just slide it in, screw it down so it doesn't get pulled out by accident. Put it back in and you're good to go. Panel never has to get power down. This screen is accessed by the master code as I just showed you and actually just like a lot of features on this panel, it's also accessible through the installer code.
So if we do four, one, one, two, you'll see the screen where it's connecting to the server or at least trying to connect to the server. That's actually trying to connect to alarm net. This panel is really expecting to have monitoring involved so anytime you try to access the program, it's going to try to associate itself with an account in the Cloud. We don't have an account yet because we haven't done our cellular. But if we ignore that, let's just assume we jumped right in to this page when we did installer code. So if we hit 'Program,' I'm sorry, it's actually under 'Test' and then 'Install Cellular Module.' So that's the same 'Install Cellular Module' button that you have on the Master Code program inside. You can go add it either way, master code is default one, two, three, four. You can get into it from 'Advanced' or if you do installer code, you do it from 'Test' and then 'Install Cellular Module.'
They're asking, are you sure you want to do it? You just say yes, and it literally tells you right on the screen what you need to do. So hopefully not many people need this video because it's that easy but you know how to get there and we'll show you exactly what each of these steps look like.
So step number one, remove panel side cover. So right on the side here, there's a little part of the plastic that will actually pop out. So you push it from the bottom to the top, and you could see it pops out a bit here. And when we remove this piece of plastic, it's just a slot in, or in and down to get it into place. You can see the notches here. With this removed, we can slide the cellular in. And if this was not in the cellular mode to install it, once you pop this, you actually have the panel beep at you with a tamper on the Expansion Module. So it's different than the Case Tamper which we've shown you during our Install video. It's actually the Expansion Module Tamper so it's a separate tamper. It will send as separate message to the central station that would let you know, hey someone's trying to mess with the GSM. Because we're on the mode of installing this cellular module, we didn't get that beeping. I can show you that at the very end of the video just so you can see.
So this module, on the top, you have your sticker, okay? On the sticker you have you date code when it was manufactured. This one's 6-19-2015. You have your MAC address and your CRC numbers. Those are the numbers that associate this device or this panel with Honeywell's servers, all right? So that MAC and CRC are unique identifiers for this module. And you'd have to provide those numbers to your alarm monitoring provider, and that's how they would associate your Lyric Cellular Communicator with an account at Honeywell.
And you can also see this strip down here, this is antenna. So you basically, with the antenna down and the stickers going vertically like this, on its side, and the connector in towards the panel, that's the proper position. There's actually a little plastic arm that pulls out, so if you ever going to remove the module, you snap this out and you can pull it out, makes it easy. So you want the arm towards the back, you want the stickers towards the front, and you want the connector in towards the panel. And you basically slide it into this port on the bottom right there, and it just pushes all the way in until you can't push it anymore, fits in nice and snug. And there's actually a screw that comes with the module. So you have this little screw. And now that the module's installed, there's a little part of the plastic where it holds it in place. So you screw it in, and if someone did try to use the plastic arm to remove the cellular unit, then you wouldn't be able to remove it because of the screw. That would hopefully prevent someone from accidentally taking this unit out, not really knowing why it's there, or that it should not be removed. And really the unit's not going to fall out without the screw but it's included, so why not use it.
So we have or small little Phillip's head screwdriver and we're just going to give a few turns to get that fit in nice and tight. You still have access to this plastic arm. If you were to remove it, obviously you take the screw out, this little plastic arm slides out even when it's installed, and that's just so you can give a little yank to pull this out and remove the cellular if you were trying to take this cellular out of the panel.
With that installed, the last step is to just put our side cover plate here back in. And when you look at the plate, there's these tabs here and the notches. So you can't really mess this up obviously, because it wouldn't fit on this side, only goes on this side. But if you are wondering if it's this way or this way, you just kind of fit in the notches and it slides in nice and tight, and snug, and then snaps down into place.
And if you look at the steps, we have number one was to remove the panel side cover, that's been done; two is to remove existing cellular module if present. So if you had an issue with your cellular, let's say, you tried AT&T and there was no coverage so you're swapping to a Verizon version, that might be a reason you would be removing an existing cellular. We ignored that step because ours didn't have it. Number three was to install the module, we just did that. And now we've attached the panel side cover, which is step number four, so we're done. It's that easy, it's right there on the screen to remind you of what you are doing. You hit 'Okay.' It says that it was installed successfully so it knows it worked. You hit 'Okay,' and now our panel is equipped with a cellular communicator and we're ready to go to get monitoring service, whether it's Total Connect service and/or Central Station service through an alarm net provider, a company that offers alarm net service.
And now that we're out of the GSM installation step, or rather the installation mode that we put the panel into first, I want to demonstrate what happens if someone tries to pop this cover off. You can hear the panel beeping at you. That's a trouble beep. And if we were to hit 'System,' we can see 'Expansion Module Tamper.' So again, that's a very unique type of tamper, different than the regular case or cover tamper, and it means that someone is trying to access our panel's communication module. So if you ever got a call from the central station about that and it's an expansion module tamper, you would know that it's specifically about that unit getting removed. And if we hit our 'Home' button twice, we have our keypad screen, and we can hit our master code to clear that tamper. So that 9-0-1 expansion module tamper goes away and the only issue we have now is com trouble. Once we activate this for monitoring, that will go away as well.
So we hope you've enjoyed that video, that walk through of how to install a Lyric-3G AT&T cellular module into a Honeywell Lyric wireless security system. If you have any questions about which cell communicator to get for your Lyric, or how to install a Lyric-3G, please e-mail us, support@alarmgrid.com and we invite you to subscribe to our channel so you're up to date on all of the new videos that we'll be releasing about this great new Lyric system.
- Uploaded